


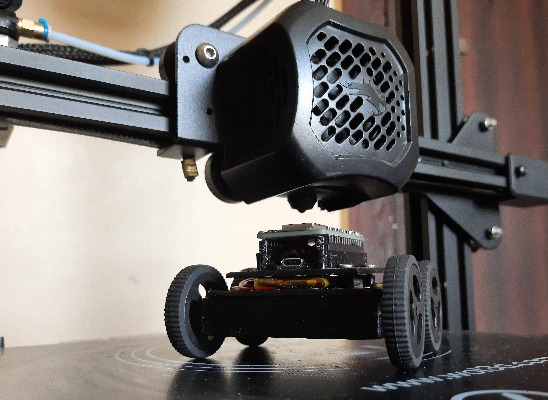
Smartphone Controlled 4X4 Robot With ESP8266
Supplies
For this project, you will need:
- An ESP8266 microcontroller(Node MCU)
- A dual H-bridge motor driver(MX1508, DRV8833, etc, having a size as small as possible)
- 4 3-volt N20 geared DC motors
- 4 compatible wheels for the motors with diameter <= 35mm
- A 3.7-volt lithium polymer battery(Recommended capacity >= 600mAh)
- A charging controller module for the battery
- 21 SWG wires
- 2 1x15 female headers
- A 1x3 male header
- A 1x3 female header or Dupont connector(For battery)
- 4 7mm long, self-tapping screws with 2.5mm external thread diameter
- 4 7mm long, self-tapping screws with 3mm external thread diameter
- 4 10mm long, self-tapping screws with 3mm external thread diameter
- A 7mm long, self-tapping screw with a wide head and 2.5mm external thread diameter
- A Phillips-head screwdriver
- A soldering iron
- Solder wire
- Solder flux(Recommended)
- Hot glue gun
Step 1: Program the Microcontroller

You can get the Arduino code from here.
Step 2: Note the ESP's IP Address

After programming the microcontroller, open the serial monitor and wait for the ESP to connect to the Wi-Fi router. After it has been connected, you should see its IP address on the serial monitor. You can note it and type it in the address bar of any browser from a device that is connected to the same router and you should land on a webpage with a slider and a couple of buttons.
Step 3: Print the Parts

You can download all the required files for the 3D parts from here.
You can also use any 4X4 wheeled or tracked chassis if you don't have access to a 3D printer.
Step 4: Study the Circuit Schematic

Go through the circuit schematic to understand how to connect all the components and modules together.
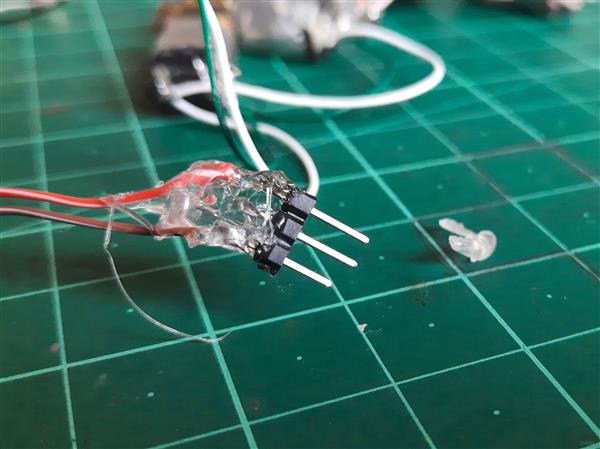
Step 5: Solder Wires to the Motors

Use a bit of hot glue to secure the wires.
Step 6: Install the Motors in the Chassis

Step 7: Solder Wires to the Motor Driver's Power and Inputs

Step 8: Connect the Wheels to the Motors

Step 9: Connect the Motors to the Motor Driver

Step 10: Screw on the Chassis Cover

Route the wires of the motor driver out from the cover's hole and screw it on using the 10mm long screws with 3mm wide threads.
Step 11: Place the Battery on the Cover

Step 12: Screw on the Mount for the Microcontroller

Route the input wires from one side and the power wires from the other side of the mount's center and screw on the mount for the microcontroller with screws 7mm long, having 3mm wide threads, ensuring the battery is in place. You can also place a small piece of folded paper on the battery before screwing on the mount to ensure that it fits in securely.
Step 13: Make the Wiring Connections

Follow the circuit schematic and solder appropriate wires to every module and component. For making connections to the female headers, plug them into the microcontroller to ensure the wires are soldered to the correct pins. Take special care of polarity and ensure to not mix the power and signal wires. Use hot-glue to secure the connections.
Push one of the extreme pins of the male header of the battery connector to mark it as the -ve terminal.
I had actually made the wiring connections before screwing on the mount for the microcontroller(As you can see in the left picture) and it was a bit difficult to pass the components through the holes.
Step 14: Glue the Switch


Glue the switch on the side of the mount as shown in the picture above. The other side is made to fit the charger controller.
Step 15: Install the Charging Controller

Push the PCB into the area on the opposite side of the switch as shown in the above picture. It is quite a tight fit so make sure to use enough force and take care to not break anything.
Step 16: Fasten the Clamp for the Charging Controller

While keeping the clamp with the longer side up and towards the direction of the PCB's USB port, screw it in place with a wide-head screw 7mm long and having 2.5mm wide threading.
Step 17: Plug the Microcontroller in the Headers

Make sure to plug the correct header on each side with the correct orientation.
Step 18: Screw on the Microcontroller

Screw on the microcontroller to ensure it stays in place securely.
Step 19: Connect the Battery

Take care of the polarity when plugging in the connector.
Step 20: Power Up the Robot
After powering up, the blue LED near the ESP microcontroller should blink until it gets connected to the Wi-Fi router. After that, open the web control interface on the device connected to the same router and check if you can operate it as shown in the above video.
Step 21: Share With the Community
If you made this robot, I would love to see your creation. If you can, do share it with the community to inspire others as well.
Also, if you have any suggestions or feedback, do share them in the comments.
Smartphone Controlled 4X4 Robot With ESP8266


Raspberry Pi 5 7 Inch Touch Screen IPS 1024x600 HD LCD HDMI-compatible Display for RPI 4B 3B+ OPI 5 AIDA64 PC Secondary Screen(Without Speaker)
BUY NOW


- Comments(0)
- Likes(1)
 More by KushagraK7
-
 Raspberry Pi Pico RC Vehicle
SuppliesA Raspberry Pi Pico(Almost any microcontroller can be used here, but the Pico offers great f...
Raspberry Pi Pico RC Vehicle
SuppliesA Raspberry Pi Pico(Almost any microcontroller can be used here, but the Pico offers great f...
-
 Stepper Motor Controlled Stepper Motor Without Microcontroller!
Step 1: Watch the VideoWatch the video to get a full understanding of the project and learn how to t...
Stepper Motor Controlled Stepper Motor Without Microcontroller!
Step 1: Watch the VideoWatch the video to get a full understanding of the project and learn how to t...
-
 Automated Model Railroad Layout Running Two Trains
I made an Automated Model Train Layout with Passing Siding a while back. Upon request from a fellow ...
Automated Model Railroad Layout Running Two Trains
I made an Automated Model Train Layout with Passing Siding a while back. Upon request from a fellow ...
-
 Program the Raspberry Pi Pico With the Arduino IDE
The Raspberry Pi Pico is a recently launched product in the family of microcontrollers and its load ...
Program the Raspberry Pi Pico With the Arduino IDE
The Raspberry Pi Pico is a recently launched product in the family of microcontrollers and its load ...
-
 Reuse an Old Laptop's Touchpad to Control a Computer!
PS/2 laptop touchpads are among the coolest user interface devices to use with a microcontroller. Th...
Reuse an Old Laptop's Touchpad to Control a Computer!
PS/2 laptop touchpads are among the coolest user interface devices to use with a microcontroller. Th...
-
 Automated Model Railroad Layout With Reverse Loops
In one of my previous projects, I showed how to make a Simple Automated Point to Point Model Railroa...
Automated Model Railroad Layout With Reverse Loops
In one of my previous projects, I showed how to make a Simple Automated Point to Point Model Railroa...
-
 Use a Stepper Motor As a Rotary Encoder
Rotary encoders are great for use in microcontroller projects as an input device but their performan...
Use a Stepper Motor As a Rotary Encoder
Rotary encoders are great for use in microcontroller projects as an input device but their performan...
-
 Keyboard Controlled Model Train(PS/2 Interface)
Using Arduino microcontrollers, there are a lot of ways of controlling model railway layouts. A keyb...
Keyboard Controlled Model Train(PS/2 Interface)
Using Arduino microcontrollers, there are a lot of ways of controlling model railway layouts. A keyb...
-
 Stepper Motor Speed and Direction Control Without a Microcontroller
In one of my previous projects, I showed you how to control a stepper motor's speed using a 555 time...
Stepper Motor Speed and Direction Control Without a Microcontroller
In one of my previous projects, I showed you how to control a stepper motor's speed using a 555 time...
-
 Smartphone Controlled 4X4 Robot With ESP8266
SuppliesFor this project, you will need:An ESP8266 microcontroller(Node MCU)A dual H-bridge motor dr...
Smartphone Controlled 4X4 Robot With ESP8266
SuppliesFor this project, you will need:An ESP8266 microcontroller(Node MCU)A dual H-bridge motor dr...
-
 Touchpad Controlled Digital Servo Motor
Here is a quick and simple project where we control a digital servo motor with the slide of our fing...
Touchpad Controlled Digital Servo Motor
Here is a quick and simple project where we control a digital servo motor with the slide of our fing...
-
 Smartphone Controlled Model Railroad With an ESP8266
IntroA while back, I made a project where a stepper motor's position is controlled using a smartphon...
Smartphone Controlled Model Railroad With an ESP8266
IntroA while back, I made a project where a stepper motor's position is controlled using a smartphon...
-
 Simple USB Volume Controller with Arduino
This project uses a rotary encoder connected to an Arduino Leonardo to control the audio volume of a...
Simple USB Volume Controller with Arduino
This project uses a rotary encoder connected to an Arduino Leonardo to control the audio volume of a...
-
 Motor Speed and Direction Control with a Web-Server using an ESP01
Supplies:For this project, you will need:An ESP01 microcontroller(You can use any ESP8266-based micr...
Motor Speed and Direction Control with a Web-Server using an ESP01
Supplies:For this project, you will need:An ESP01 microcontroller(You can use any ESP8266-based micr...
-
 Wi-Fi Controlled Stepper Motor With an ESP Microcontroller
Step 1: Get All the Required StuffFor this project, you will need:An ESP8266 microcontrollerA Steppe...
Wi-Fi Controlled Stepper Motor With an ESP Microcontroller
Step 1: Get All the Required StuffFor this project, you will need:An ESP8266 microcontrollerA Steppe...
-
 Simple Automated Model Railroad Loop With Yard Siding
Video:Supplies: For this project, you will require:An Arduino microcontroller board compatible with ...
Simple Automated Model Railroad Loop With Yard Siding
Video:Supplies: For this project, you will require:An Arduino microcontroller board compatible with ...
-
 Laptop Touchpad Controlled Model Railroad
Supplies:For this project, you will require:An Arduino microcontroller compatible with Adafruit Moto...
Laptop Touchpad Controlled Model Railroad
Supplies:For this project, you will require:An Arduino microcontroller compatible with Adafruit Moto...
-
 Control a Stepper Motor with a Slide of Your Finger
Supplies:An Arduino microcontroller boardA PS/2 touchpad from a laptop(Try to get one with a Synapti...
Control a Stepper Motor with a Slide of Your Finger
Supplies:An Arduino microcontroller boardA PS/2 touchpad from a laptop(Try to get one with a Synapti...
-
Programmable Mist Maker - XIAO / QT PY Extension
1062 2 1 -
RadioHAT - Raspberry Pi radio development platform
874 0 2 -
-
-
-
-
ARPS-2 – Arduino-Compatible Robot Project Shield for Arduino UNO
3327 0 6 -
A Compact Charging Breakout Board For Waveshare ESP32-C3
3934 3 8 -
AI-driven LoRa & LLM-enabled Kiosk & Food Delivery System
4323 2 2


