


|
Fusion 360Autodesk
|
|
|
|
Easy EDA |
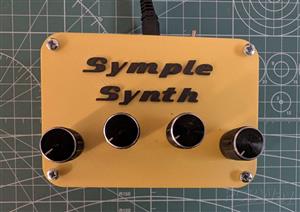
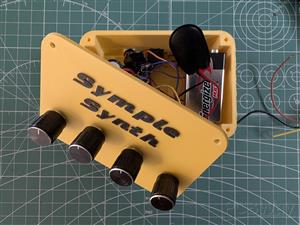
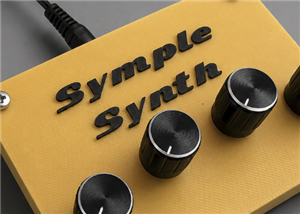
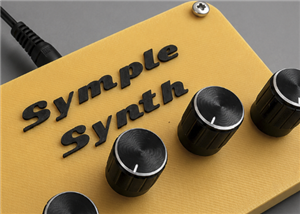
Symple Synth
Many of the discarded electronic devices we find in the trash contain circuit boards with components that can be salvaged and repurposed into a simple synthesizer.
Extracting components from obsolete equipment is straightforward. Heat the solder joints on the circuit board using a soldering iron or a hot-air station. Then remove the molten solder with a desoldering pump or extract the components directly. Useful parts include resistors, diodes, capacitors, transistors, potentiometers, and audio jacks.
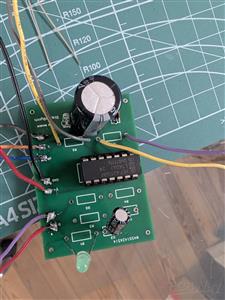
There is one component that must be purchased, but it is very inexpensive, typically costing around one dollar: a Hex Schmitt Trigger IC. It can be found at electronics suppliers under part numbers such as 40106, 4584, or 74C14. Prefixes and suffixes generally do not matter—for example, an HF40106BP will work perfectly. However, if the middle part of the designation changes, the device may no longer operate at the required voltage. For instance, a 74HC14 is not suitable. I also recommend using an IC socket.
The circuit we will build is a polyphonic oscillator originally described in Nicolas Collins' book Handmade Electronic Music.
To simplify assembly, I designed a PCB that only requires soldering the components into place, although the circuit can also be built on a breadboard.
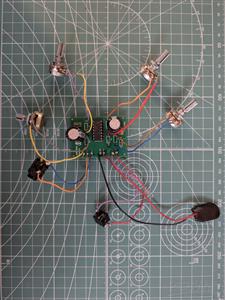
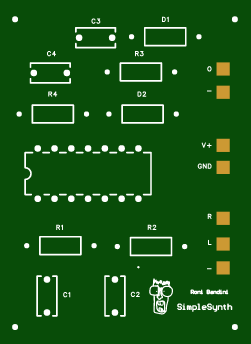
The IC is the component connected to the footprint with seven holes on each side. Capacitors are installed in positions C1, C2, and so on. Diodes are placed in D1 and D2. Potentiometers or resistors go in positions R1 through R4. Output Jack 1 is connected to -R and -L, while the second output jack is connected to O and -. The 9V battery connects to V+ and GND.
Some component values that work particularly well are:
- 1N914 or 1N4148 diodes
- Linear potentiometers from 10kΩ to 100kΩ, photoresistors, or even fixed resistors
- 0.1 µF ceramic capacitors or 8.2 µF electrolytic capacitors. For electrolytic capacitors, orient the positive lead toward the IC in C2, or toward the outer edge of the PCB in C4.
Larger capacitors produce lower-frequency sounds reminiscent of metronome clicks, while smaller capacitors generate higher-pitched tones that can extend into ultrasonic frequencies.
The circuit is divided into two sections. The section without diodes sends signals to the left and right channels of a stereo jack. The two channels may have different output levels, which can be corrected using the amplifier's balance control or by adding 10kΩ resistors to each output. The diode section combines the audio signals using ring modulation and does not require volume balancing.
A bit more about sound generation with the Hex Schmitt Trigger. The IC contains six inverters. Each inverter turns a logic 1 into a logic 0, or a logic 0 into a logic 1. When 9V is applied to the input, the inverter outputs 0V. That output is fed back to the input through a resistor, causing the process to repeat continuously and generate a square wave. The oscillation frequency depends on the resistor and capacitor values that determine the charging and discharging rate of the circuit.
There is still plenty of room for improvement in the PCB design—which, incidentally, was my first PCB project. In a future revision I plan to add 3 mm mounting holes in the corners for enclosure installation, replace the square solder pads with headers or jumper connections, and improve the overall component layout.
Demo
https://www.youtube.com/shorts/IbUpmuGNxYY
https://www.youtube.com/shorts/wHtayY4GwAU
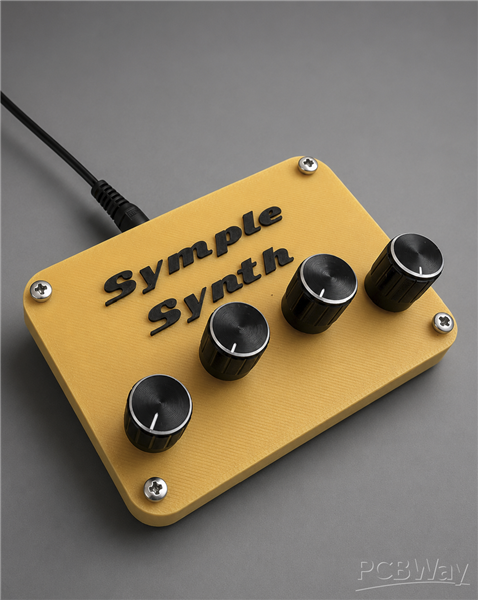
For 3d printed parts go to https://www.pcbway.com/project/shareproject/Simple_Synth_5a25d138.html
For a related project, see the Atari Punk Console, which uses two 555 timer ICs:
Symple Synth
*PCBWay community is a sharing platform. We are not responsible for any design issues and parameter issues (board thickness, surface finish, etc.) you choose.


Raspberry Pi 5 7 Inch Touch Screen IPS 1024x600 HD LCD HDMI-compatible Display for RPI 4B 3B+ OPI 5 AIDA64 PC Secondary Screen(Without Speaker)
BUY NOW


- Comments(0)
- Likes(1)
More by Roni Bandini
-
 Swatch Retro Internet Time Clock with Xiao TFT Round Display
Internet Time is a decimal time concept released in 1998 by the Swatch corporation. Instead of hours...
Swatch Retro Internet Time Clock with Xiao TFT Round Display
Internet Time is a decimal time concept released in 1998 by the Swatch corporation. Instead of hours...
-
 Simple Synth
3d printed enclosure for Simple Synth.For PCB and instructions go to https://www.pcbway.com/project/...
Simple Synth
3d printed enclosure for Simple Synth.For PCB and instructions go to https://www.pcbway.com/project/...
-
 Symple Synth
Many of the discarded electronic devices we find in the trash contain circuit boards with components...
Symple Synth
Many of the discarded electronic devices we find in the trash contain circuit boards with components...
-
 Drone Detection
 SystemAs part of a symposium presentation, I decided to build several drone detectio...
Drone Detection
Drone Detection SystemAs part of a symposium presentation, I decided to build several drone detectio...
-
 Joule Thief
Components:Ferrite torroid (You can make one with an old low consumption Lamp and 2 copper wires)1k ...
Joule Thief
Components:Ferrite torroid (You can make one with an old low consumption Lamp and 2 copper wires)1k ...
-
 Fall Detection client-server system with Machine Learning
Falls could be dangerous in any situation but for certain working scenarios, consequences are defini...
Fall Detection client-server system with Machine Learning
Falls could be dangerous in any situation but for certain working scenarios, consequences are defini...
-
 Bhopal 84, detect harmful gases with machine learning and Arduino
Industries working with chemicals are always subject to leaks that could harm workers. Sometimes tho...
Bhopal 84, detect harmful gases with machine learning and Arduino
Industries working with chemicals are always subject to leaks that could harm workers. Sometimes tho...
-
 Ibarrola, anti facial recognition servo glasses
These are simple servo glasses designed to fool facial recognition software with manual and automati...
Ibarrola, anti facial recognition servo glasses
These are simple servo glasses designed to fool facial recognition software with manual and automati...
-
 Bitcoin ring with Attiny85
I’ve started to think about a project that could take advantage of DigiSpark board features (reduced...
Bitcoin ring with Attiny85
I’ve started to think about a project that could take advantage of DigiSpark board features (reduced...
-
 Dry Martini WiFi operated neon led sign
English CC captions availableI like Dry Martinis. Maybe due to the cocktail glass design or to the f...
Dry Martini WiFi operated neon led sign
English CC captions availableI like Dry Martinis. Maybe due to the cocktail glass design or to the f...
-
 Vespa Diorama ESP32 NTP clock
I love Italian motorcycles. I have a Ducati, I’ve rided a Guzzi to travel around Europe and I even f...
Vespa Diorama ESP32 NTP clock
I love Italian motorcycles. I have a Ducati, I’ve rided a Guzzi to travel around Europe and I even f...
-
Programmable Mist Maker - XIAO / QT PY Extension
936 1 0 -
RadioHAT - Raspberry Pi radio development platform
761 0 2 -
-
-
-
-
ARPS-2 – Arduino-Compatible Robot Project Shield for Arduino UNO
3222 0 6 -
A Compact Charging Breakout Board For Waveshare ESP32-C3
3843 3 8 -
AI-driven LoRa & LLM-enabled Kiosk & Food Delivery System
4199 2 2


