


Smart Motor Safety and Monitoring System Using Arduino Nano
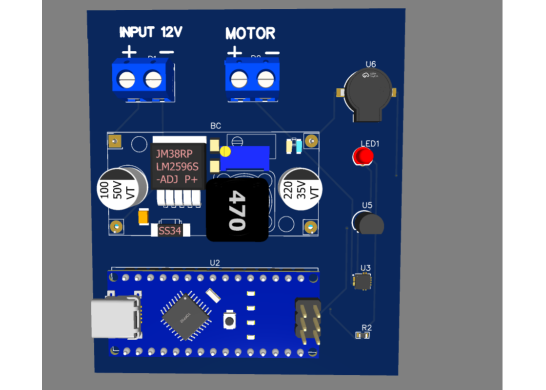
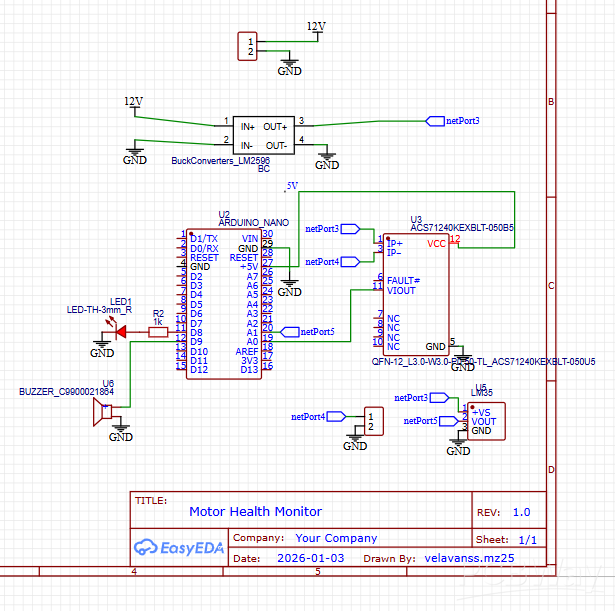
This project is a smart motor monitoring system using an Arduino Nano that keeps an eye on current, temperature, and vibration in real time. It uses an ACS712 sensor to track current, an LM35 to measure temperature, and a piezo sensor to detect vibrations. Whenever any parameter goes beyond safe limits, the system immediately alerts you with an LED and buzzer, helping prevent motor damage. All components share a common 5V supply and ground, and the motor connects via simple terminal pins, making it modular and easy to test. This compact setup is ideal for ensuring motor safety and monitoring performance efficiently.
const int currentPin = A0;
const int tempPin    = A1;
const int vibPin     = 2;
const int ledPin     = 8;
const int buzzerPin  = 9;

const float currentThreshold = 2.0;
const float tempThreshold    = 50.0;
const int vibrationThreshold  = HIGH;

const float ACSSensitivity = 0.185;
const float ACSZeroCurrent = 2.5;

void setup() {
  Serial.begin(9600);
  pinMode(vibPin, INPUT);
  pinMode(ledPin, OUTPUT);
  pinMode(buzzerPin, OUTPUT);
  digitalWrite(ledPin, LOW);
  digitalWrite(buzzerPin, LOW);
}

void loop() {
  int currentRaw = analogRead(currentPin);
  float currentVoltage = (currentRaw / 1023.0) * 5.0;
  float current = (currentVoltage - ACSZeroCurrent) / ACSSensitivity;

  int tempRaw = analogRead(tempPin);
  float tempVoltage = (tempRaw / 1023.0) * 5.0;
  float temperature = tempVoltage * 100.0;

  int vibration = digitalRead(vibPin);

  bool overCurrent = current > currentThreshold;
  bool overTemp    = temperature > tempThreshold;
  bool vibrated    = vibration == vibrationThreshold;

  if (overCurrent || overTemp || vibrated) {
    digitalWrite(ledPin, HIGH);
    digitalWrite(buzzerPin, HIGH);
  } else {
    digitalWrite(ledPin, LOW);
    digitalWrite(buzzerPin, LOW);
  }

  Serial.print("Current: "); Serial.print(current); Serial.print(" A, ");
  Serial.print("Temp: "); Serial.print(temperature); Serial.print(" C, ");
  Serial.print("Vibration: "); Serial.println(vibration);

  delay(500);
}
Smart Motor Safety and Monitoring System Using Arduino Nano
*PCBWay community is a sharing platform. We are not responsible for any design issues and parameter issues (board thickness, surface finish, etc.) you choose.


Raspberry Pi 5 7 Inch Touch Screen IPS 1024x600 HD LCD HDMI-compatible Display for RPI 4B 3B+ OPI 5 AIDA64 PC Secondary Screen(Without Speaker)
BUY NOW


- Comments(3)
- Likes(0)
More by VELAVAN S S
-
Programmable Mist Maker - XIAO / QT PY Extension
455 0 0 -
RadioHAT - Raspberry Pi radio development platform
361 0 1 -
-
-
-
-
ARPS-2 – Arduino-Compatible Robot Project Shield for Arduino UNO
2899 0 6 -
A Compact Charging Breakout Board For Waveshare ESP32-C3
3403 3 8 -
AI-driven LoRa & LLM-enabled Kiosk & Food Delivery System
3729 2 2


