PCBWay Community
Search title or content
Search
PCBWay
PCB Instant Quote
CNC | 3D Printing
Login
Sign Up
More Notifications
No notifications.
My Profile
My projects
My Likes
My Deals
My Goods for Bazaar
Settings
Sign Out
Projects
Categories
DIY Electronics
Arduino
Hardware
Audio
Computers & USB
Breakout Board Projects
Home Automation
LED Displays & Matrices
IoT
Robotics
View all categories
By Source Files
Onju Voice - AI assistant replacement to Google Nest Mini by @justLV
LogicAnalyzer V6.0
DIY 1kW Open Source MPPT Solar Charge Controller
Tad Boy Color
SummerCart64 - a fully open source N64 flashcart
kv4p HT v1.7b
QuinLED-Dig-Uno
Bike Fingerprint - PCB
Arduino RC engine sound & light controller with inertia simulation for ESP32
Solar Powered WiFi Weather Station V2.0
Frog Boy Color
SIDKick pico 0.2 (SID 6581/8580-replacement for C64/C128)
View all source files projects
Featured Projects
Onju Voice - AI assistant replacement to Google Nest Mini by @justLV
LogicAnalyzer V6.0
DIY 1kW Open Source MPPT Solar Charge Controller
Featured
Source Files
Video
View all projects
Questions
Sponsorships
Feedback
Blog
Store
PCB Design
Contest
- 2026 KiCad PCB Design Contest
- 8th Project Design Contest
- 7th Project Design Contest
- KiCad Design Contest
- 6th Project Design Contest
- 5th PCB Design Contest
- 4th PCB Design Contest
- Raspberry Pi Pico Contest
- PCB Design Tutorial
- 3rd PCB Design Contest
- I CAN SOLDER Kit Contest
- 2nd PCB Design Contest
- 1st PCB Design Contest
Add questions
Create a project
Please verify your email address so that you can enjoy our more comprehensive services.
Wearables
Weather
All categories
DIY Electronics
Arduino
Hardware
Audio
Computers & USB
Breakout Board Projects
Home Automation
LED Displays & Matrices
IoT
Robotics
3D Printing
Blinkenlights
Calculator
Camera
Clocks
CNC
Educational
Automotive
Electronic Games
ESP32
Fabrication Tools
Flight
Guitar
Keyboards
Misc
Music
Nixie Tube
Oscilloscope
Particle
Power Supply
Programmable Logic Projects
Raspberry Pi
Radio
Retro Stuffs
Space & Satellite
Sensors
Software
Synthesizer
Ultrasonic
Virtual Reality
Wearables
Weather
Project by top creative fields
All categories
3D Printing
Arduino
Audio
Automotive
Blinkenlights
Breakout Board Projects
Calculator
Camera
Clocks
CNC
Computers & USB
DIY Electronics
Educational
Electronic Games
ESP32
Fabrication Tools
Flight
Guitar
Hardware
Home Automation
IoT
Keyboards
LED Displays & Matrices
Misc
Music
Nixie Tube
Oscilloscope
Particle
Power Supply
Programmable Logic Projects
Radio
Raspberry Pi
Retro Stuffs
Robotics
Sensors
Software
Space & Satellite
Synthesizer
Ultrasonic
Virtual Reality
Wearables
Weather
View all categories
Retro Stuffs
Retro-style is a style that human beings imitate or consciously reproduce the lifestyle, trends or artistic forms in history.
All tags
Commodore
Retro
Amiga
Cartridge
ZX Spectrum
Emulator
Create a project
Sort by : Trending
Trending
Score
Likes
Views
Discuss
Newest
Featured
Source Files
3D Design
Video
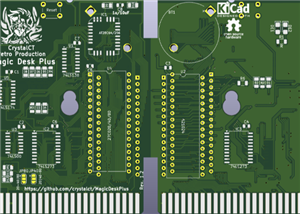
An interesting platform that can be used to develop cartridge games that require a lot of ROM space, additional RAM, and non-volatile writable memory.The Magic Desk Plus radically expands the specific...
Magic Desk Plus Cartridge for Commodore 64
98
1
1
Salvatore Cristaldi
Salvatore Cristaldi
ITALY
16
3
The weeCee is perhaps the smallest MSDOS gaming PC ever made that doesn't use emulation.It is based around an ICOP Vortex86 CPU module, which is a pentium-class x86-compatible embedded system-on-modul...
weeCee - Tiny DOS Gaming PC
79909
19
68
rasteri
rasteri
UNITED KINGDOM
56
0
The Frog Boy Color is a ground up redesign of the classic Game Boy Color, from the circuits up to the shell. Taking on a wide form factor more akin to the Game Boy Advance, it also adds USB-C charging...
Frog Boy Color
43173
6
62
Chris LeggoMyFroggo
Chris LeggoMyFroggo
UNITED STATES OF AMERICA
117
0
Computers and consoles using RBG video standard depends on the availability and cost of CRTs (Cathode Ray Tube) or LCD monitors that support low horizontal sync (15Khz) which are scarce or the use of ...
pico RGB 2 HDMI
17235
29
56
Marcelo Lorenzati
Marcelo Lorenzati
ARGENTINA
29
0
The Idea for this project came from my building of a Spitfire500 accelerator .The Spitfire500 is a 14MHz accelerator for the AMIGA 500 computer and has 8MB of fast ram on board , and an IDE interface ...
A500 IDE/Flop
3343
1
8
Alan Leverett
Alan Leverett
UNITED KINGDOM
55
39
HID2AMI HID MOUSE AND GAMEPAD to AMIGA ADAPTOR (REV 2.0.2 board)https://github.com/EmberHeavyIndustries/HID2AMIWHAT IT ISHID2AMI is an HID mouse to quadrature waveform converter and HID Gamepad adapte...
HID2AMI v2.0.2 with Mousewheel Support and new unified firmware v3.0.x
12737
13
31
Ember EmberHeavyIndustries
Ember EmberHeavyIndustries
ITALY
28
0
MiSTer Floppy is an add-on board that connects to the MiSTer USER port to provide real physical floppy disk access on the MiSTer Multisystem.Currently only the Minimig core is supported. For more deta...
MiSTer Floppy (SMD Version)
3764
0
12
Rob Smith
Rob Smith
UNITED KINGDOM
24
0
BackgroundWhen I got back into the Aquarius in the Summer of 2019, I got a bare bones Aquarius that didn't even have the switch box or cable plug for RF output. I had to hack together a BNC cable with...
Aquarius Computer Composite AV Adapter
4485
0
4
Sean Harrington
Sean Harrington
UNITED STATES OF AMERICA
24
1
LittleSixteen is an Open Hardware remake of the Commodore 16 home computer, featuring many improvements over the original design.In V3 we started making improvements to the board:Switched to external ...
LittleSixteen V3 - Improved Commodore 16 Mainboard
11972
41
19
SukkoPera
SukkoPera
ITALY
358
10
My HBC-56, a 65C02/TMS9918A homebrew computer on a backplane, fully emulated on a Raspberry Pi Pico.Emulating the following HBC-56 hardware65C02 CPU65C22 VIATMS9918A VDPDual AY-3-8910 PSGsDual NE...
PICO-56 - A 6502 + TMS9918 Retro Computer on a Raspberry Pi Pico
8736
4
27
Troy Schrapel
Troy Schrapel
AUSTRALIA
24
1
BlueSCSI is an open, cheap, and easy to use SD SCSI solution for vintage computers.BlueSCSI provides a convenient way to use MicroSD cards hard drives in your Vintage Macintosh or workstation.Simple D...
BlueSCSI 1.1-a 50 Pin
10063
7
30
Eric Helgeson
Eric Helgeson
23
0
Introduction and rationaleMost synthesizer musicians will have heard of the legendary Yamaha DX7 synthesizer. Released in 1983, its powerful and characteristic sounds defined the decade and the one th...
SEGA Synth
5632
2
11
Stefan Nikolaj
Stefan Nikolaj
NORTH MACEDONIA
6
1
This circuit was made so that you can use your old style retro 9 pin joysticks in a PC environment. You can use the retro joysticks you use for Atari, Commodore 64 and Amiga with this circuit via the ...
ArduJOY (DB9 Retro Joystick to USB Adapter)
4144
3
7
RECEP UNAL
RECEP UNAL
TURKEY
13
0
PiStormSTE is a refactor of the original Amiga 500 PiStorm board that allows you to plug it into an Atari STE and close the case.The required software can be found at the PiStorm ST repository, which ...
PiStorm STE v1.0
6215
5
17
The Technoshed
The Technoshed
UNITED KINGDOM
22
0
The SIDKick pico ("SKpico") is a drop-in replacement for the SID 6581/8580 sound chips in the Commodore 64 and 128 computers, and an alternative SID for Ultimate64-boards and the Commodore 64 Ultimate...
SIDKick pico 2350DAC (SID 6581/8580-replacement)
2450
2
12
FRNTC .
FRNTC .
GERMANY
102
0
This is a reverse engineered board by me, Natalie the Nerd.IMPORTANT!!!order at 1mm and ENIGI made this to learn and fix some super corroded boards I have.Shout out to:the original repair manual for t...
AGB CPU 03 board
6270
2
23
Natalie Cursio
Natalie Cursio
AUSTRALIA
107
0
1
2
3
4
5
6
7
8
9
10
11
...