


|
Autodesk Fusion 360Autodesk
|
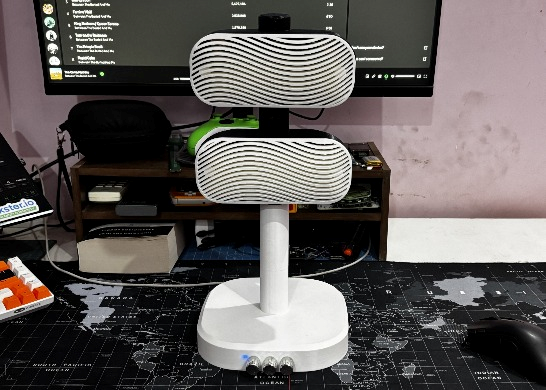
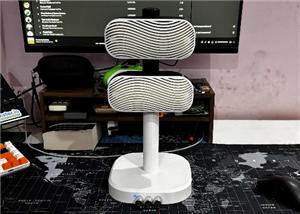
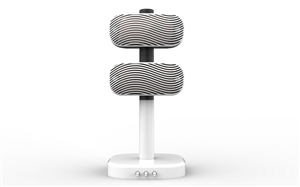
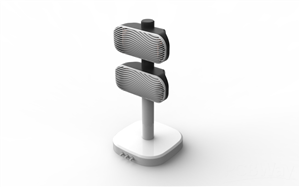
ModiFi - Modular Bluetooth Speaker
Greetings everyone and welcome back—meet ModiFi, the Modular Bluetooth Speaker that reinvents what a Bluetooth speaker can look like.
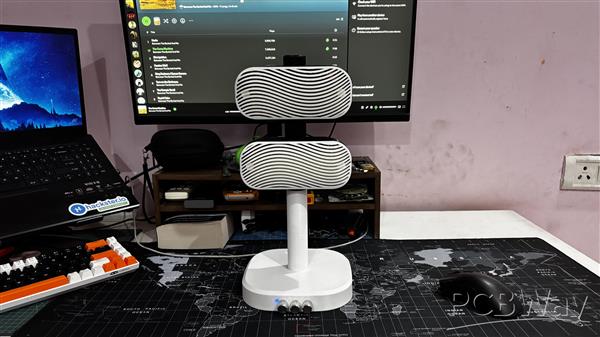
I built it specifically for my desk setup after getting fed up with the underwhelming sound from my old monitor speaker.
Instead of settling, I decided to make something from scratch—something that sounded better and looked way cooler.
At its heart is the ZK-502MT 2.0 Stereo Bluetooth Amplifier Board, delivering reliable wireless audio with crisp stereo output. Paired with a modular enclosure system and clean 3D-printed aesthetics, this build is all about flexibility, creativity, and maker-first design.
This article covers the whole build process of this Custom Speaker so let's get started with the build!
Materials required
These are the materials used in this build:
- ZK-502MT BT Amplifier Board
- 3D-printed Parts
- 12V 2600mAh Battery Pack
- DC Barrel Jack
- 3 mm LED
- 1K Resistor 1/4W
- IN5399 Diode
- Wires
- 8-Ohm Speakers
- M2 Screws
- Magnets 6mm Dia
ZK-502MT 2.0 Stereo Bluetooth Amplifier Board
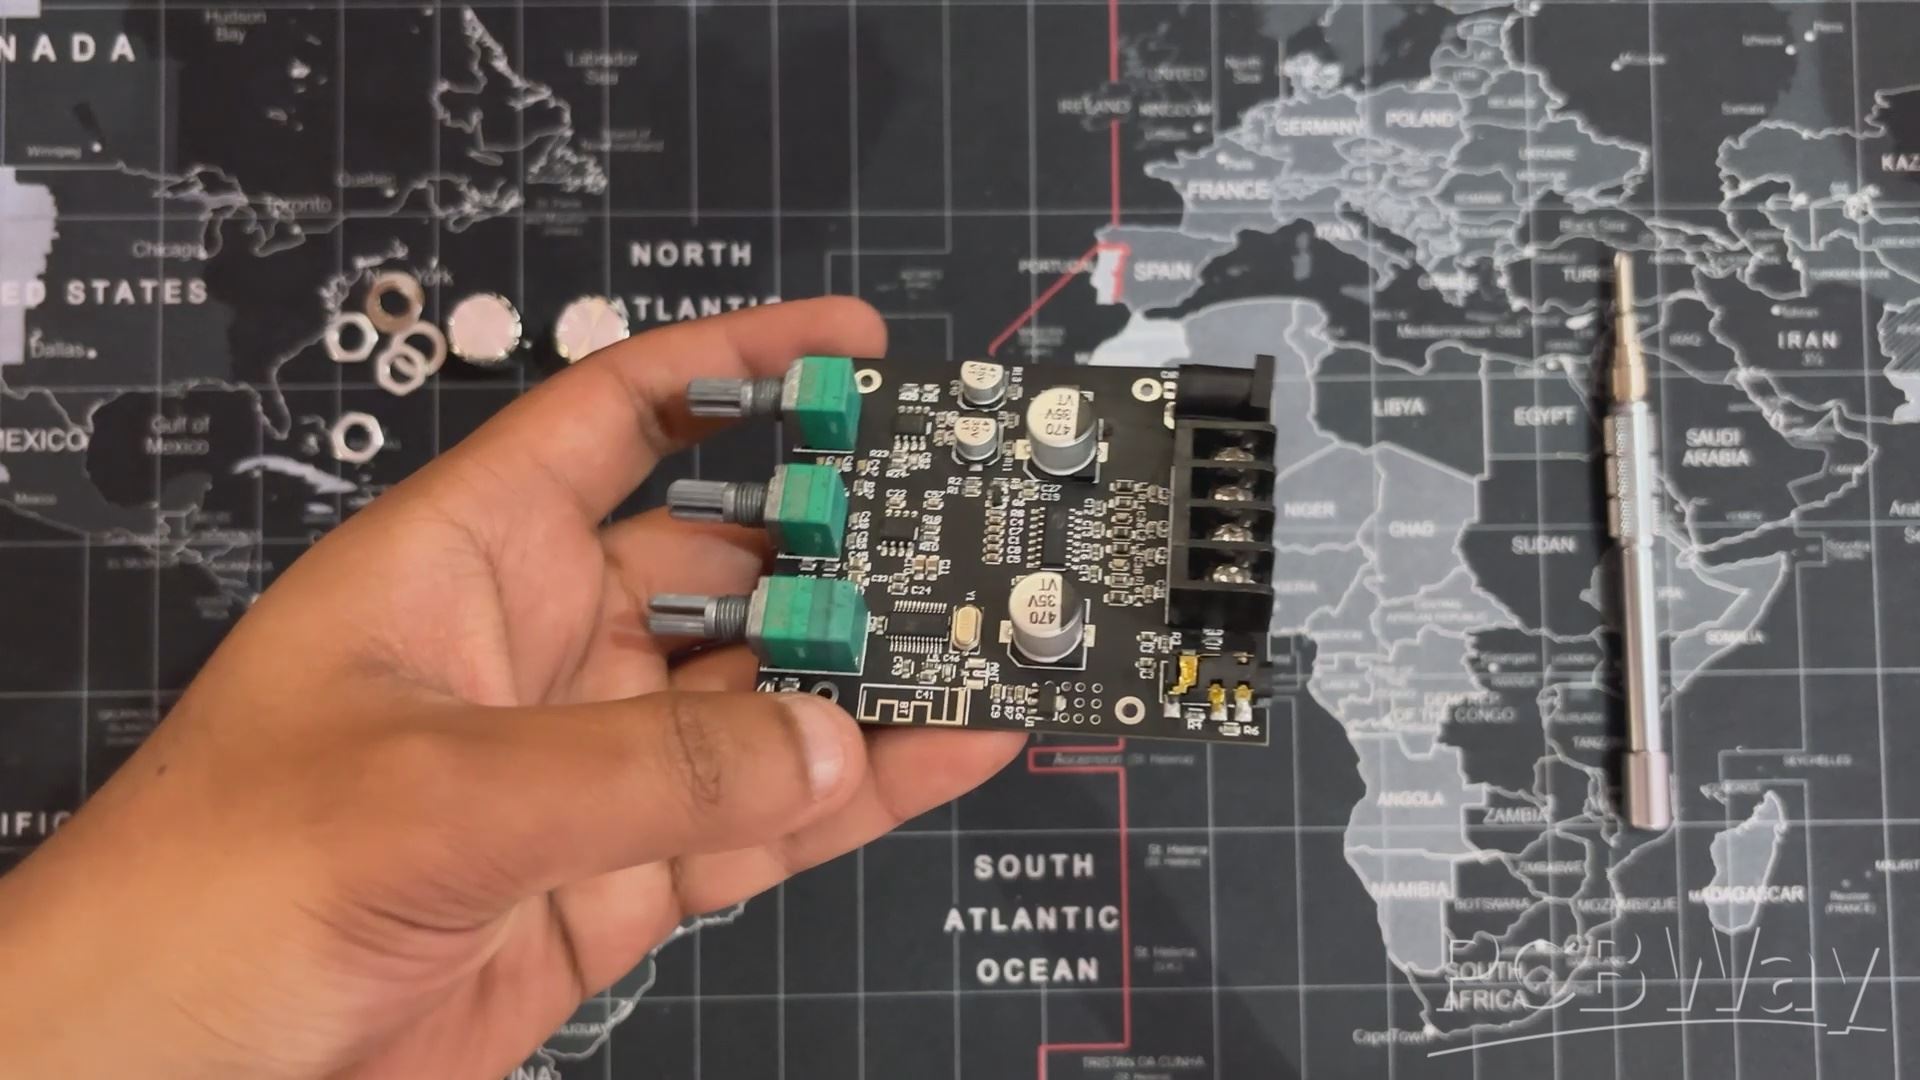
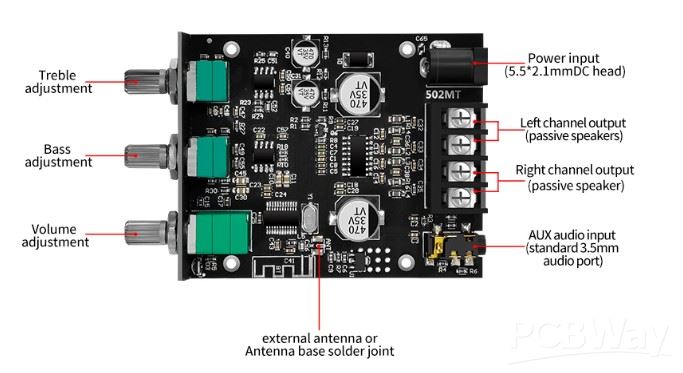
We're using the ZK-502MT Stereo Bluetooth amplifier board that features the CS8663E which is a high-efficiency Class D audio amplifier IC designed for stereo and mono applications. It’s especially popular in DIY audio builds due to its simplicity and performance.
Its standout feature is the ability to deliver 2 × 50 W of clean Class D output, making it ideal for powering medium- to high-wattage speakers with minimal heat and high efficiency.
It supports both Bluetooth and AUX input, giving users flexible connectivity, and includes manual bass and treble adjustment knobs for real-time tone control without external EQ modules.
With a wide operating voltage range (9V–24V) and built-in protection circuits, it’s engineered for reliability and ease of integration into custom enclosures—perfect for makers building portable or embedded audio devices.
PCBWAY GIFTSHOP
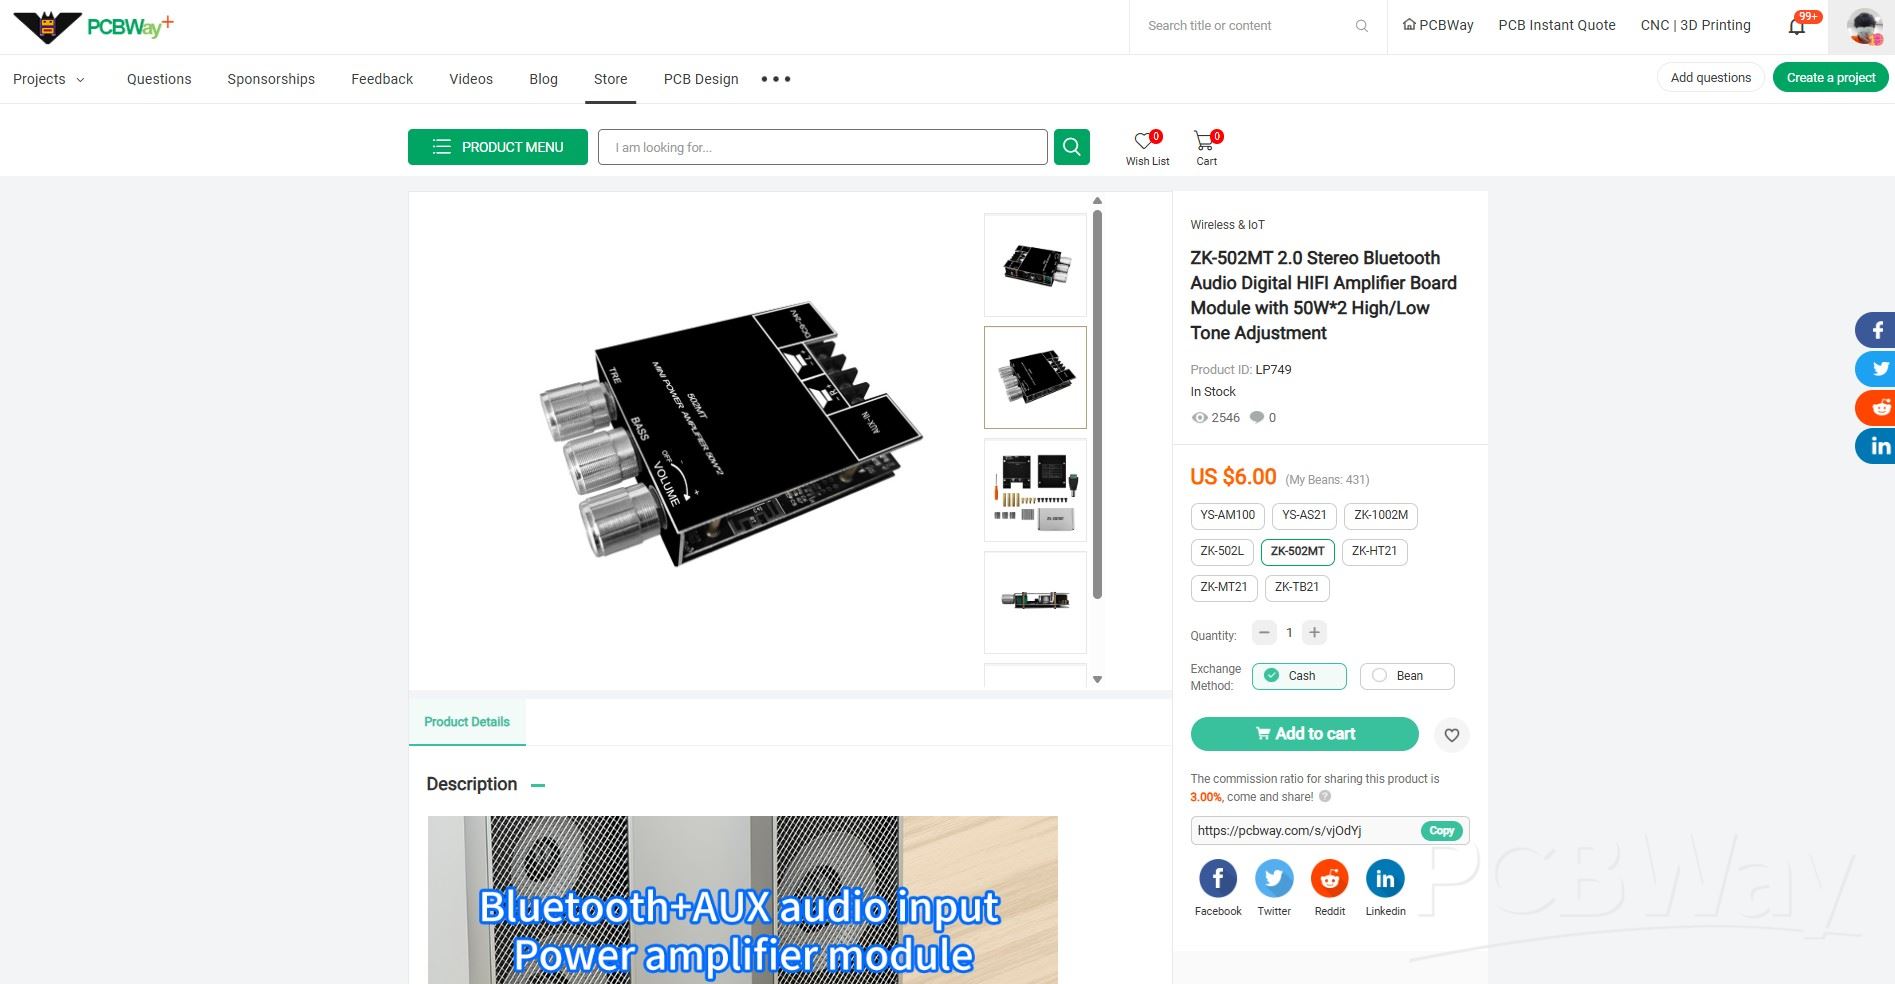
As for sourcing this Audio Module, I got this circuit from PCBWAY's gift shop.
PCBWAY Gift Shop is an online marketplace where you can get a variety of electronics modules and boards for their genuine price, or you could use the PCBWAY currency, which is called beans.
You get beans after ordering something from PCBWAY as reward points, or you can also get them by posting any project in the PCBWAY community.
September Specials from PCBWay!

This month, PCBWay is rolling out two unbeatable limited-time offers perfect for makers and engineers. First up: the iconic Purple Solder Mask, usually priced at $38.43 for 10 pcs of 2-layer 100x100 mm PCBs, is now just $5—a bold color at a bold discount. And for 3D printing enthusiasts, TPU filament starts at $7.96, down from $12.45, with bulk discounts reaching up to 80% off. Whether you're prototyping a new board or printing flexible parts, September is the time to stock up and save. Don’t miss out!
Check PCBWAY out for getting great PCB service from here: https://www.pcbway.com/
3D DESIGN
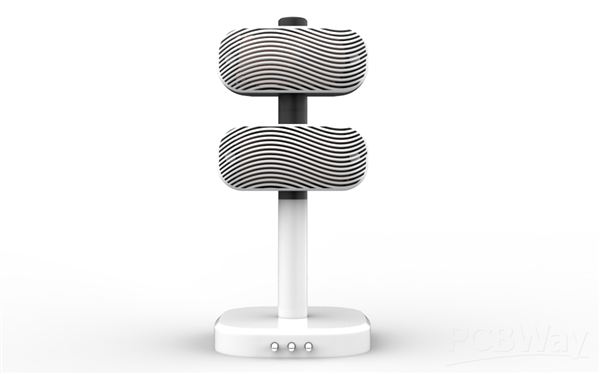
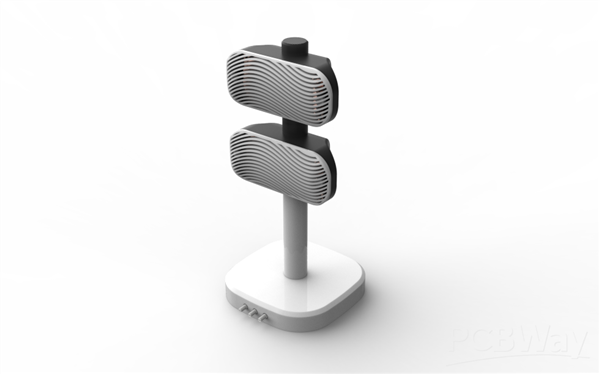

We kicked off this project by rethinking the design from the ground up. The goal was to break away from the conventional boxy speaker format—which dominates most designs and frankly feels uninspired. Instead of sticking to that rigid shape, we wanted to explore something more dynamic and visually engaging.
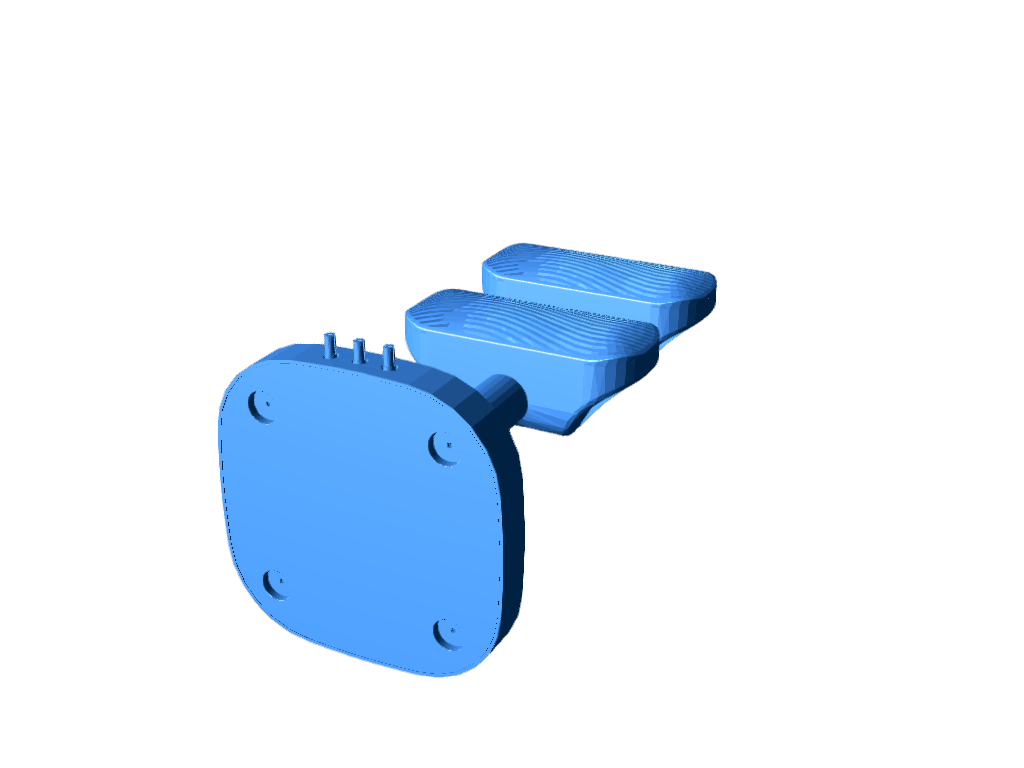
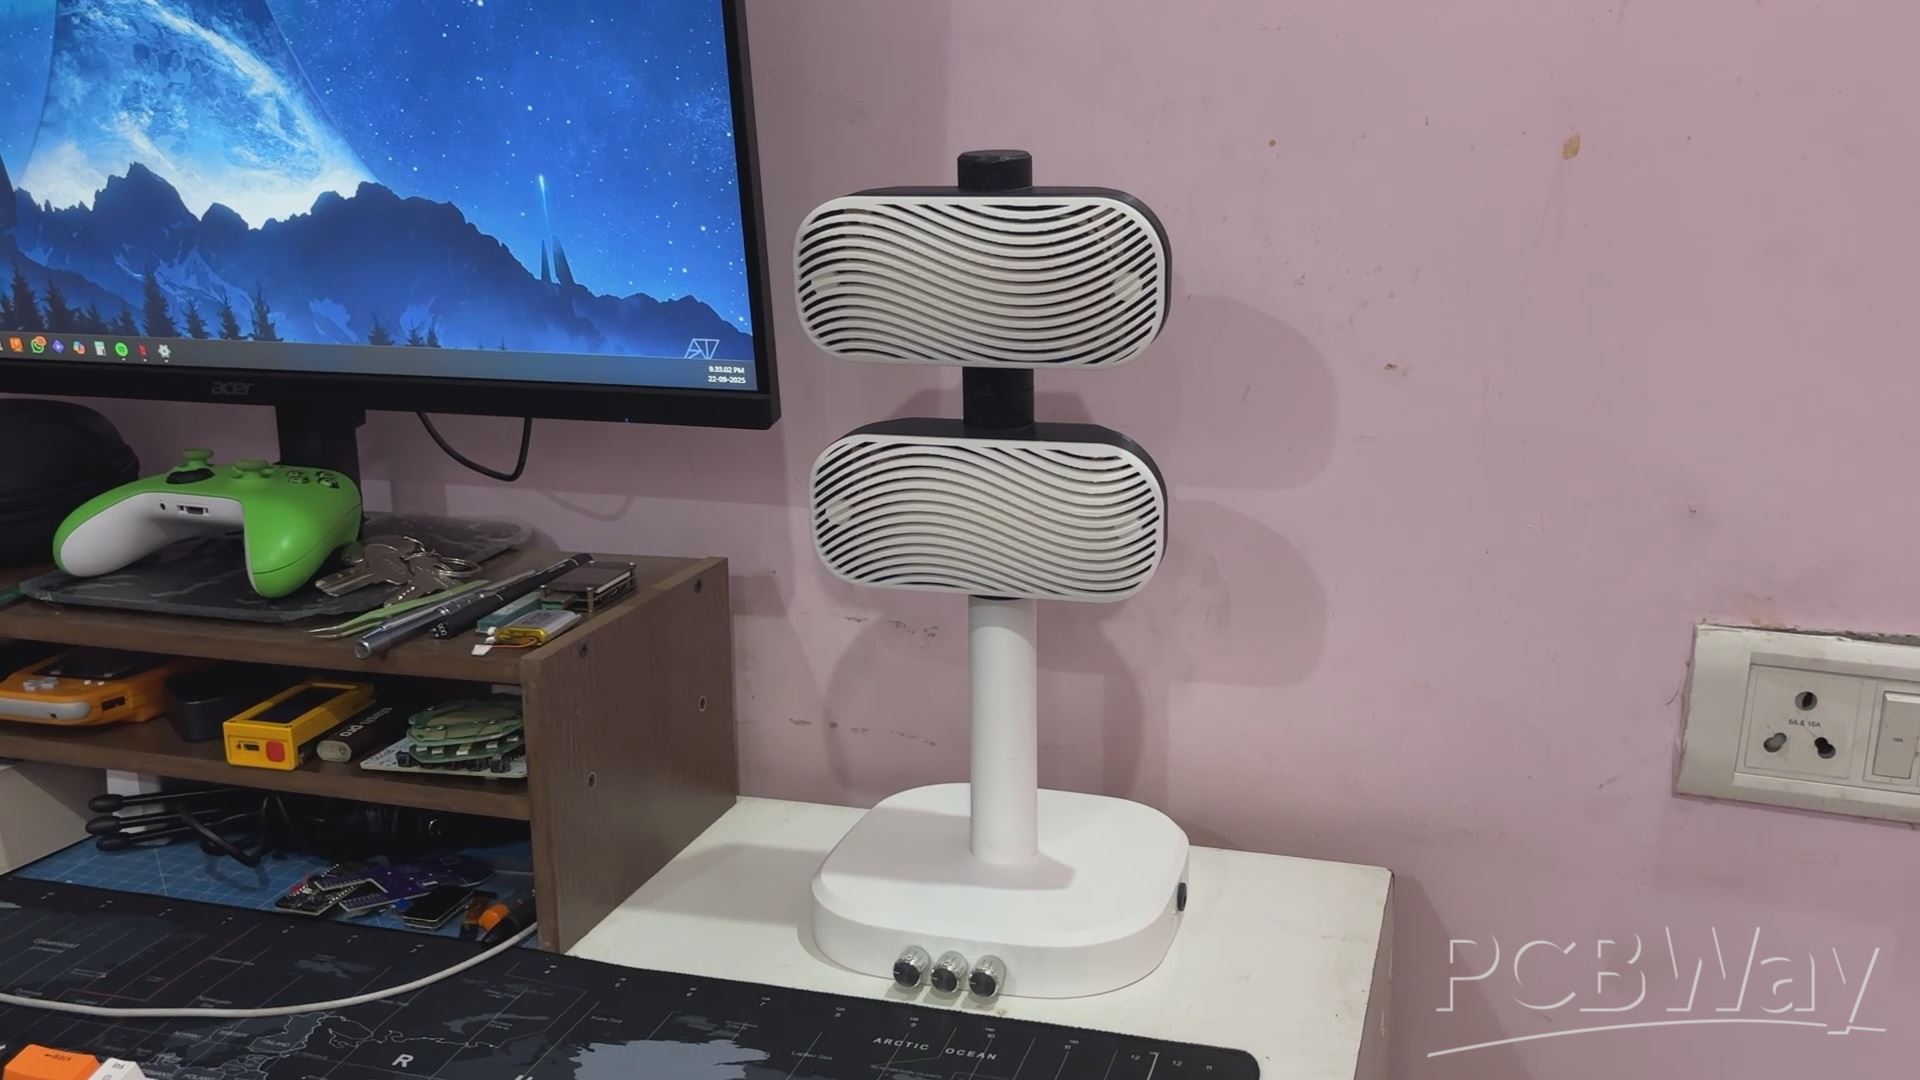
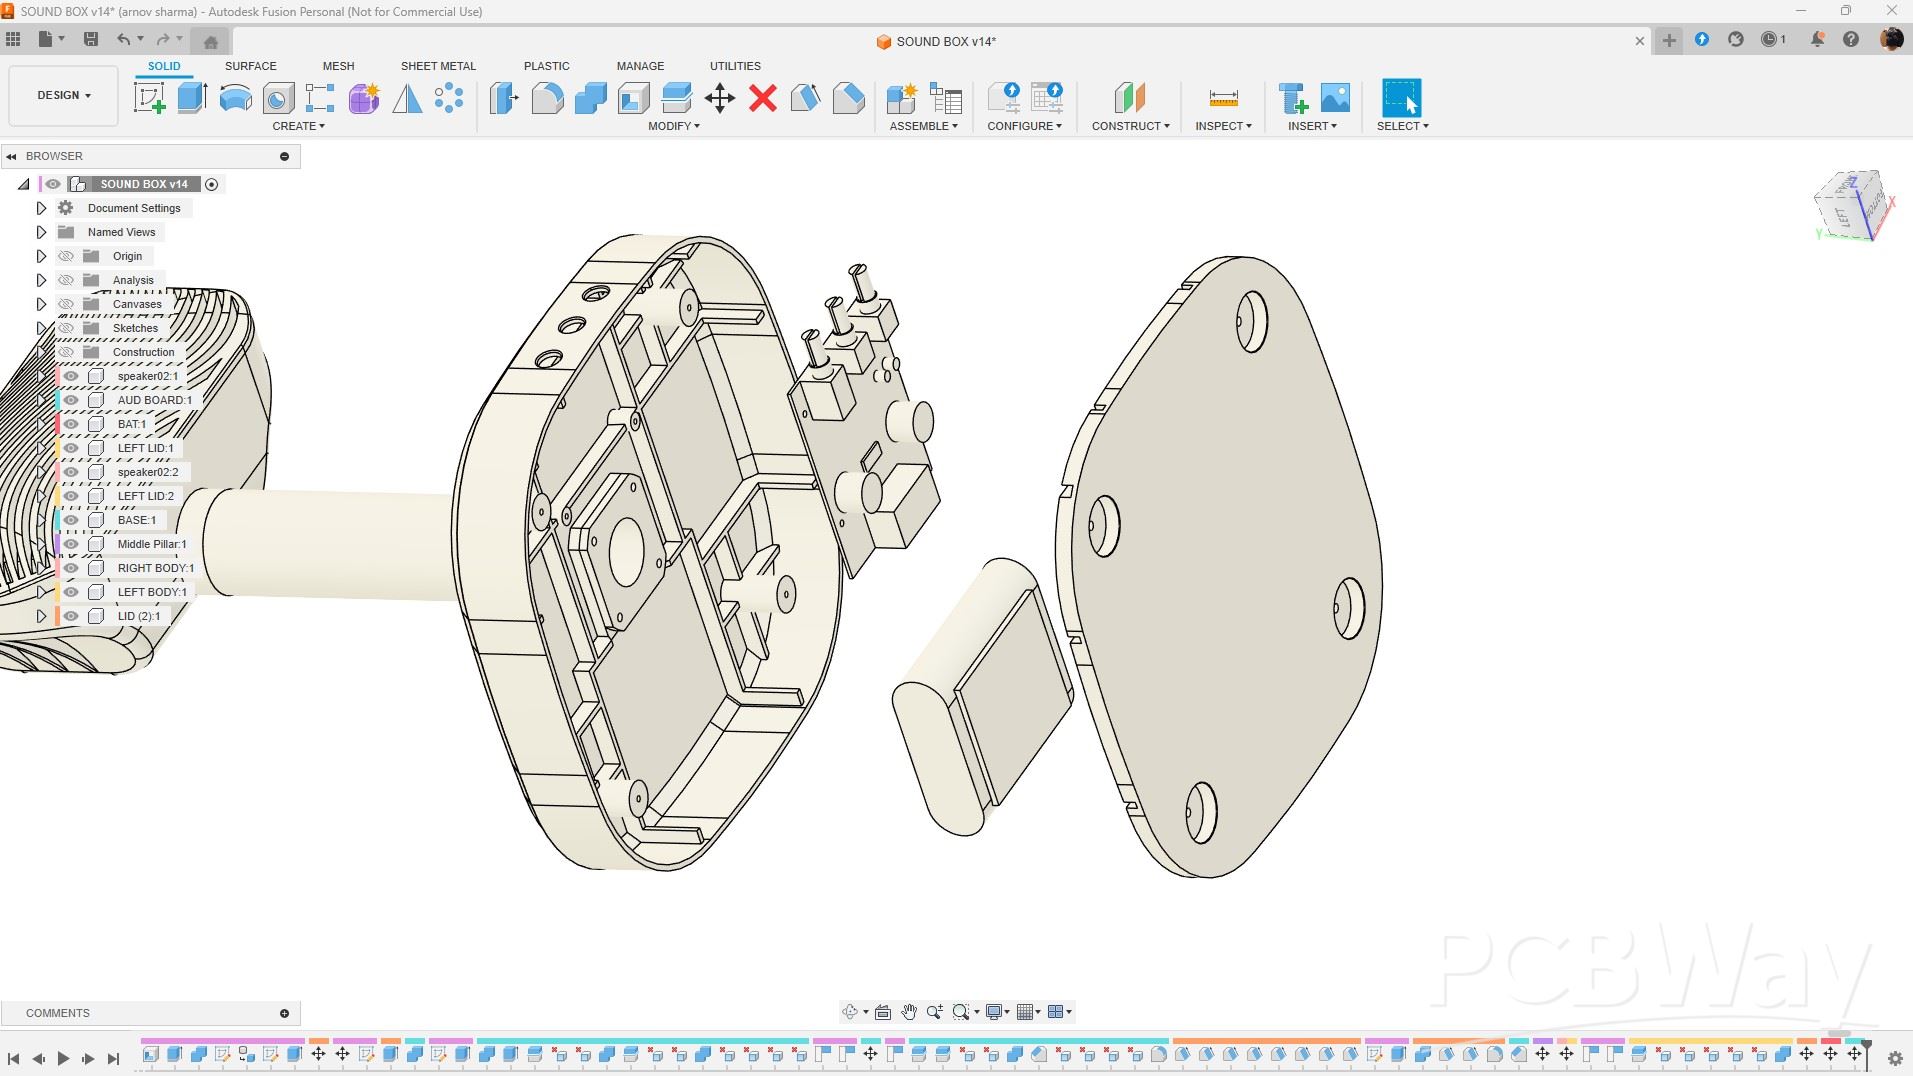
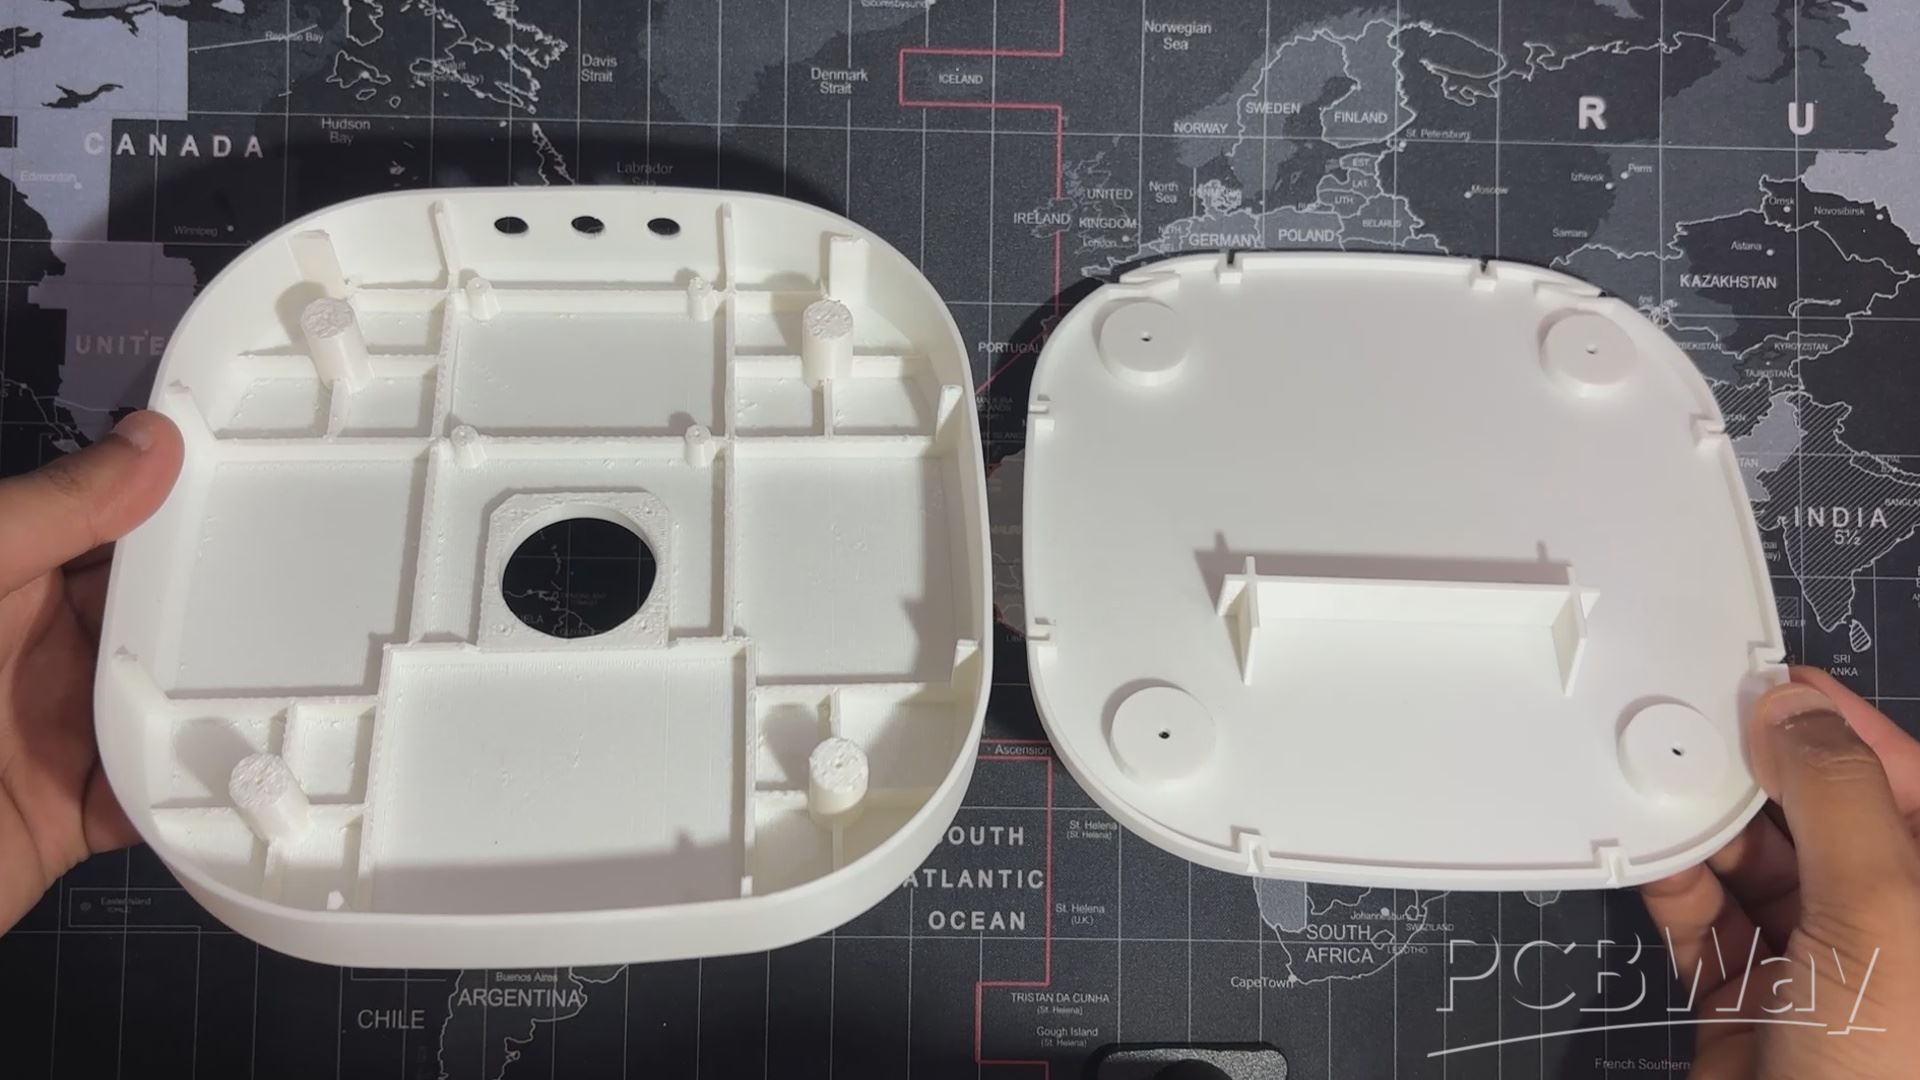
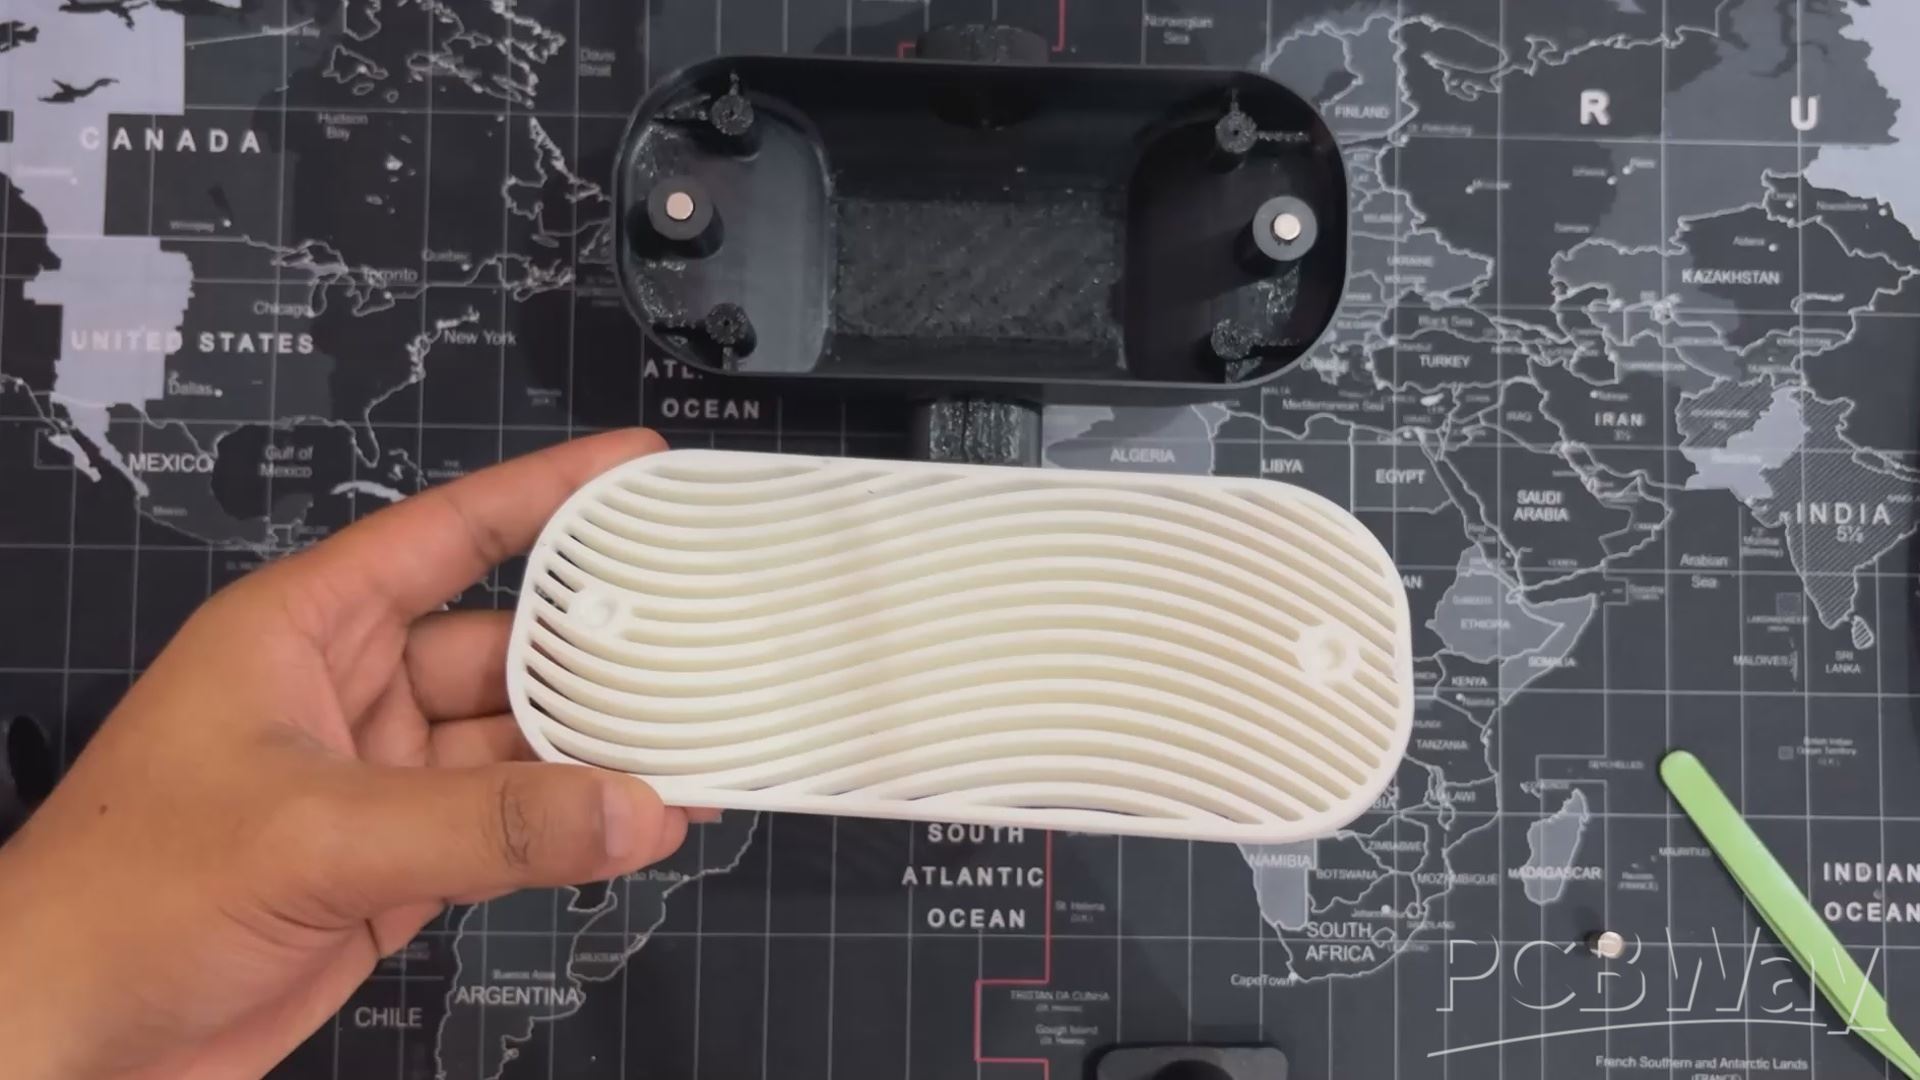
Our design starts with a central base that houses the audio module and battery. From there, the speaker units are mounted externally and connected to the base via a pipe-like structure. This connecting pipe plays a key role: it not only physically links the speaker bodies to the base but also cleverly conceals the wiring.
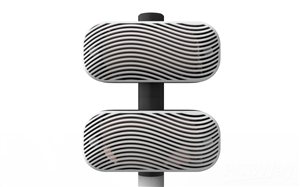
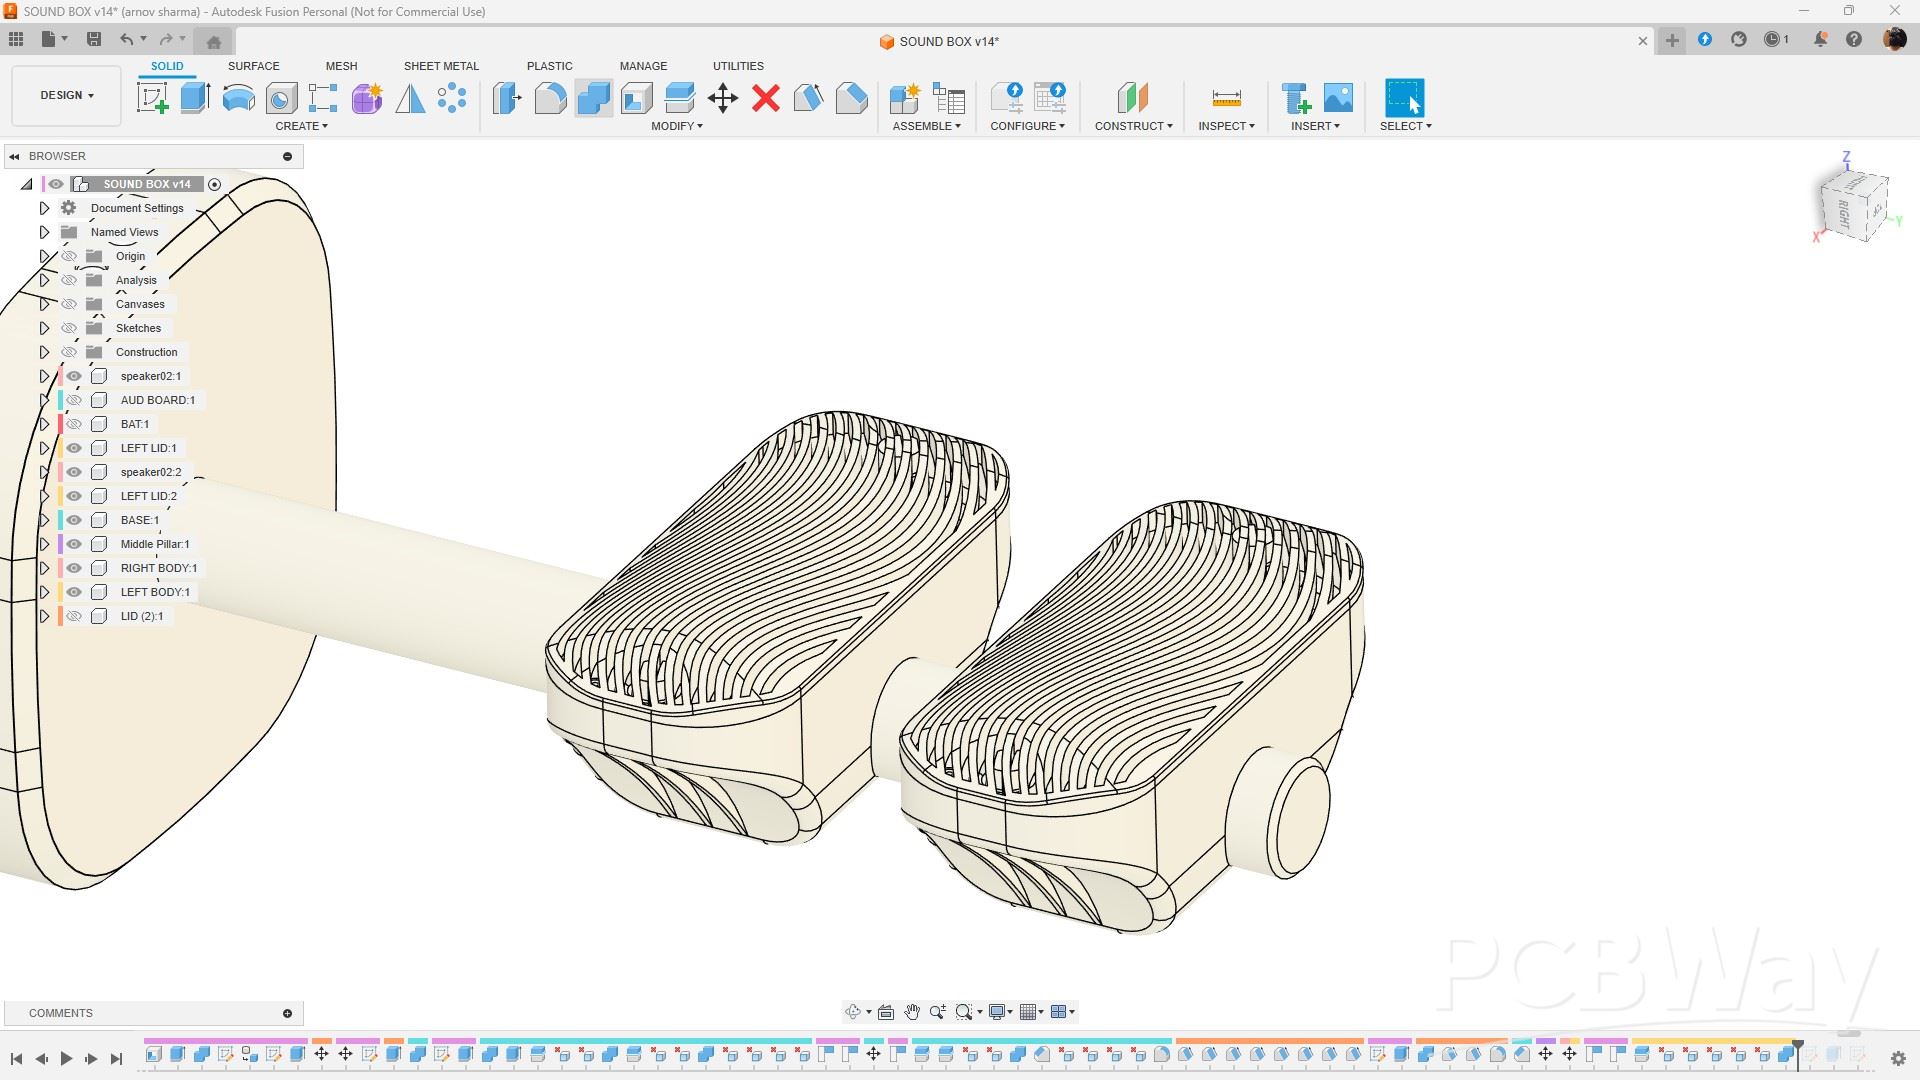
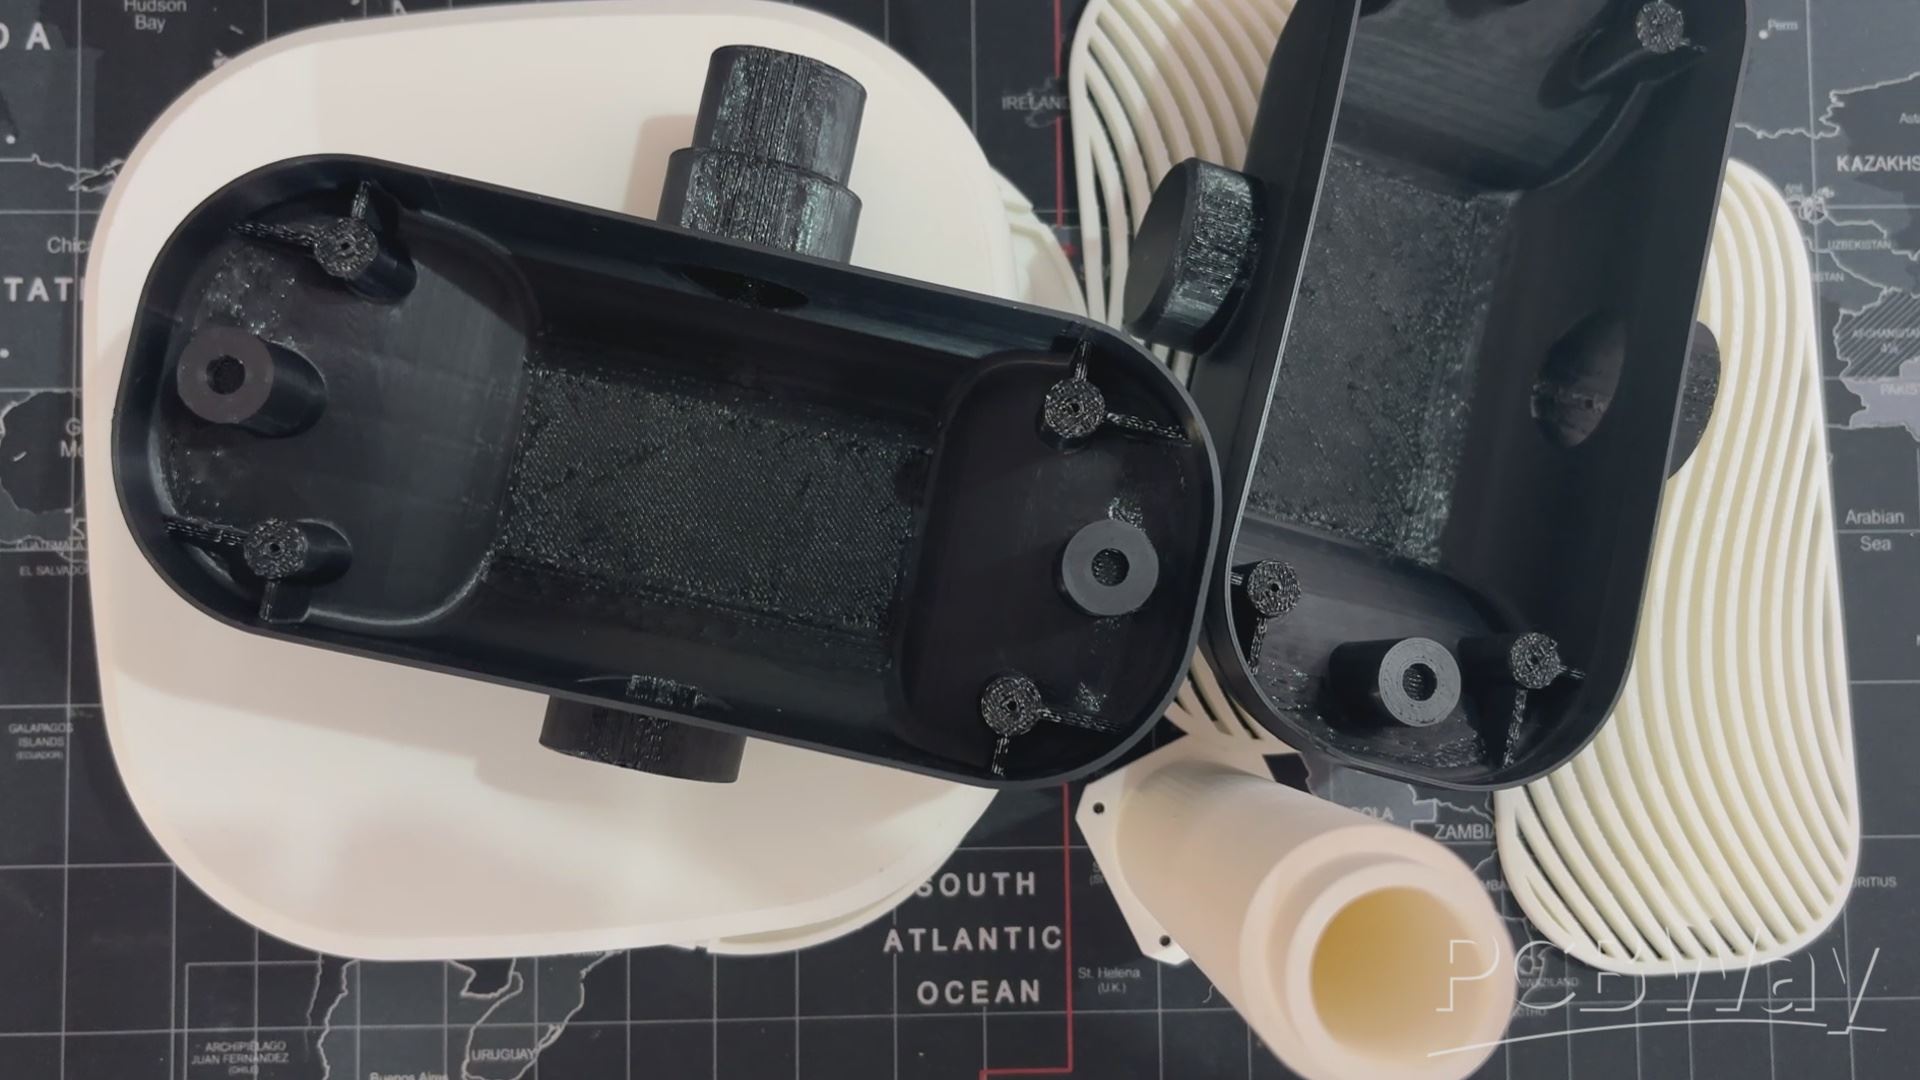
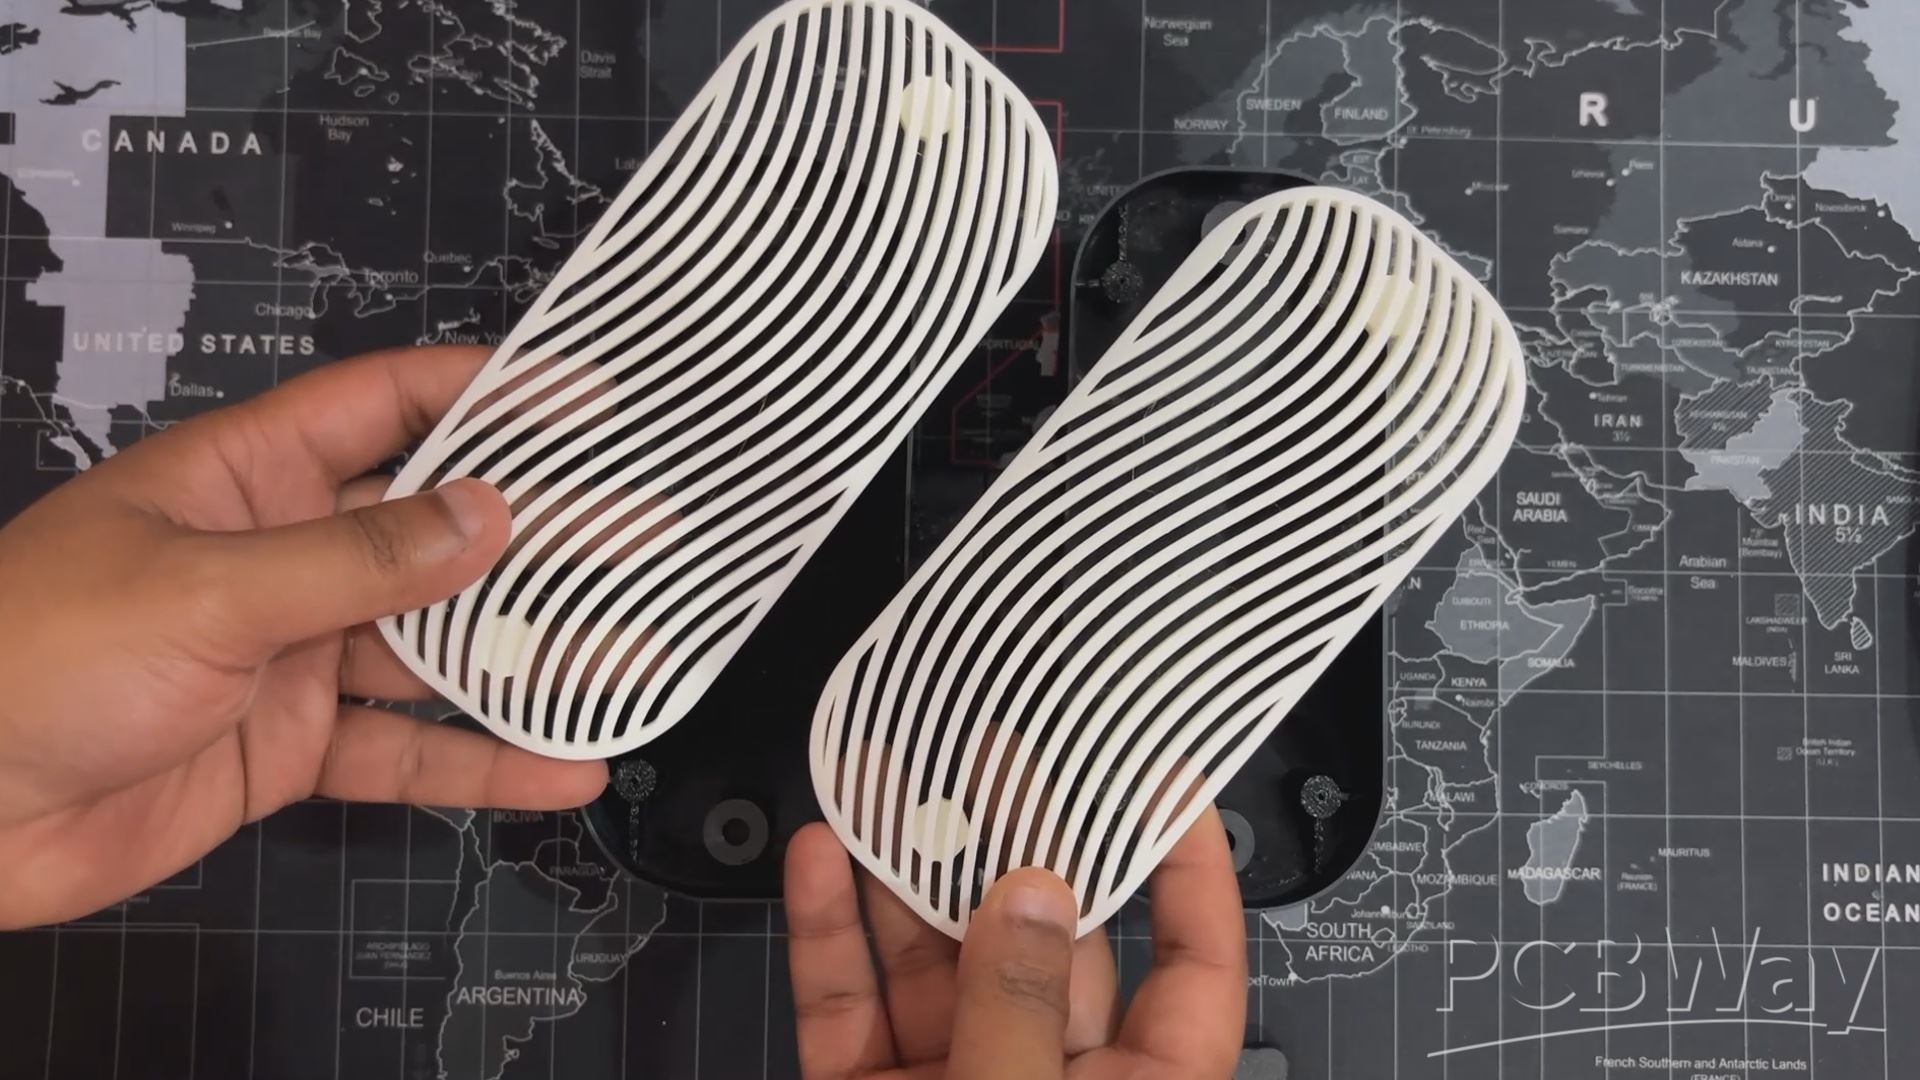
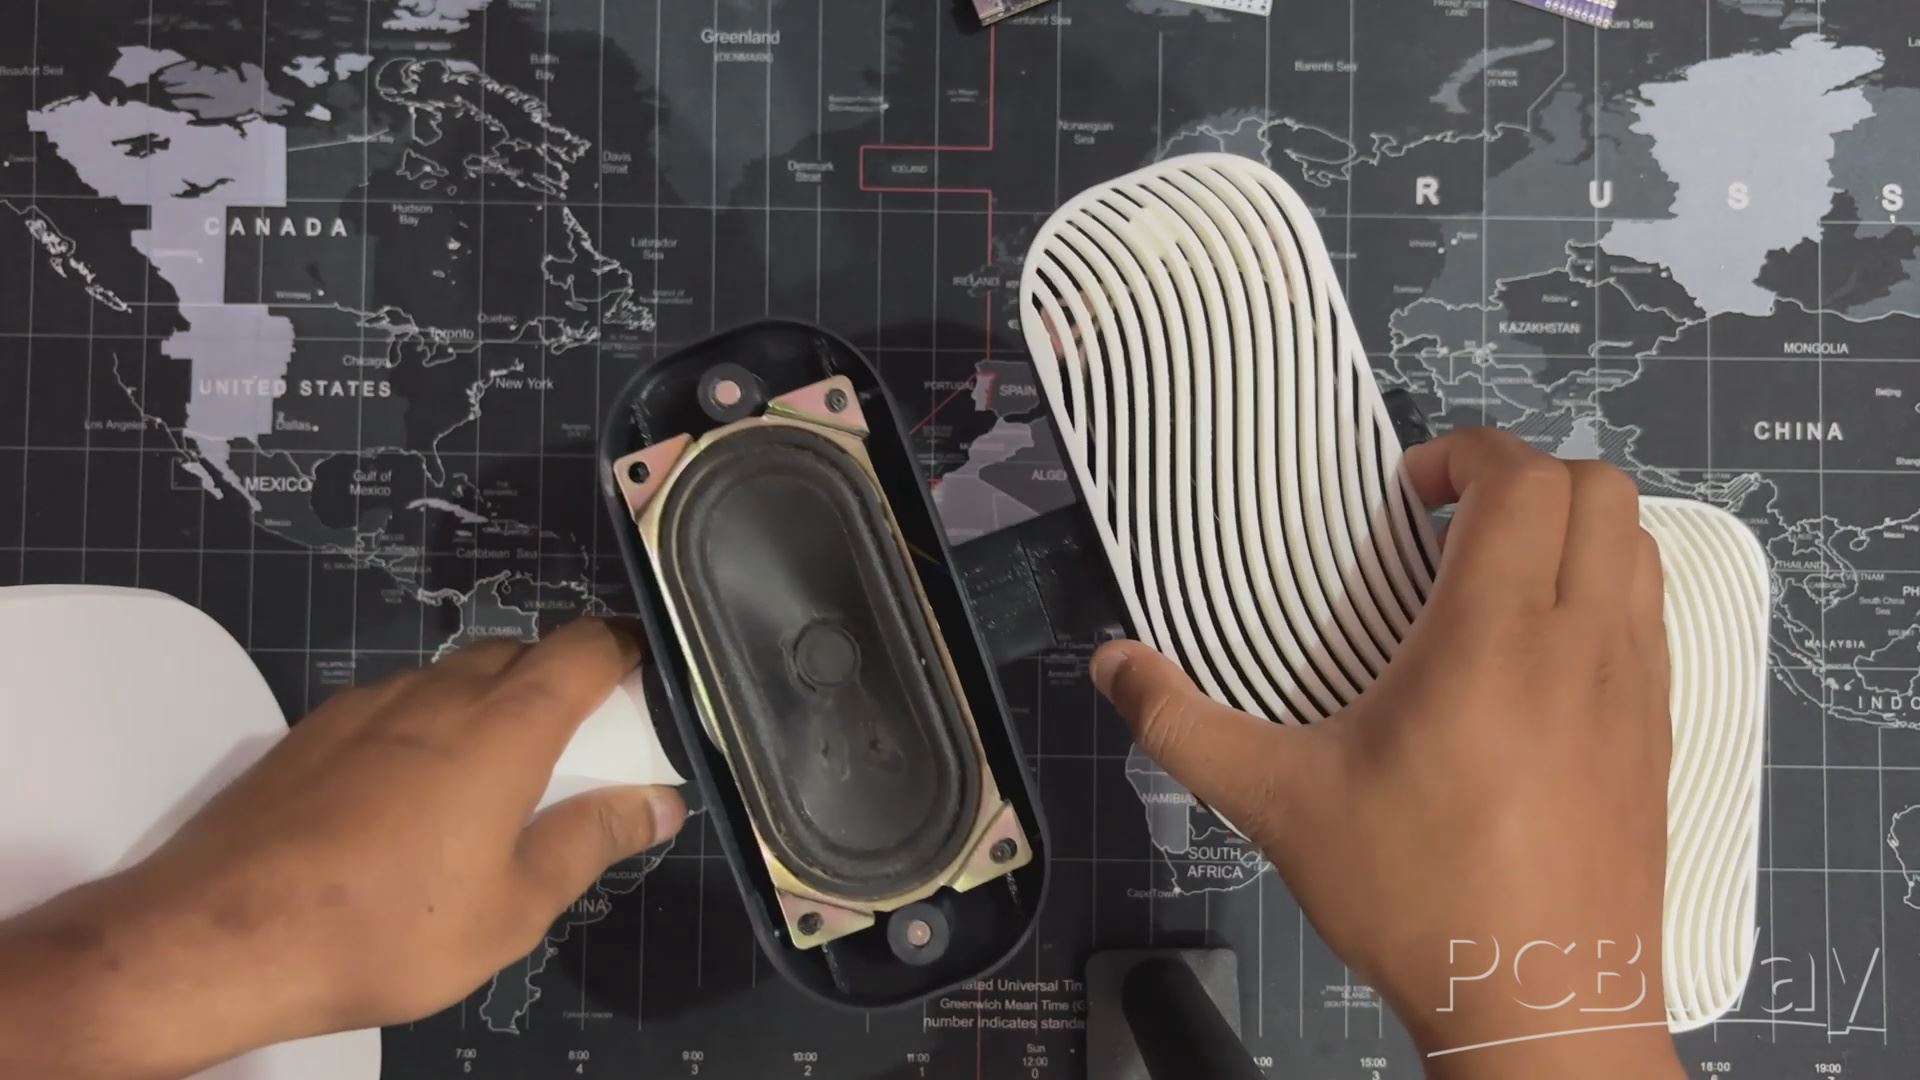
Each speaker is enclosed in a custom shell, split into two nearly identical halves—Speaker 1 and Speaker 2. Inside each half, we’ve added screw bosses for securing the drivers with M2 screws, along with a dedicated boss for embedding magnets. These magnets allow us to snap on the front mesh cleanly and securely.
To elevate the visual appeal, we designed the front mesh with a flowing, wave-like pattern. This detail gives the speaker a distinct character and helps it stand out from traditional designs.
MODULARITY
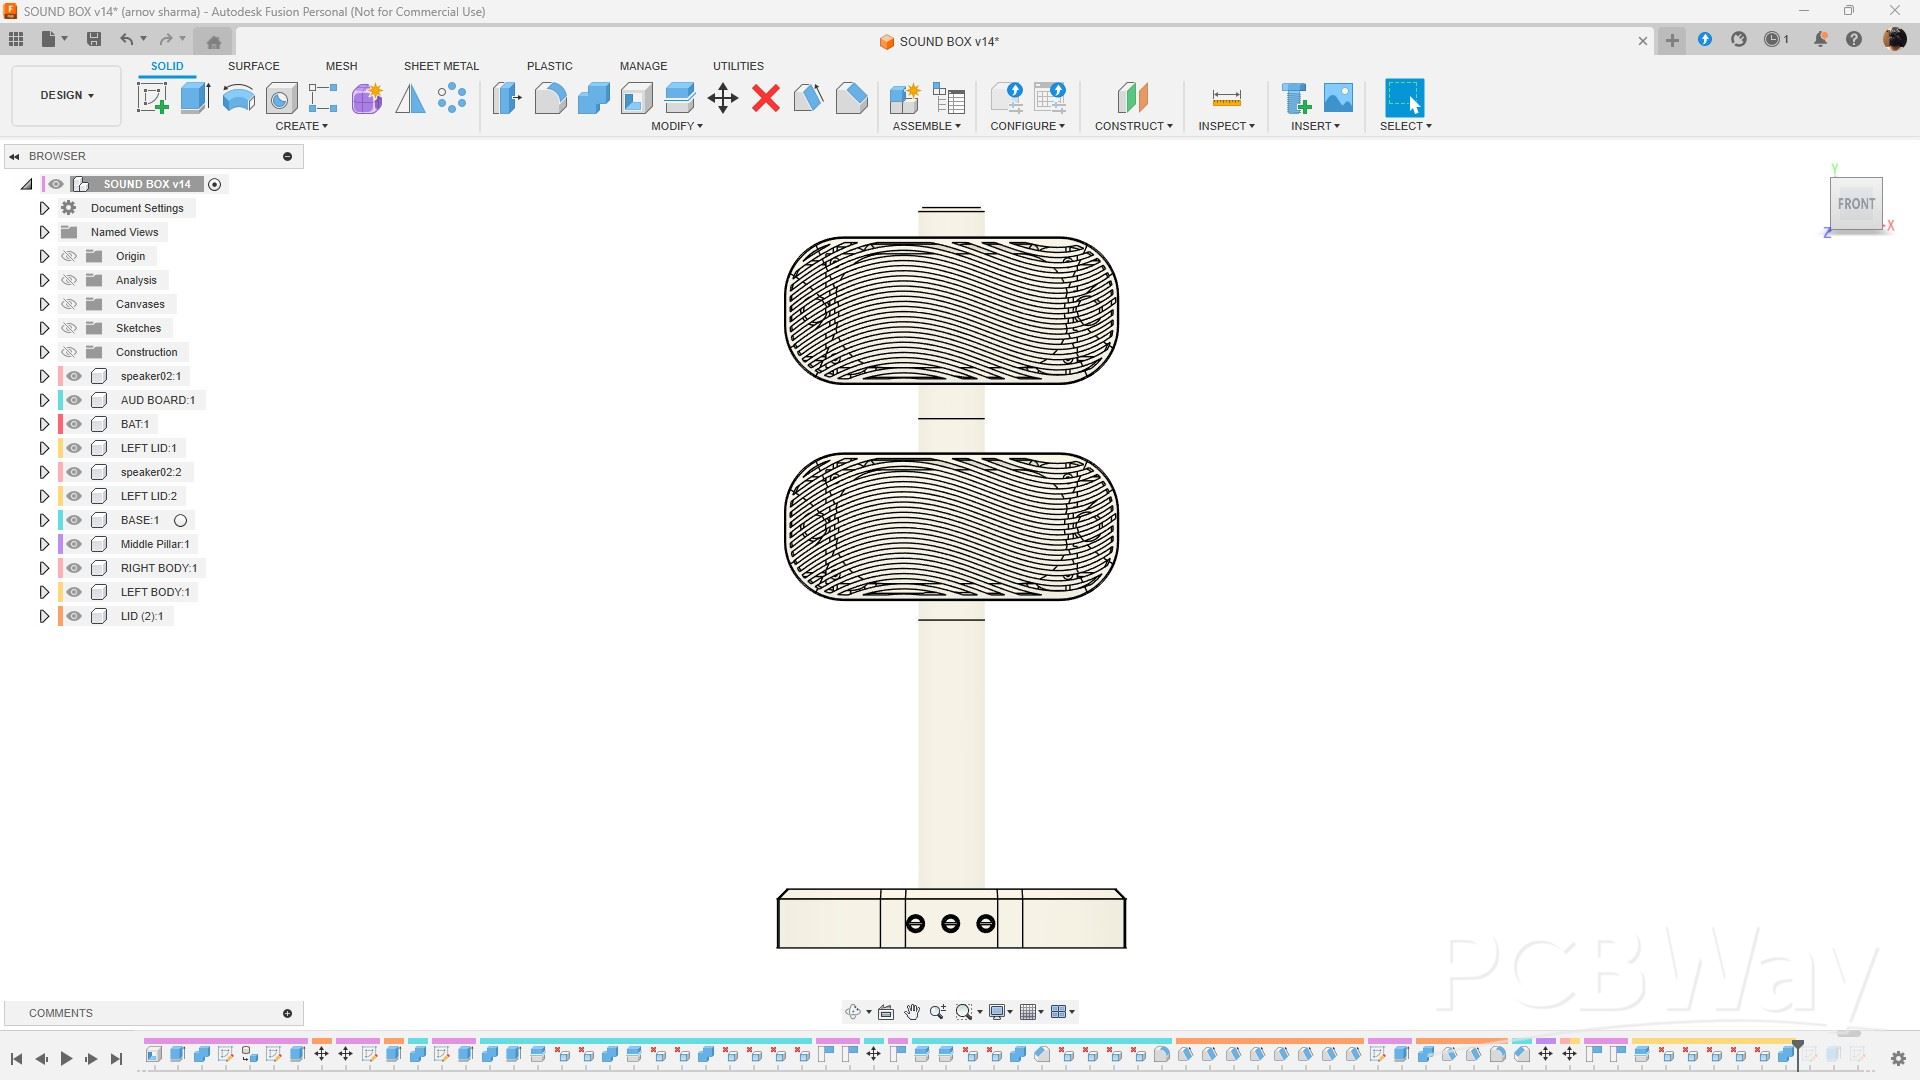
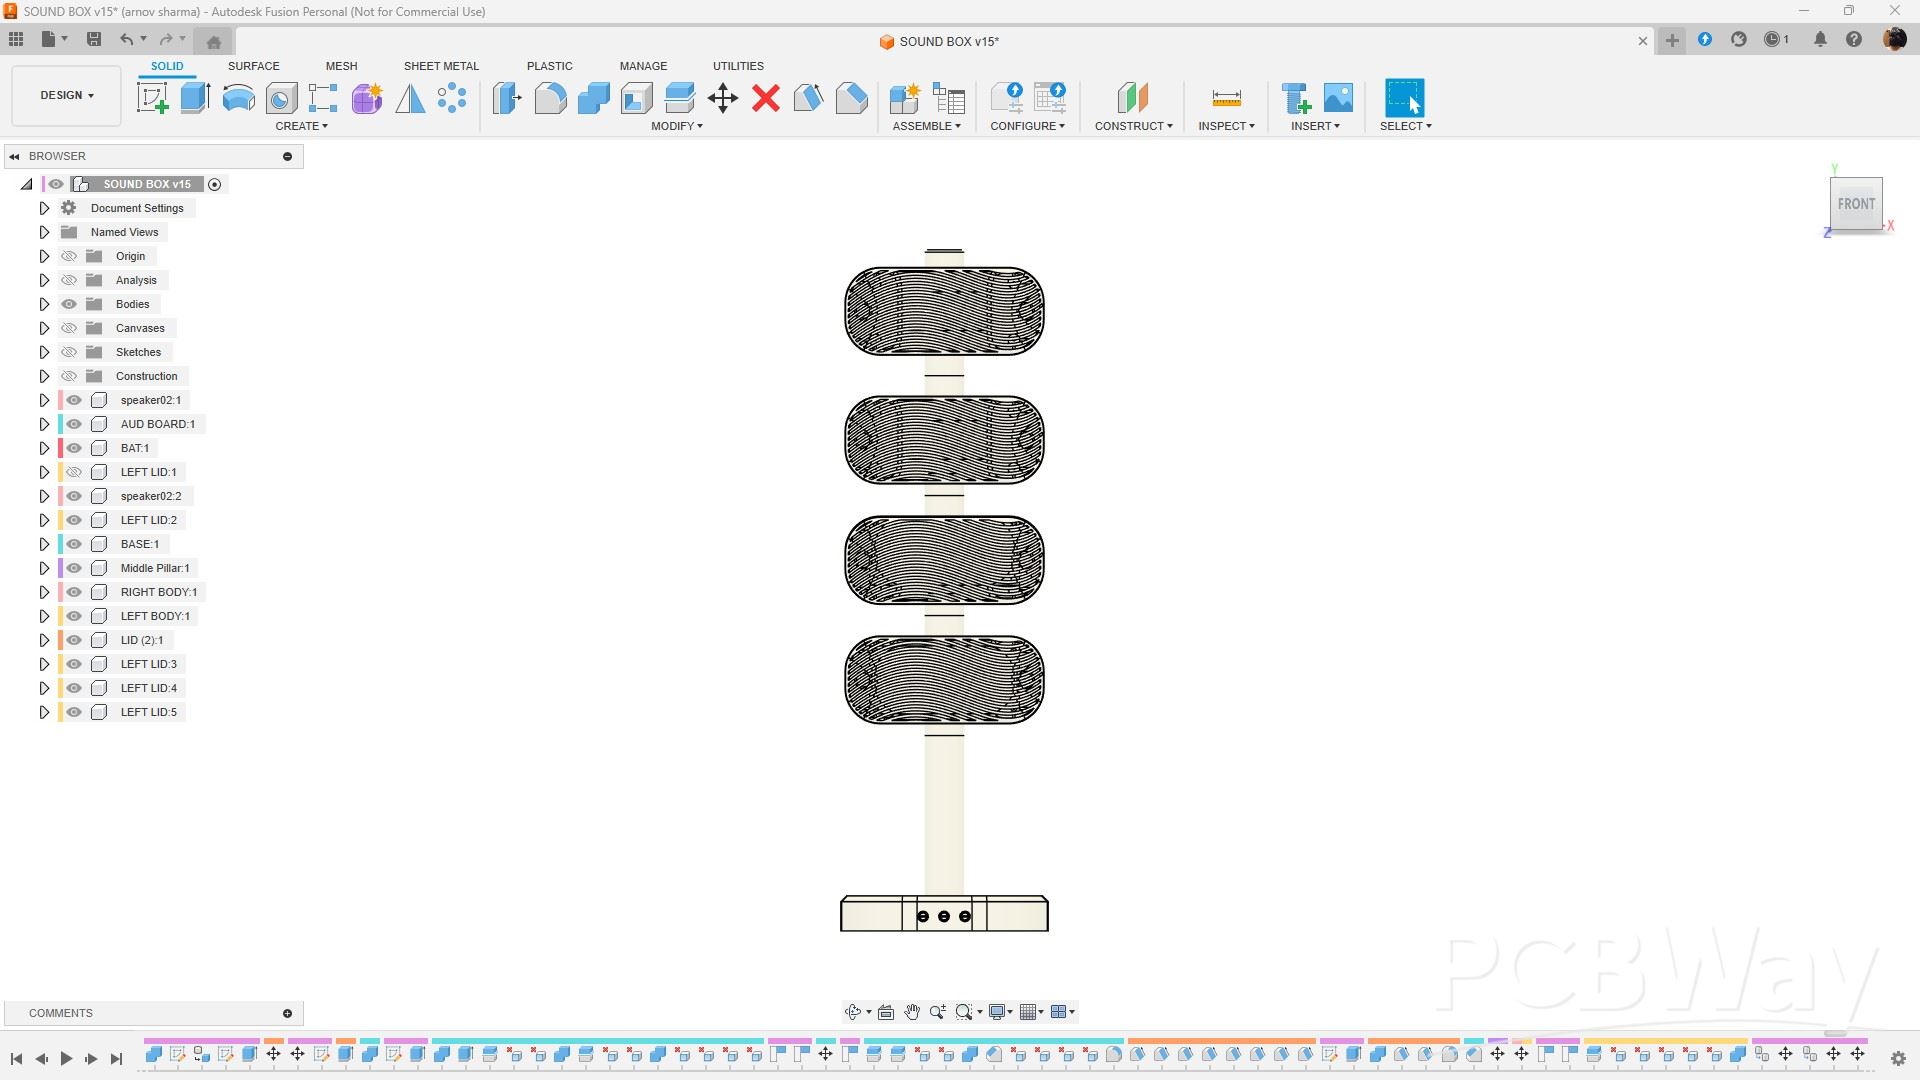
One of the standout features of our build is its modular speaker holder design, which allows us to easily double the number of speakers if needed. The setup includes two speaker holders connected by a pipe-like structure. Speaker 1 nests into Speaker 2 through this connecting pipe, and by repeating the Speaker 2 housing, we can scale the system from a 2-speaker setup to a 4-speaker array.
The beauty of this approach is that Speaker 1 remains unchanged, while Speaker 2’s enclosure can be duplicated as many times as needed to boost sound output. For our current version, we’ve kept it simple with a standard 2-speaker configuration—but the design is ready to expand whenever we want more punch.
3D Printed Parts
We used our Ender K1 Max to 3D print all the parts, running a 0.4mm nozzle with a 0.16mm layer height for fine detail. The base with its lid, the central pipe, and the front grills were printed in White Hyper PLA at 25% infill. Both Speaker 1 and Speaker 2 bodies were printed in Black Hyper PLA, also with 25% infill to maintain consistency.
Since the design includes overhangs and complex geometry, supports were necessary. I went with tree supports across all parts—they offered good stability while keeping cleanup manageable.
MAGNETIC FRONT GRILL ASSEMBLY
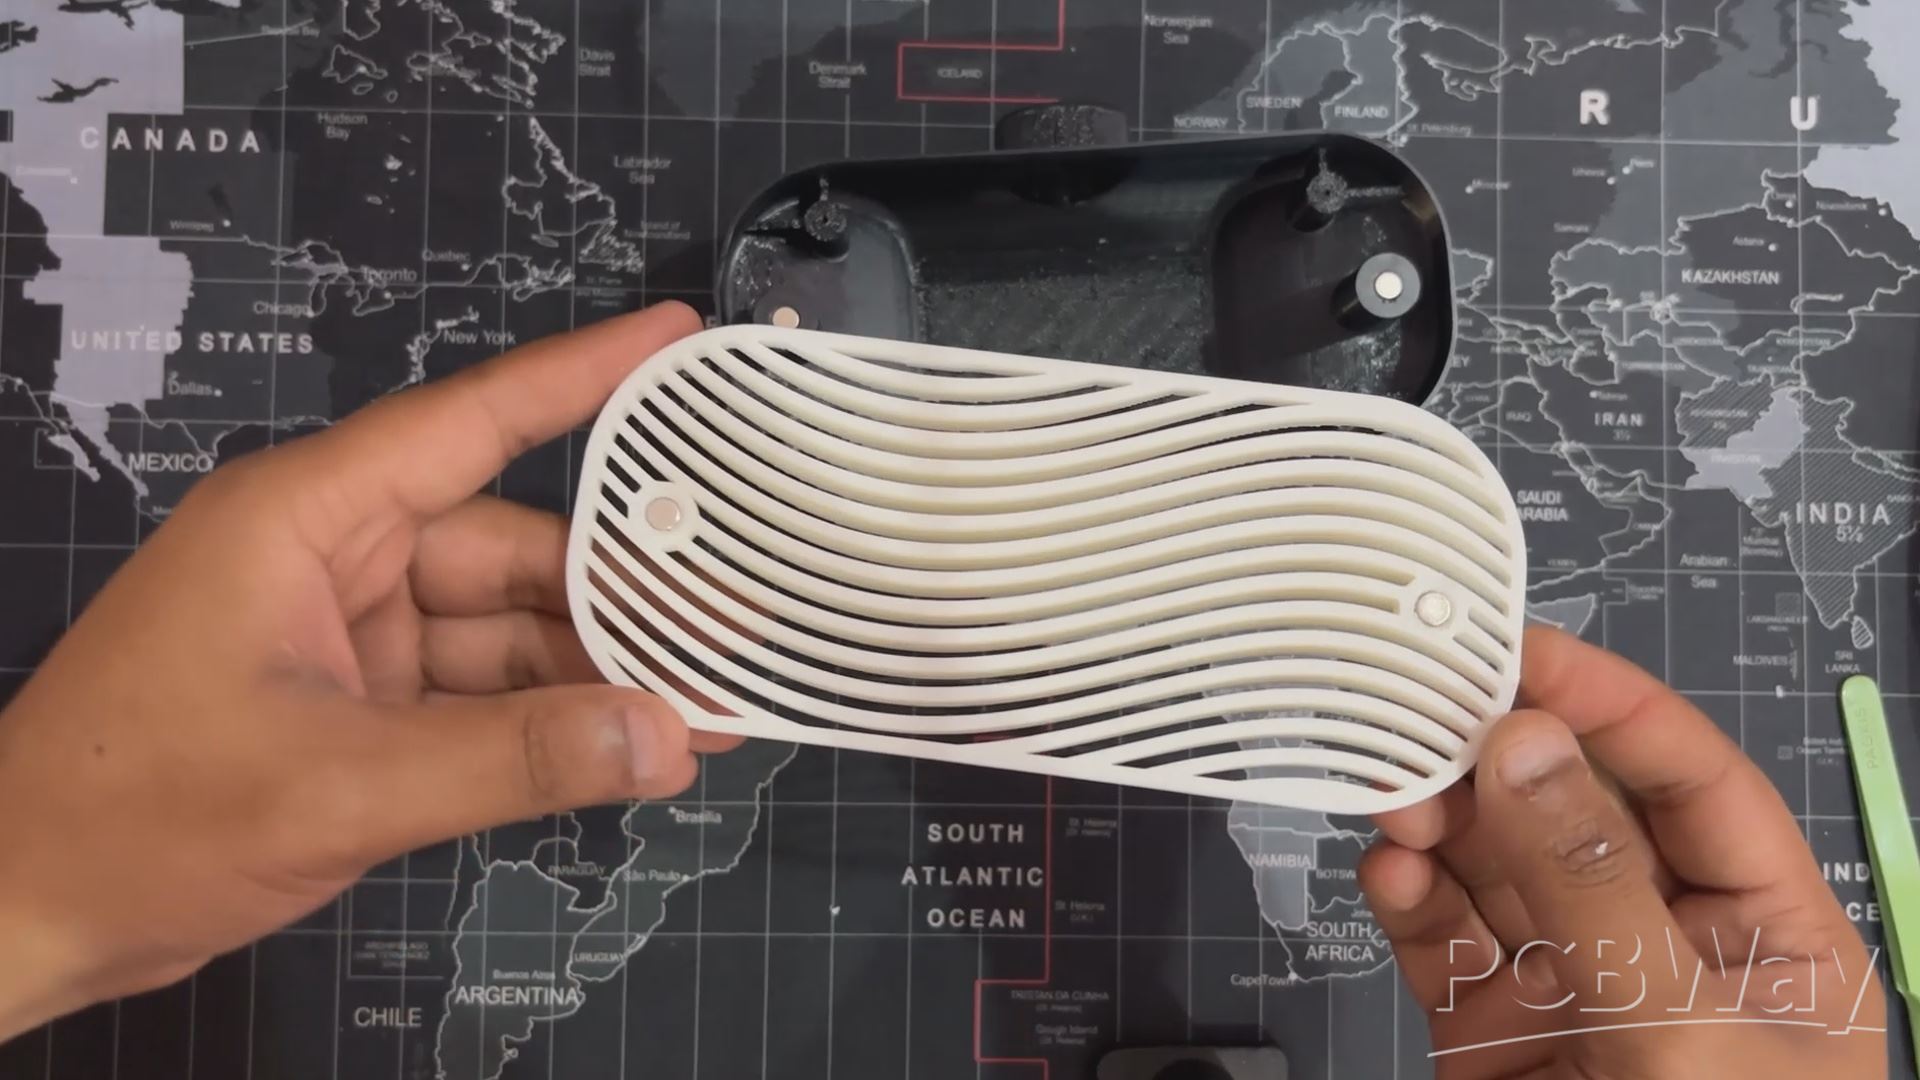
- We kicked off the build by installing magnets into the designated bosses on both Speaker 1 and Speaker 2 bodies. Each magnet was oriented with the North pole facing inward, so it sits flush inside the enclosure.
- Next, we added magnets to the front grill, this time with the South pole facing into the grill bosses. This polarity setup ensures that the grill snaps neatly onto the speaker body and stays securely in place, held by magnetic force.
- At last we push the Speaker Body 1 into Speaker body 2 and this concludes our first part of assembly.
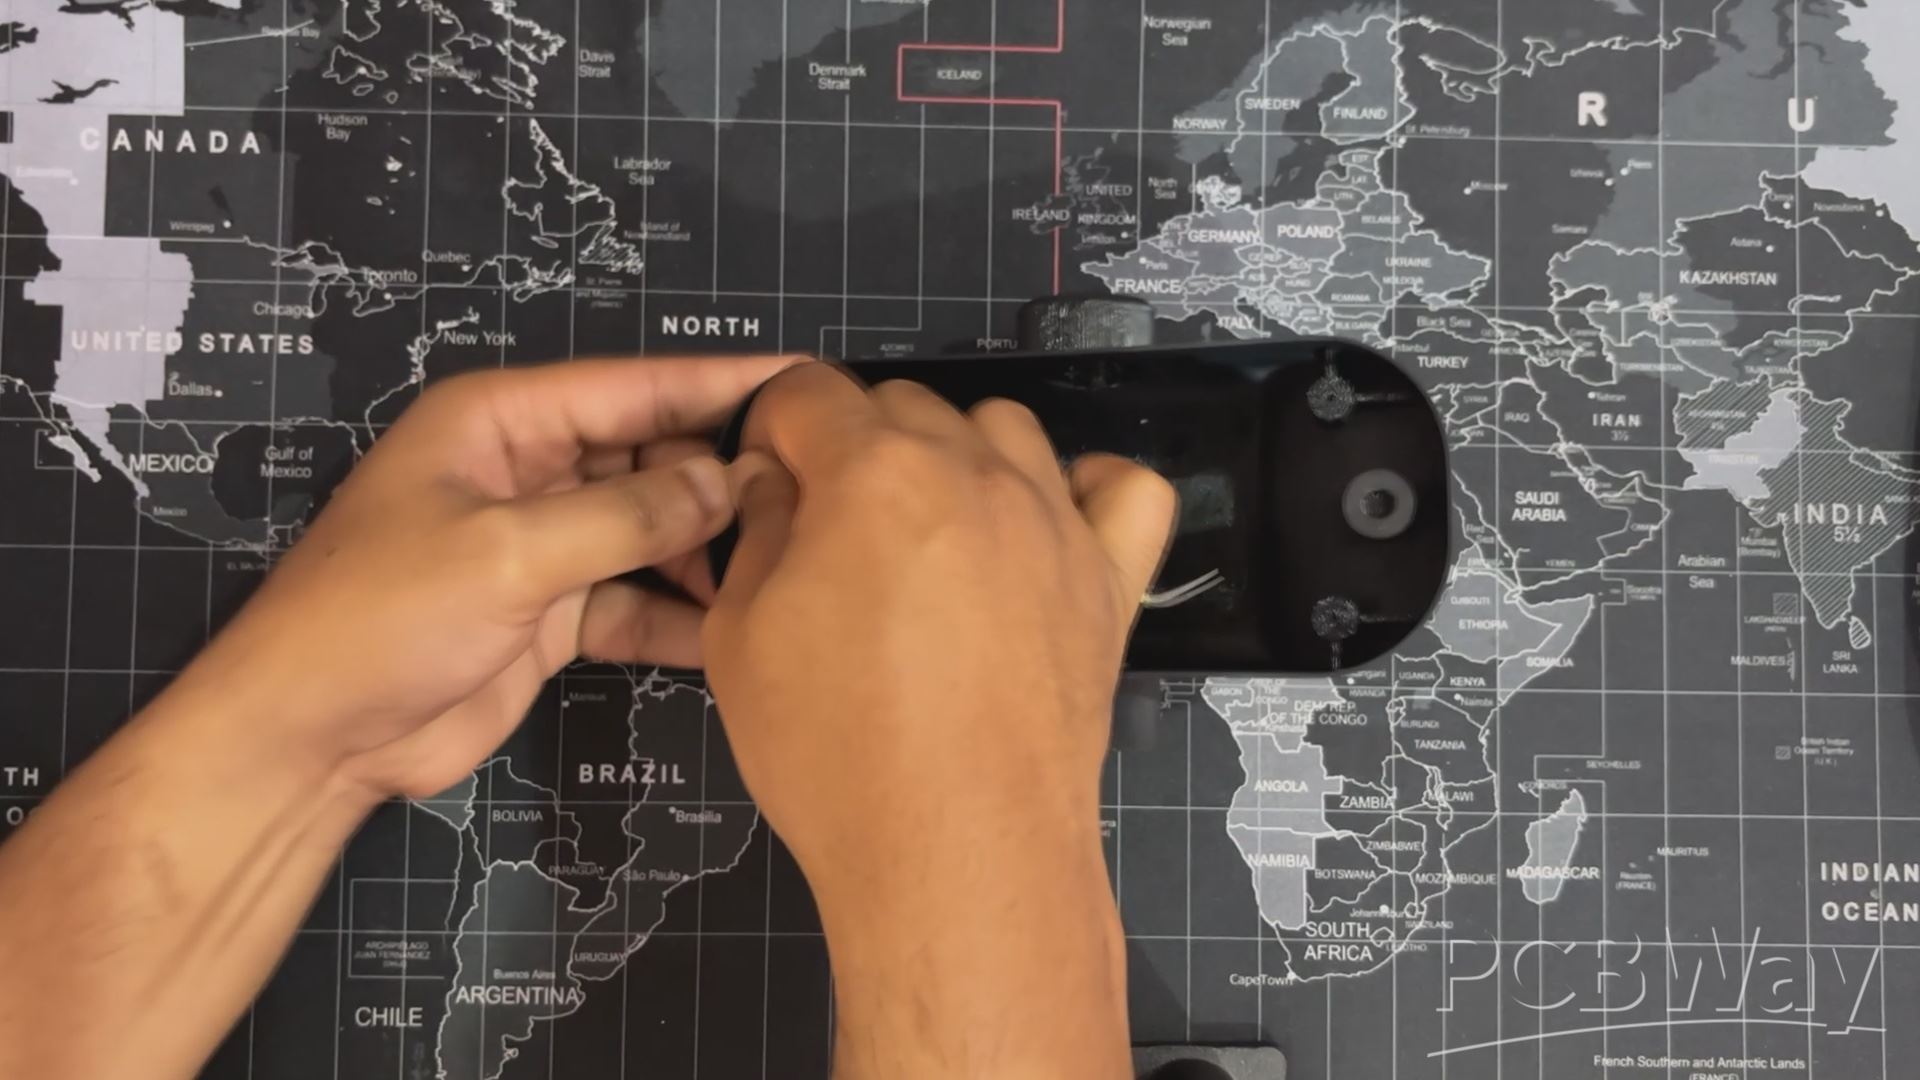
BASE - DC JACK ASSEMBLY
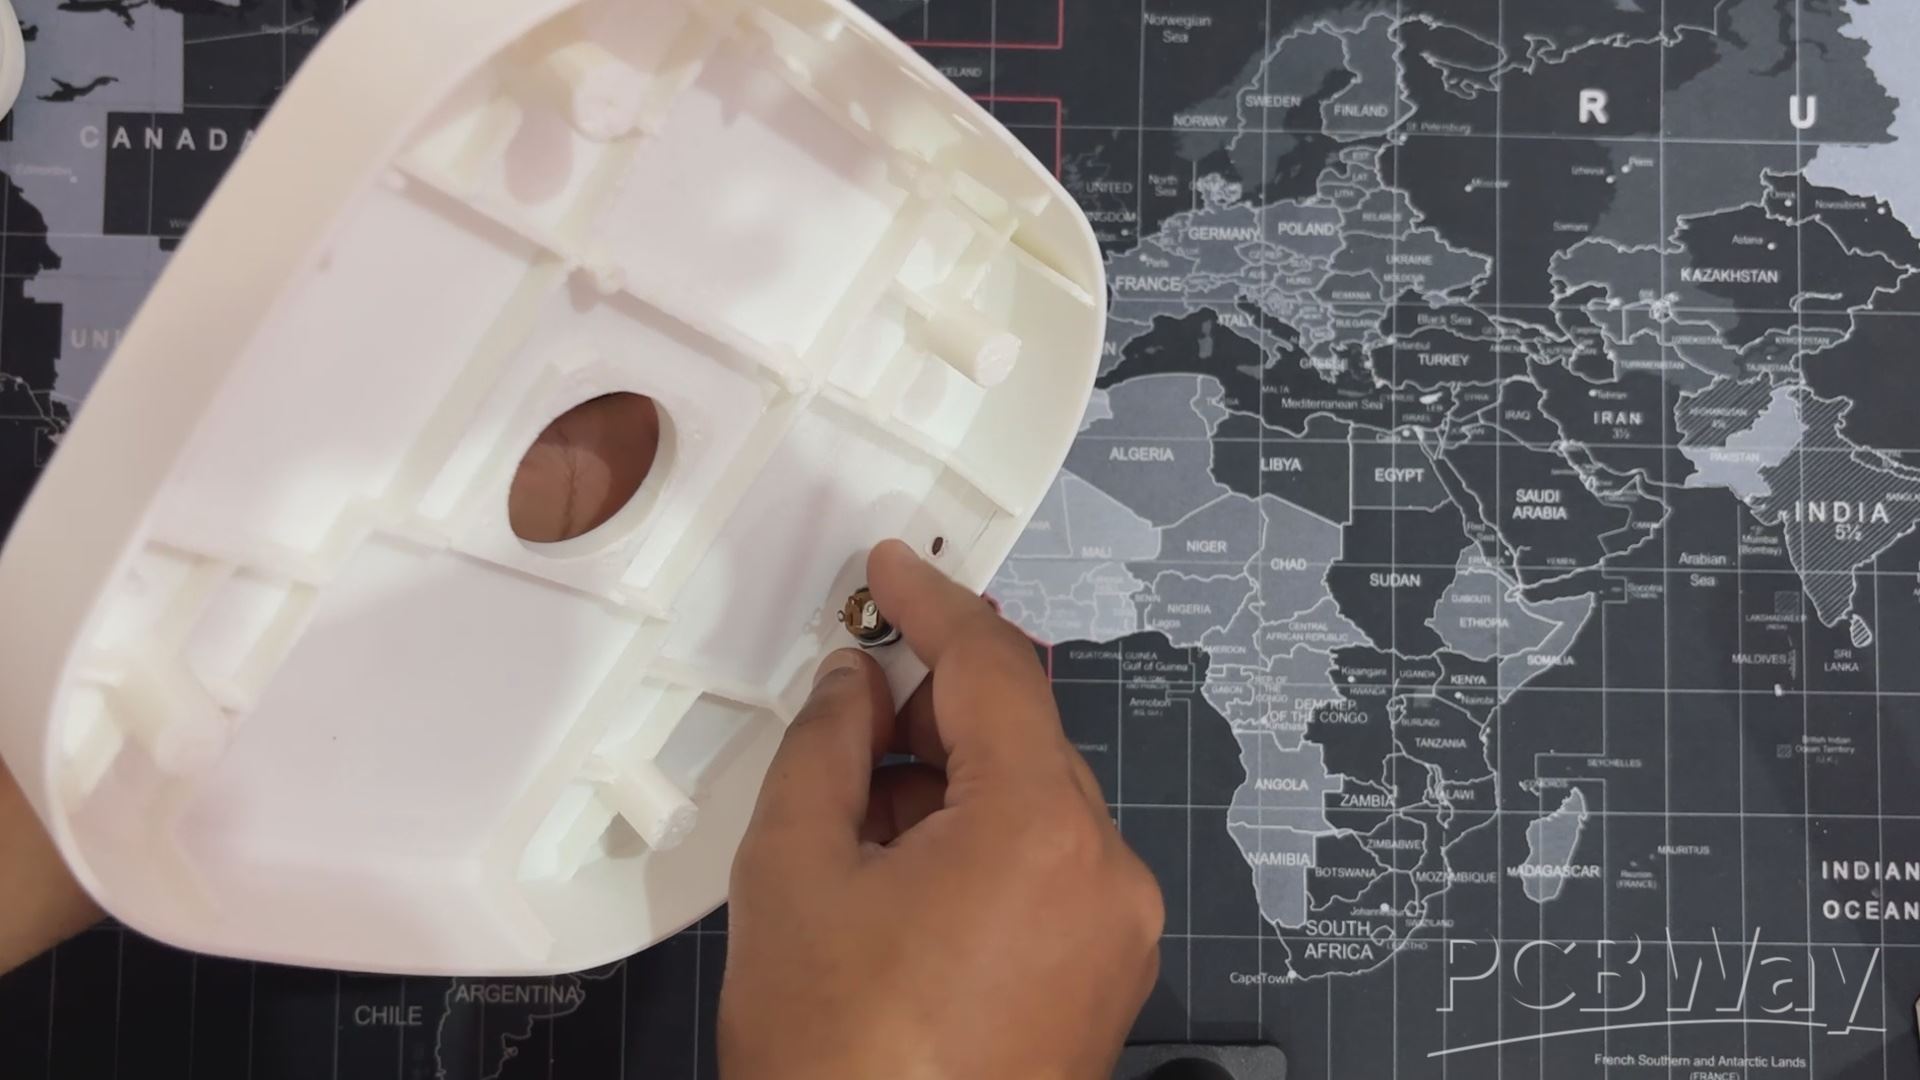
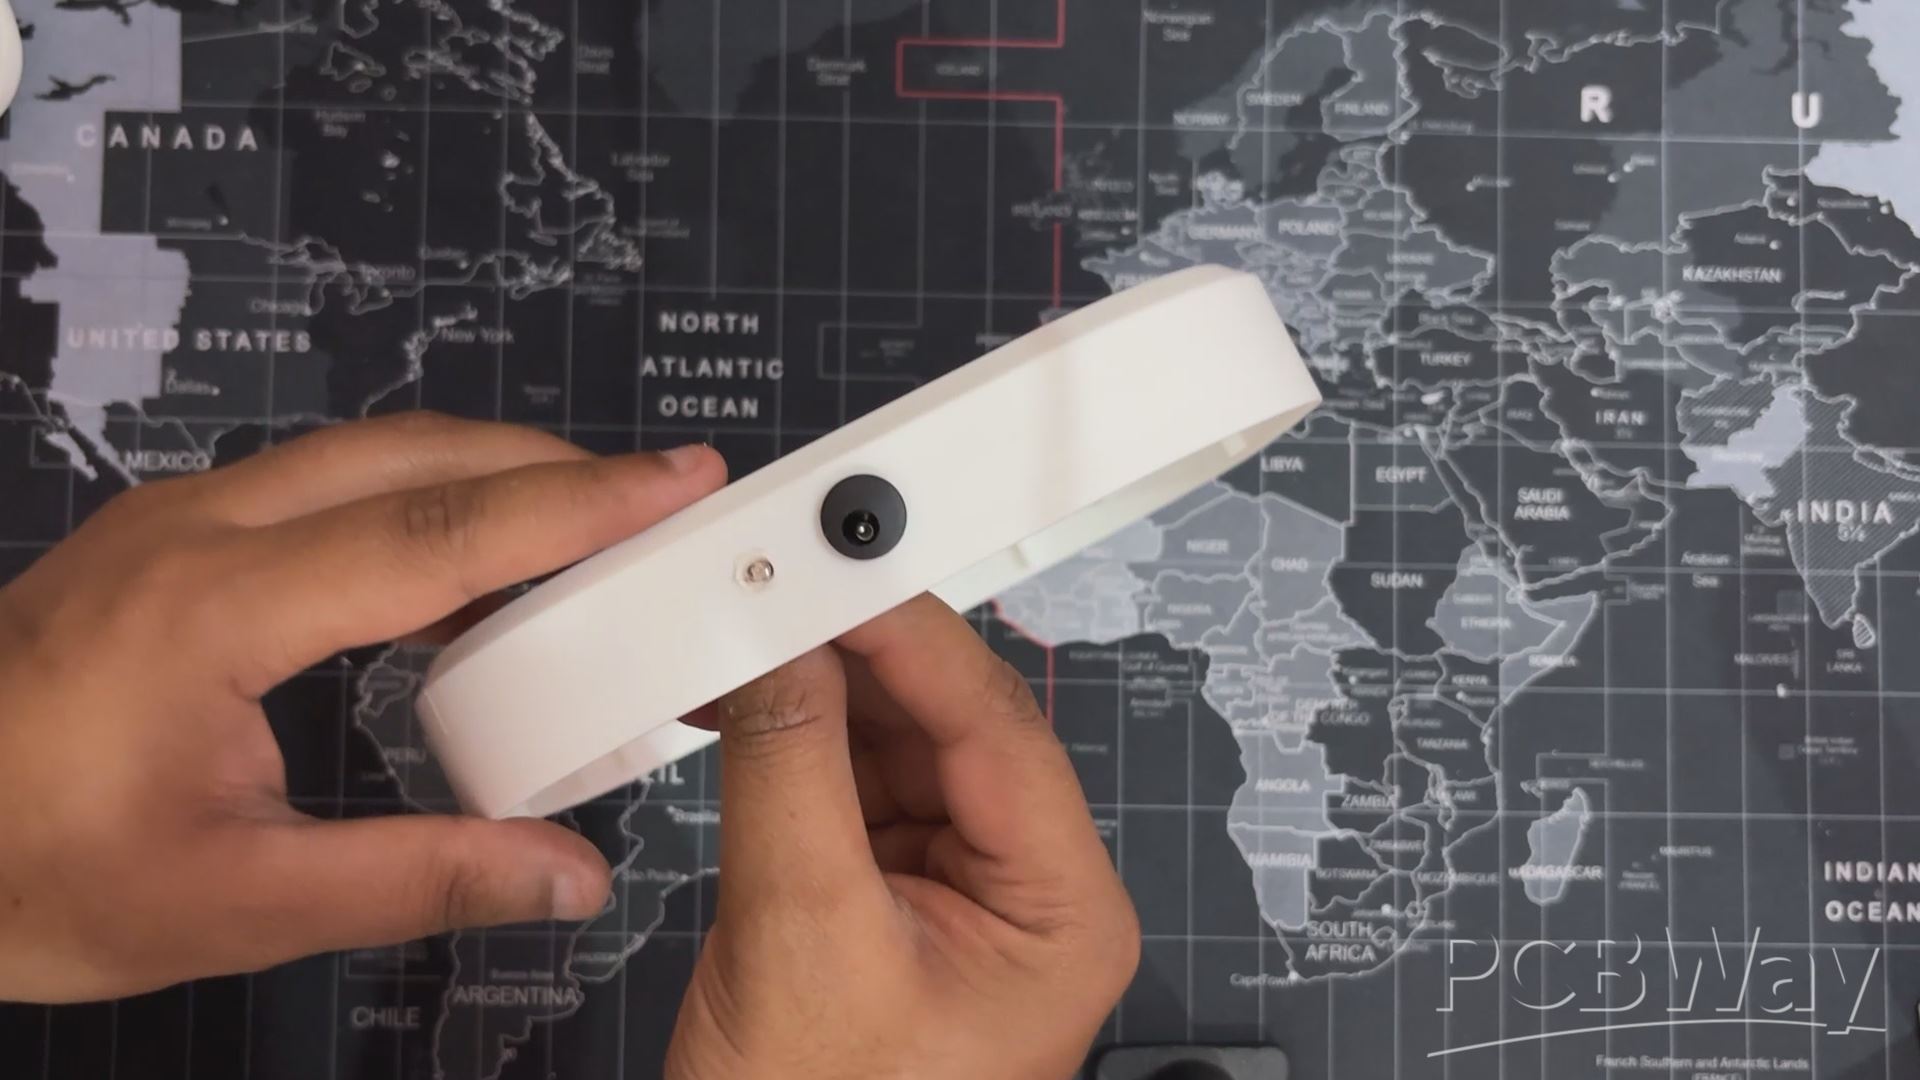
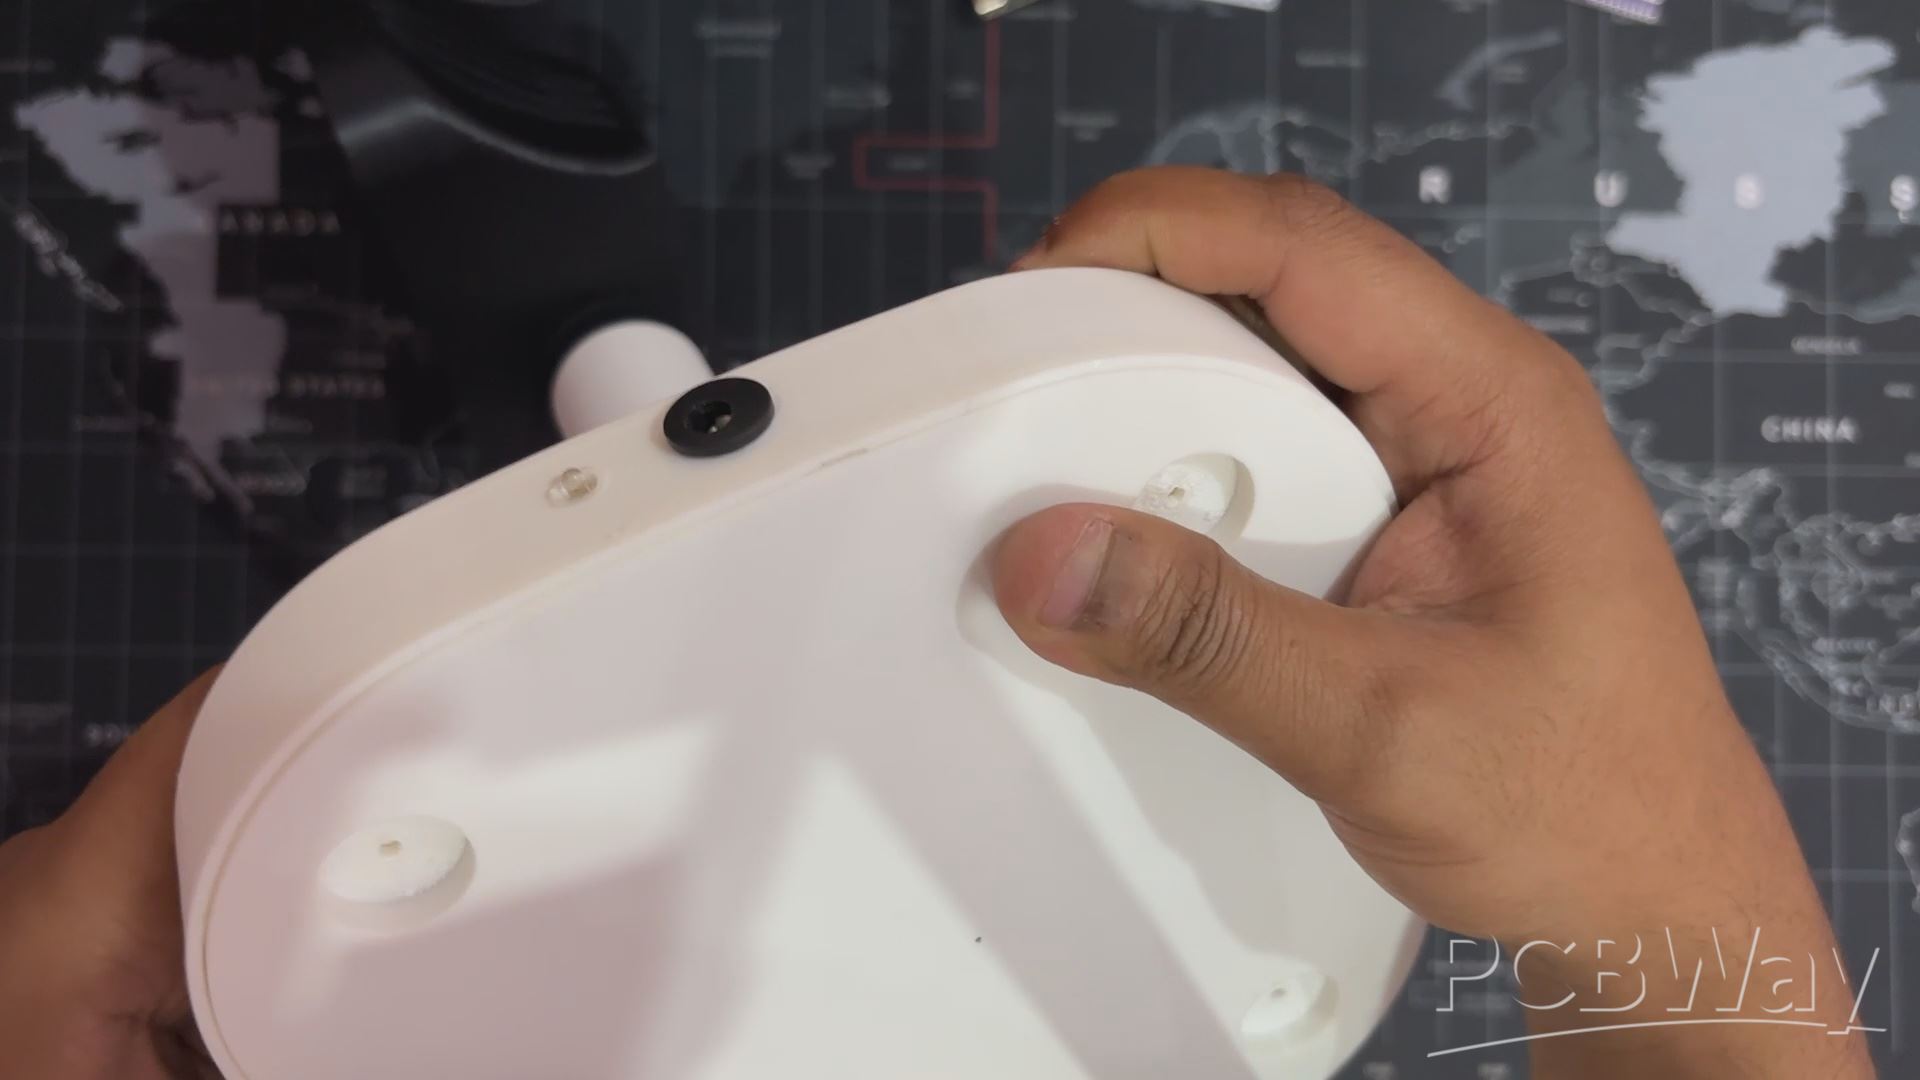
- We begin the assembly process by first adding the Barrel DC Jack in its place, then using the nut provided with the DC jack to tighten it in place.
- next, we added the 3mm LED in its place right beside the dc jack.
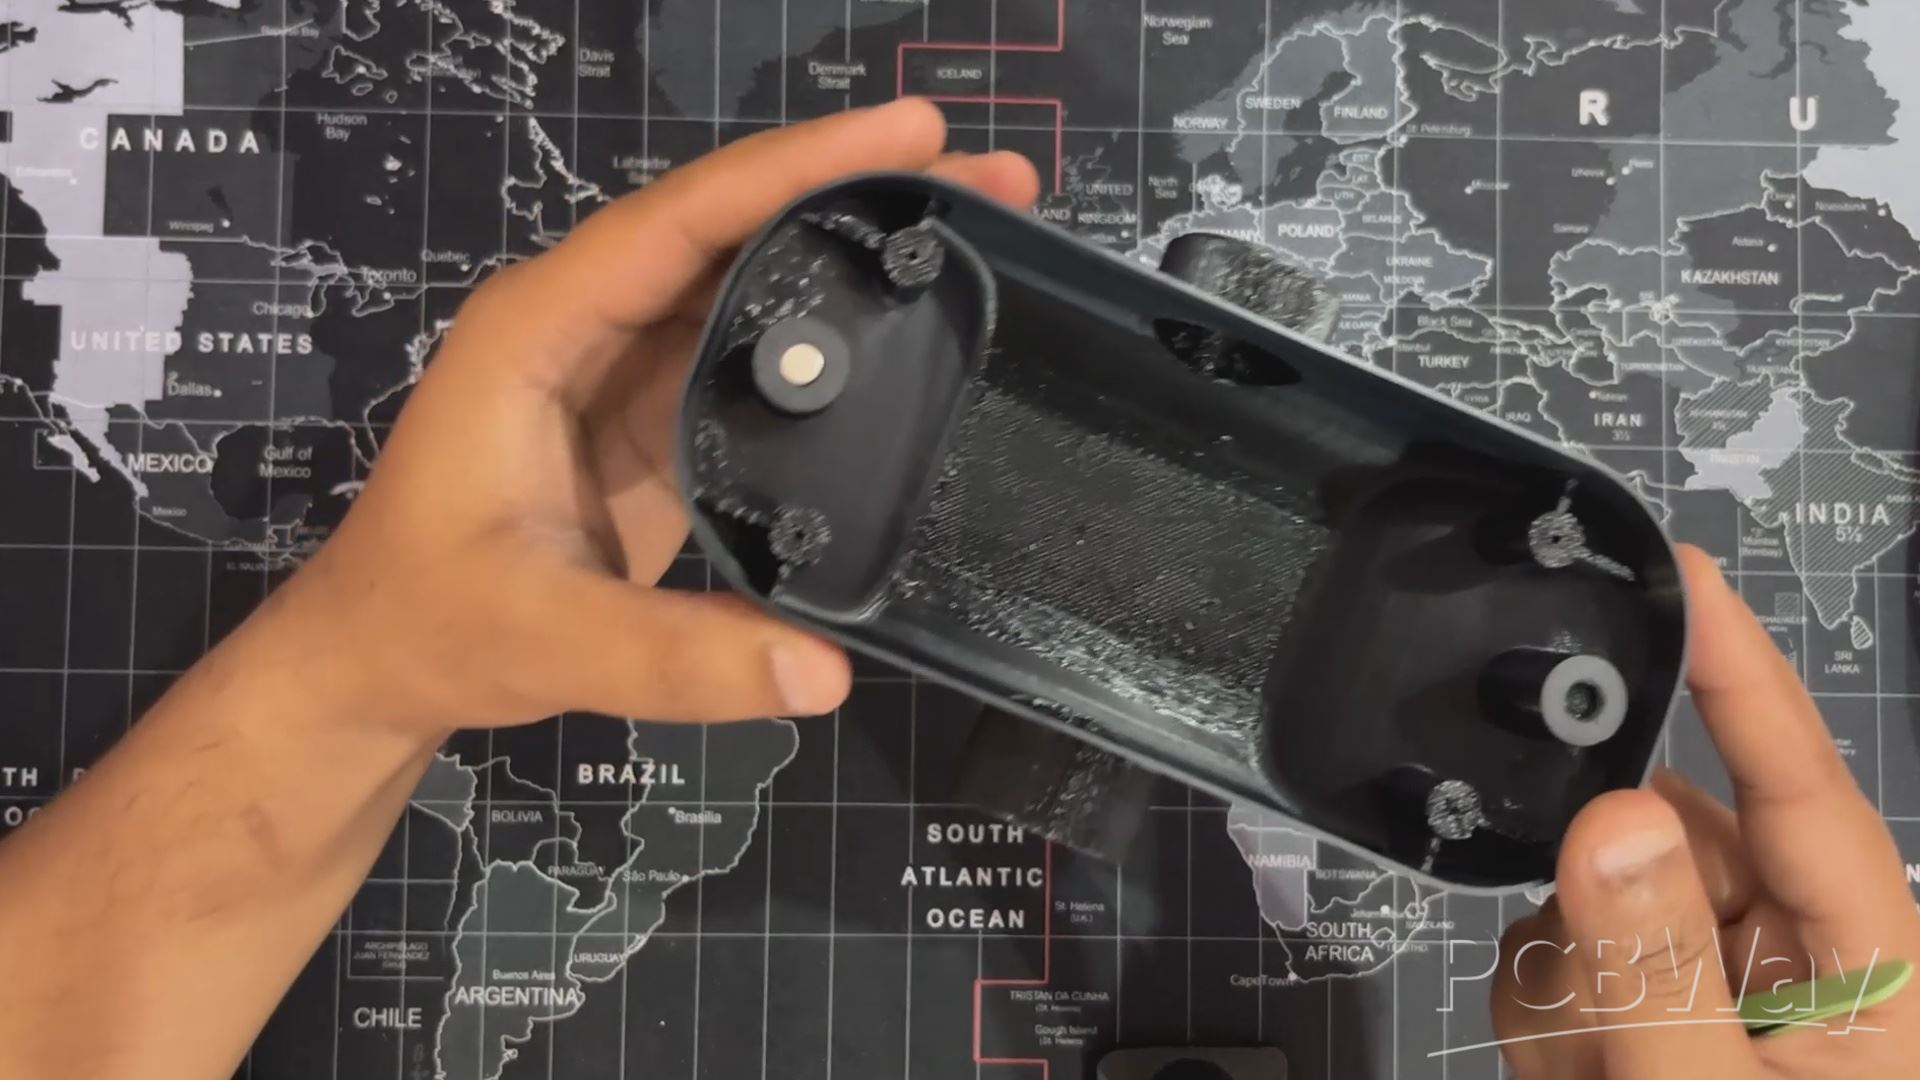
BASE ASSEMBLY
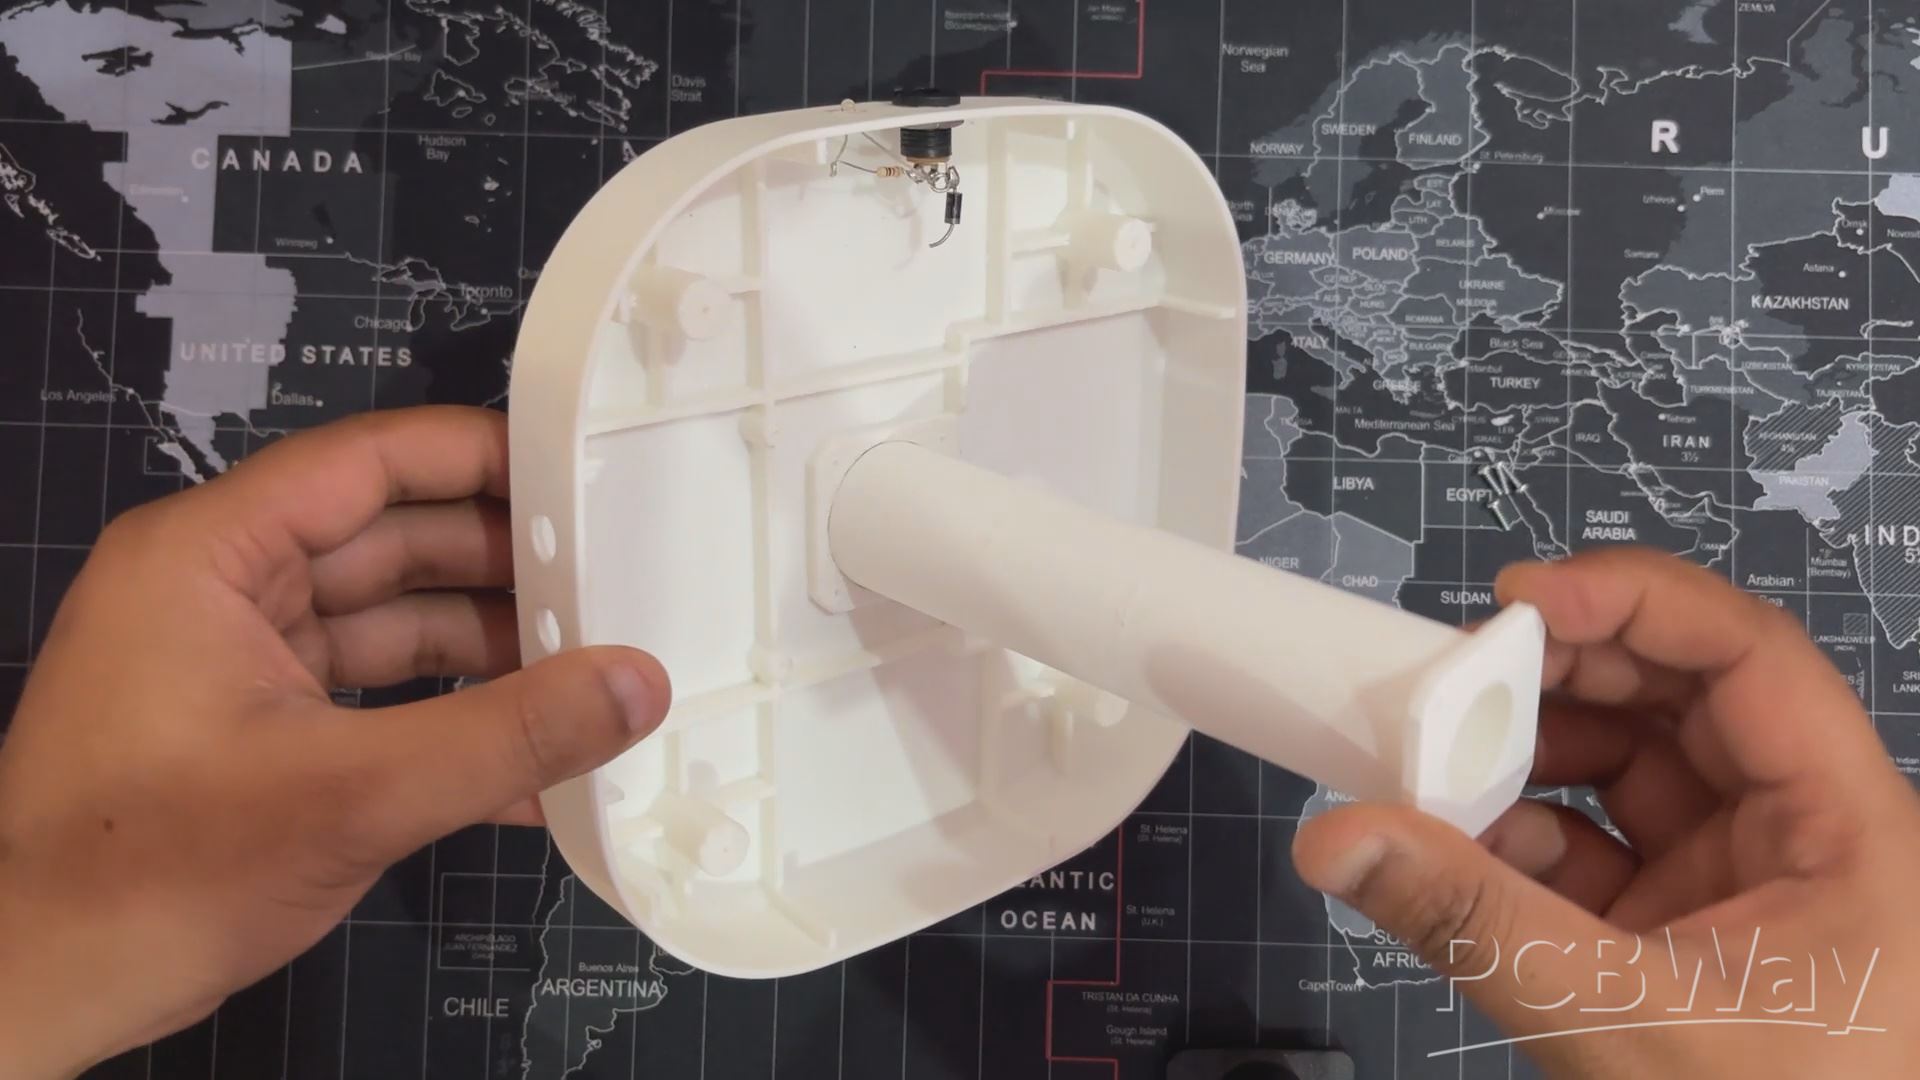
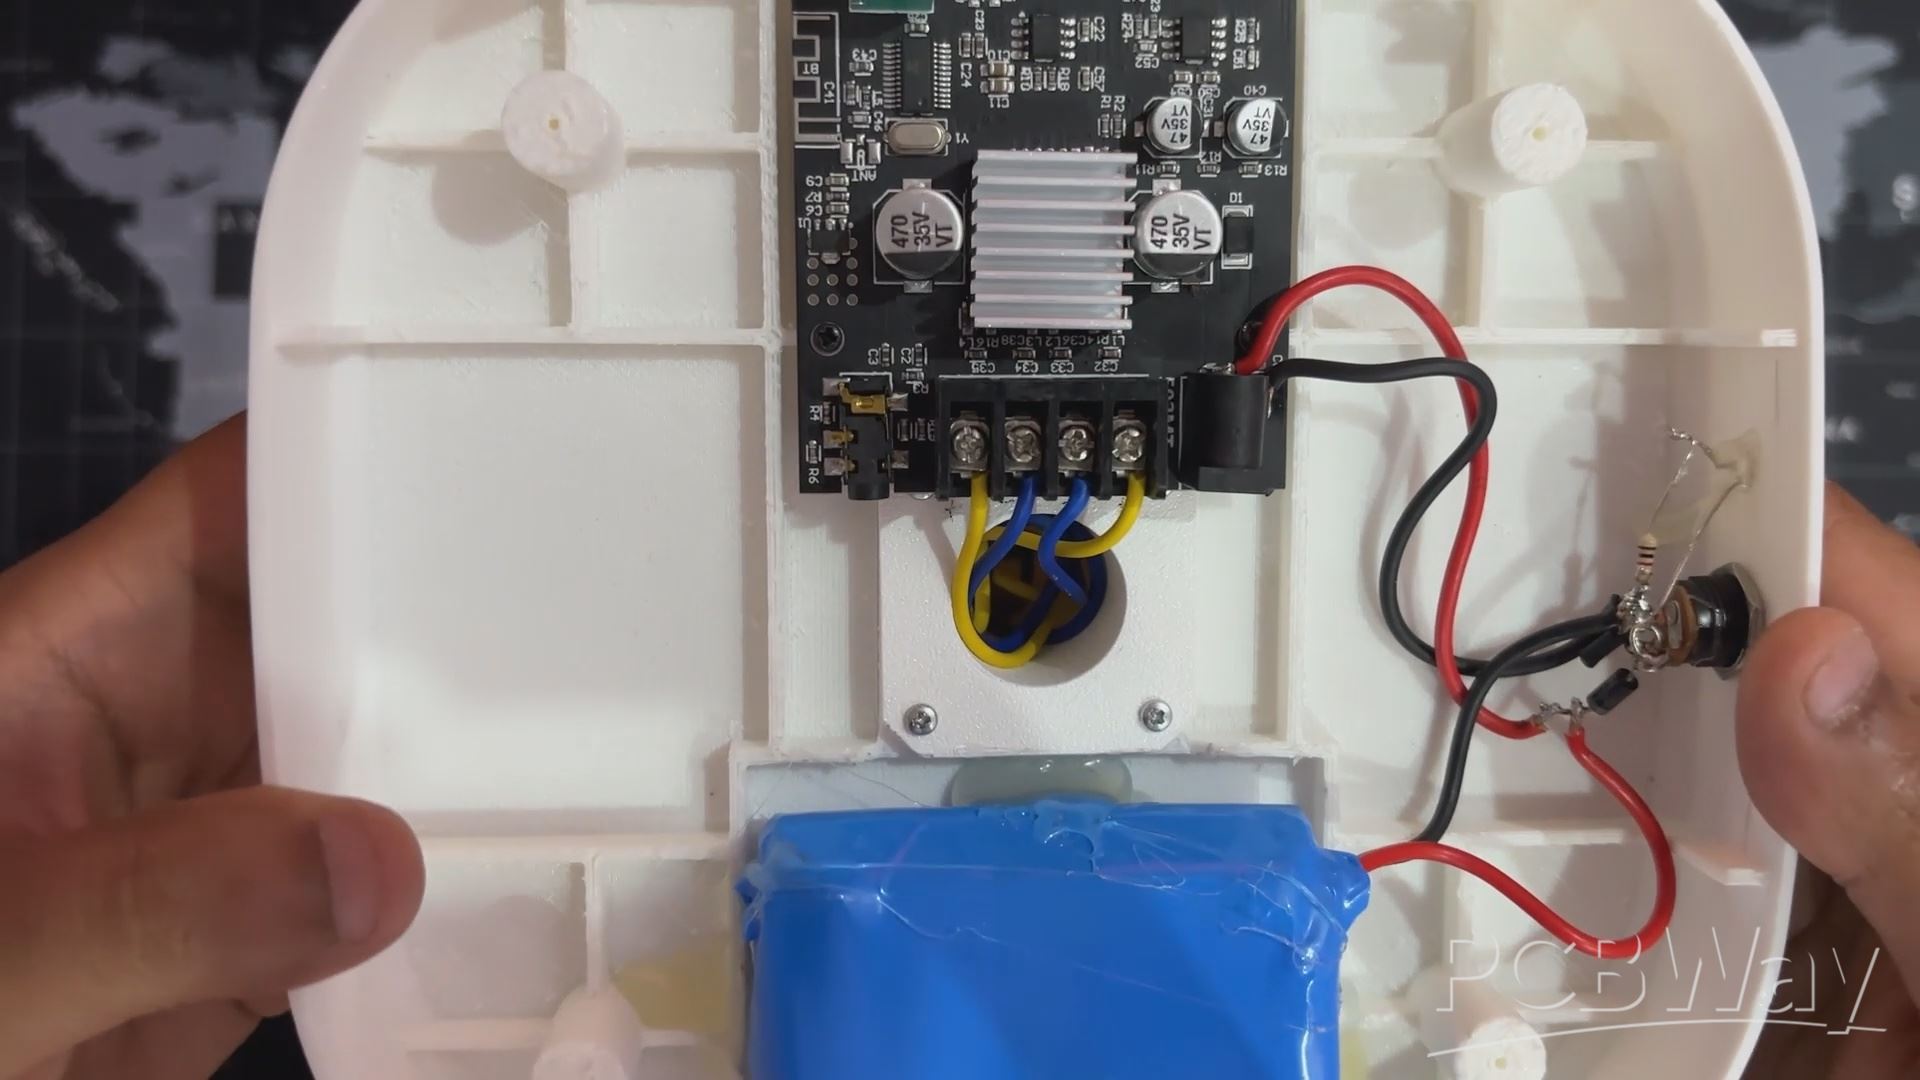
- The Pipe like part is now push-fitted in its position from the inside of Base Body, then tightened in place using four M2 screws.
- Audio board is then placed over its mounting position. and then tighten in place using four M2 screws.
POWER SOURCE ASSEMBLY
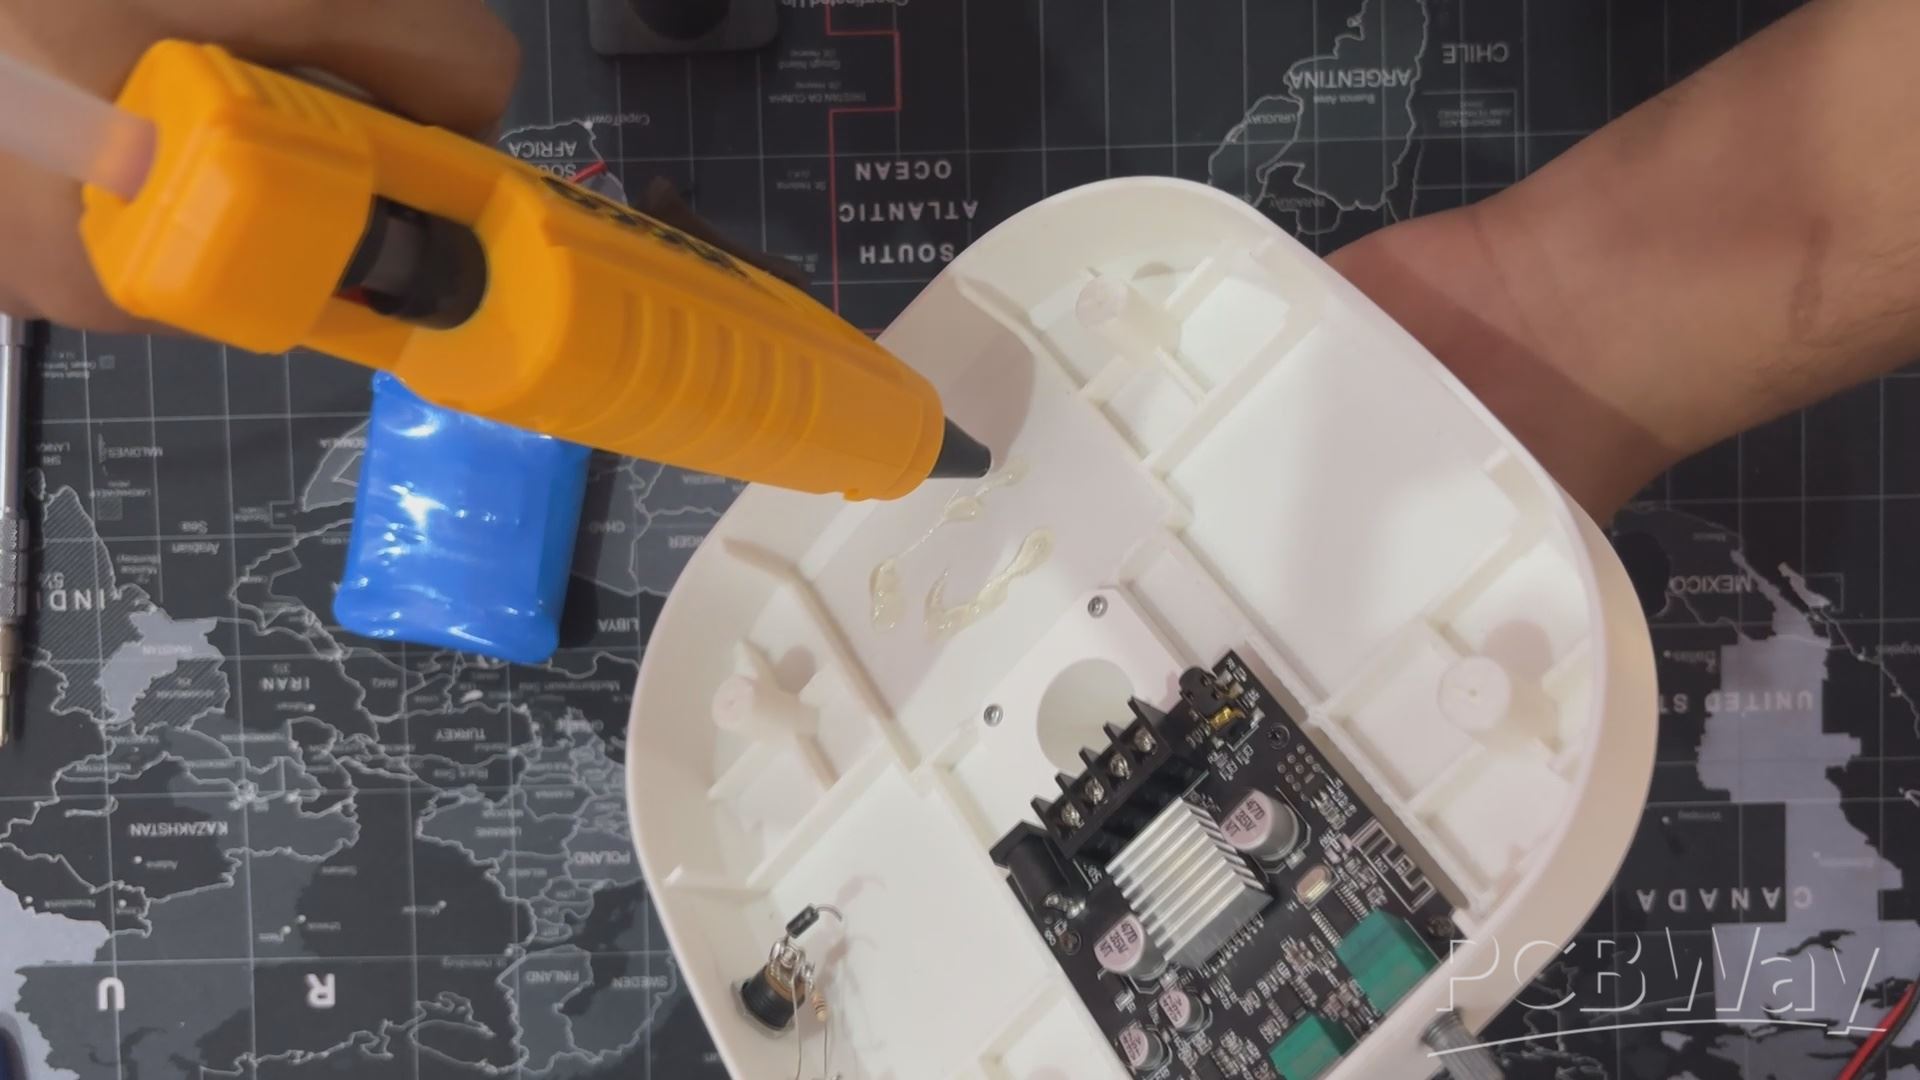
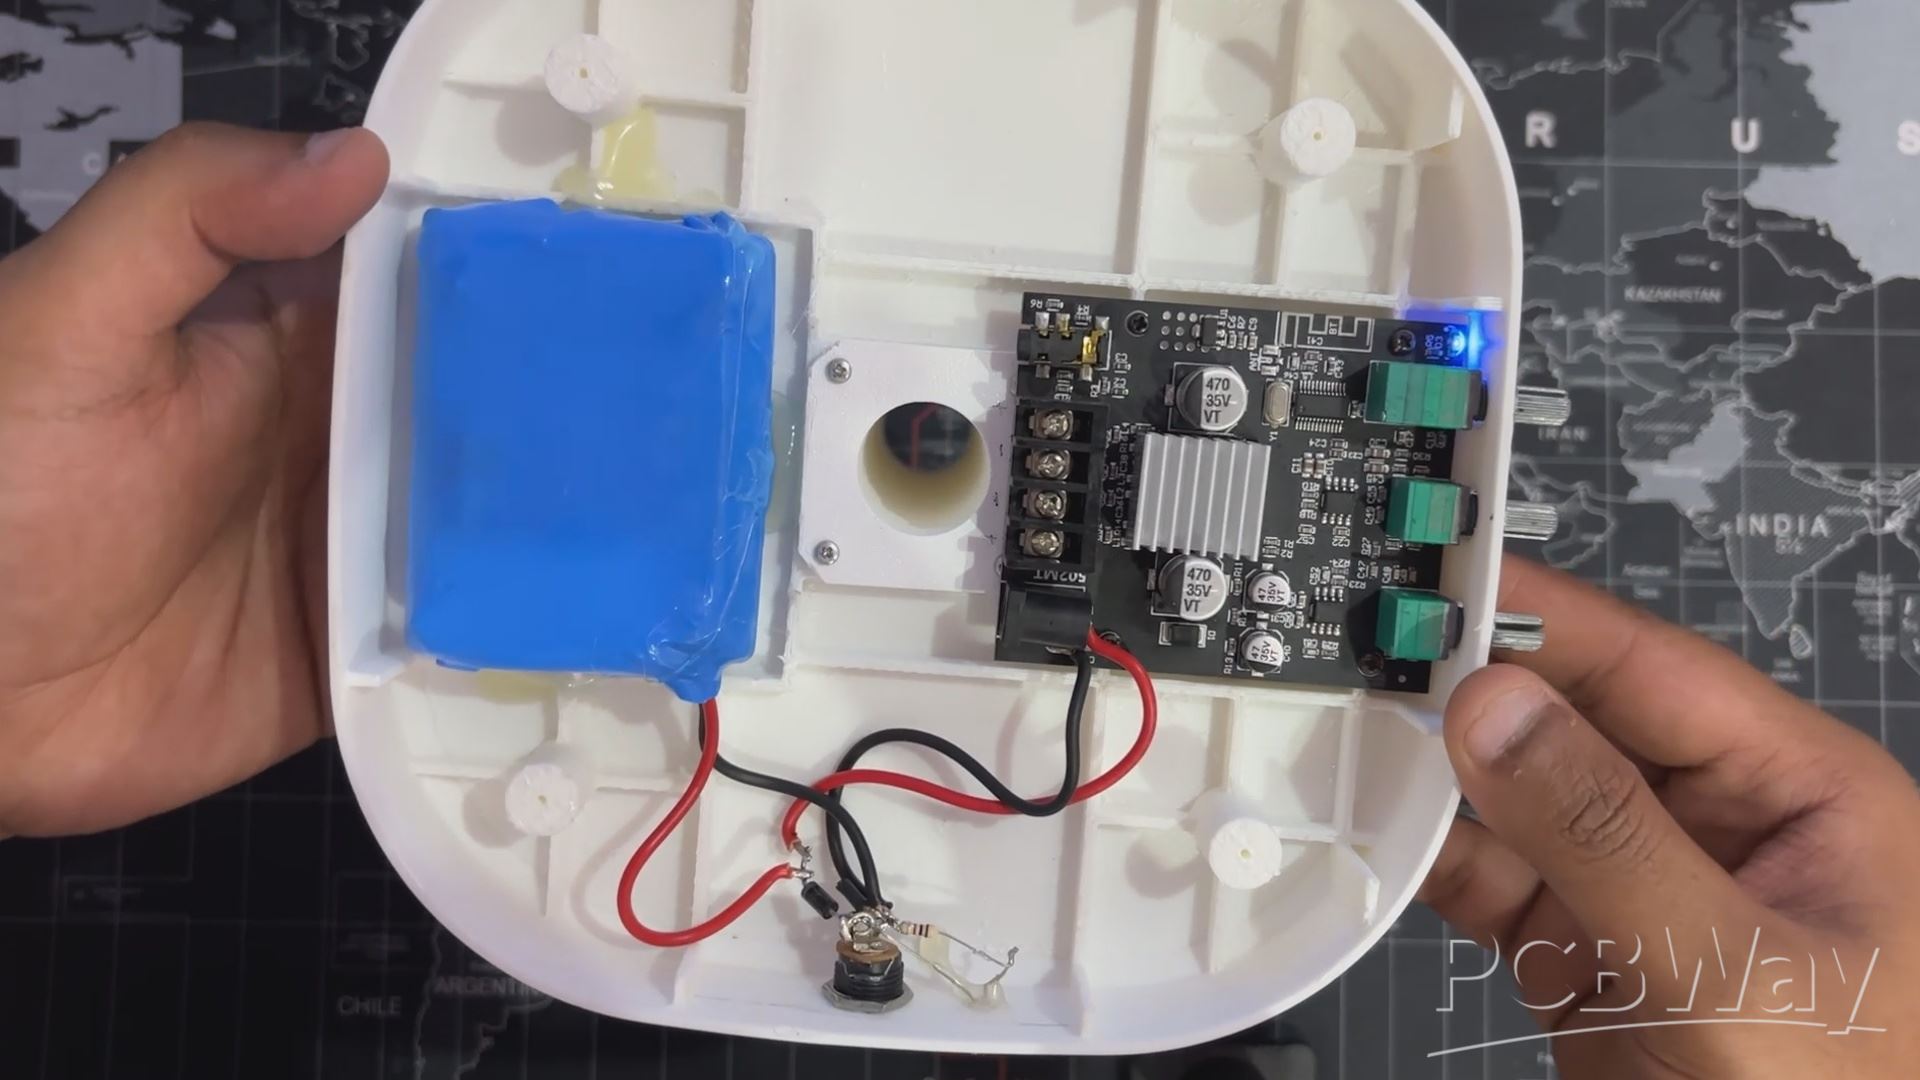
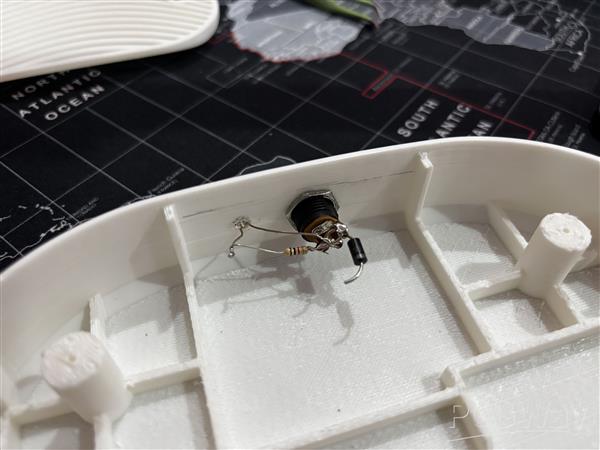
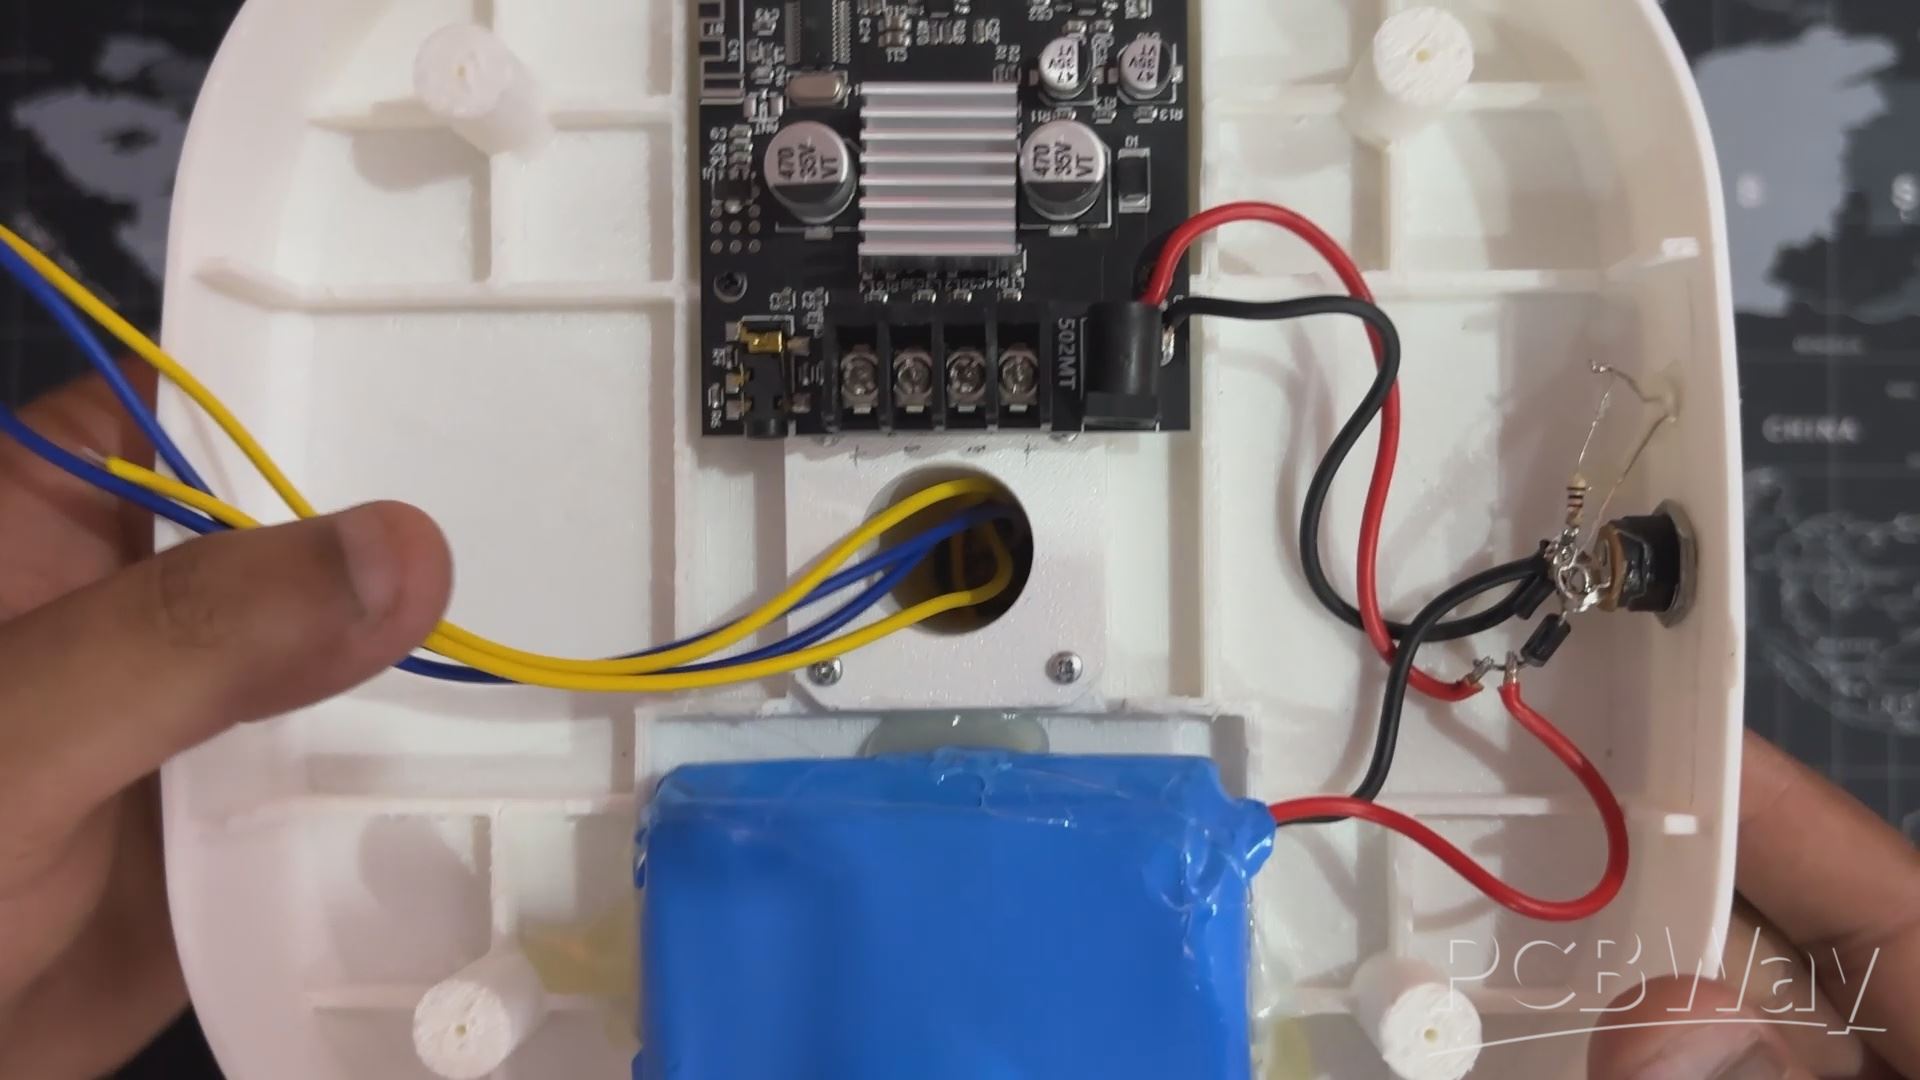
- We began the power setup by securing the 12V battery pack inside the base using hot glue.
- The battery’s positive terminal was connected to the cathode of the IN5399 diode, and from there, another wire ran from the diode’s cathode to the DC IN of the audio board.
- The battery’s negative terminal was wired to the DC barrel jack’s ground, and an additional wire from that same ground point connected to the GND pin on the audio board.
- Once all connections were made, we plugged in a DC adapter to the barrel jack—and the indicator LED lit up, confirming that the charging circuit was functioning properly. To verify that the audio board was receiving power, we turned the potentiometer knob to the ON position, which activated the board and lit up its onboard LED.
SPEAKER SECTION ASSEMBLY
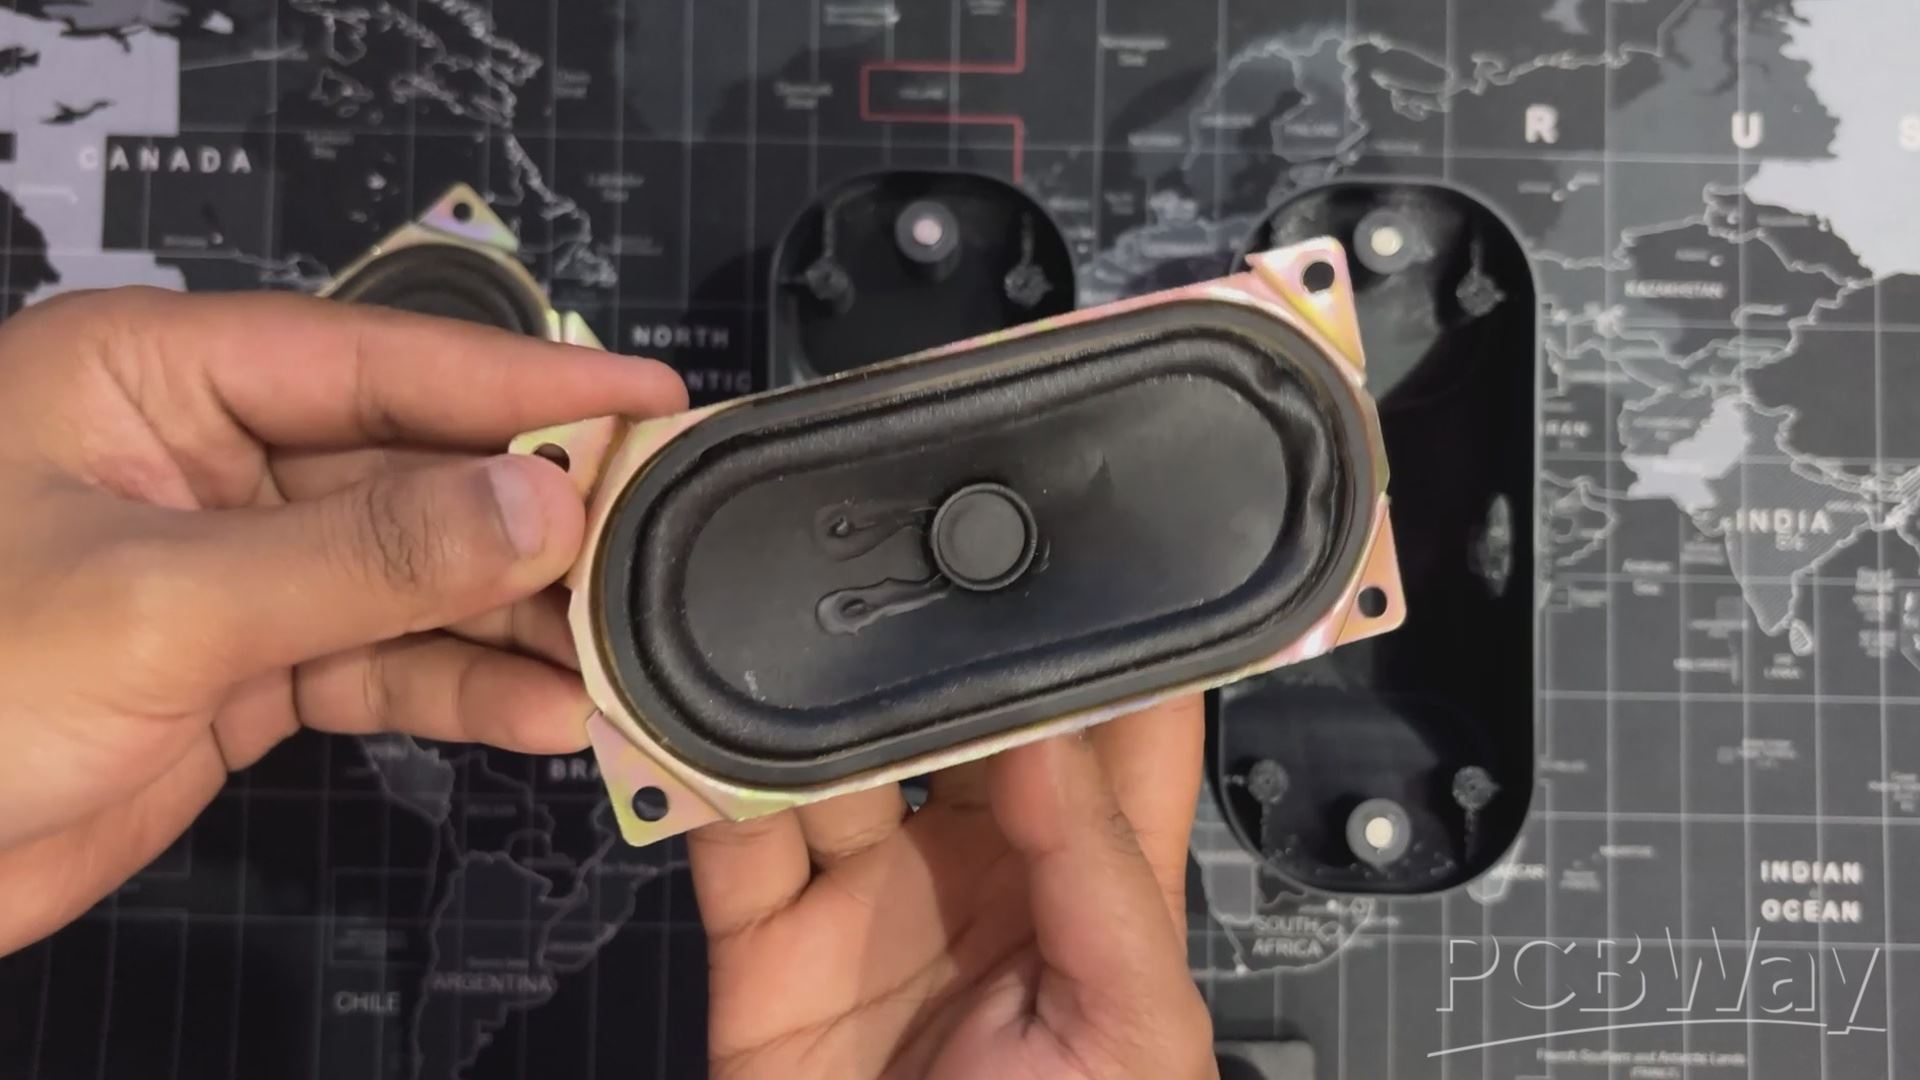
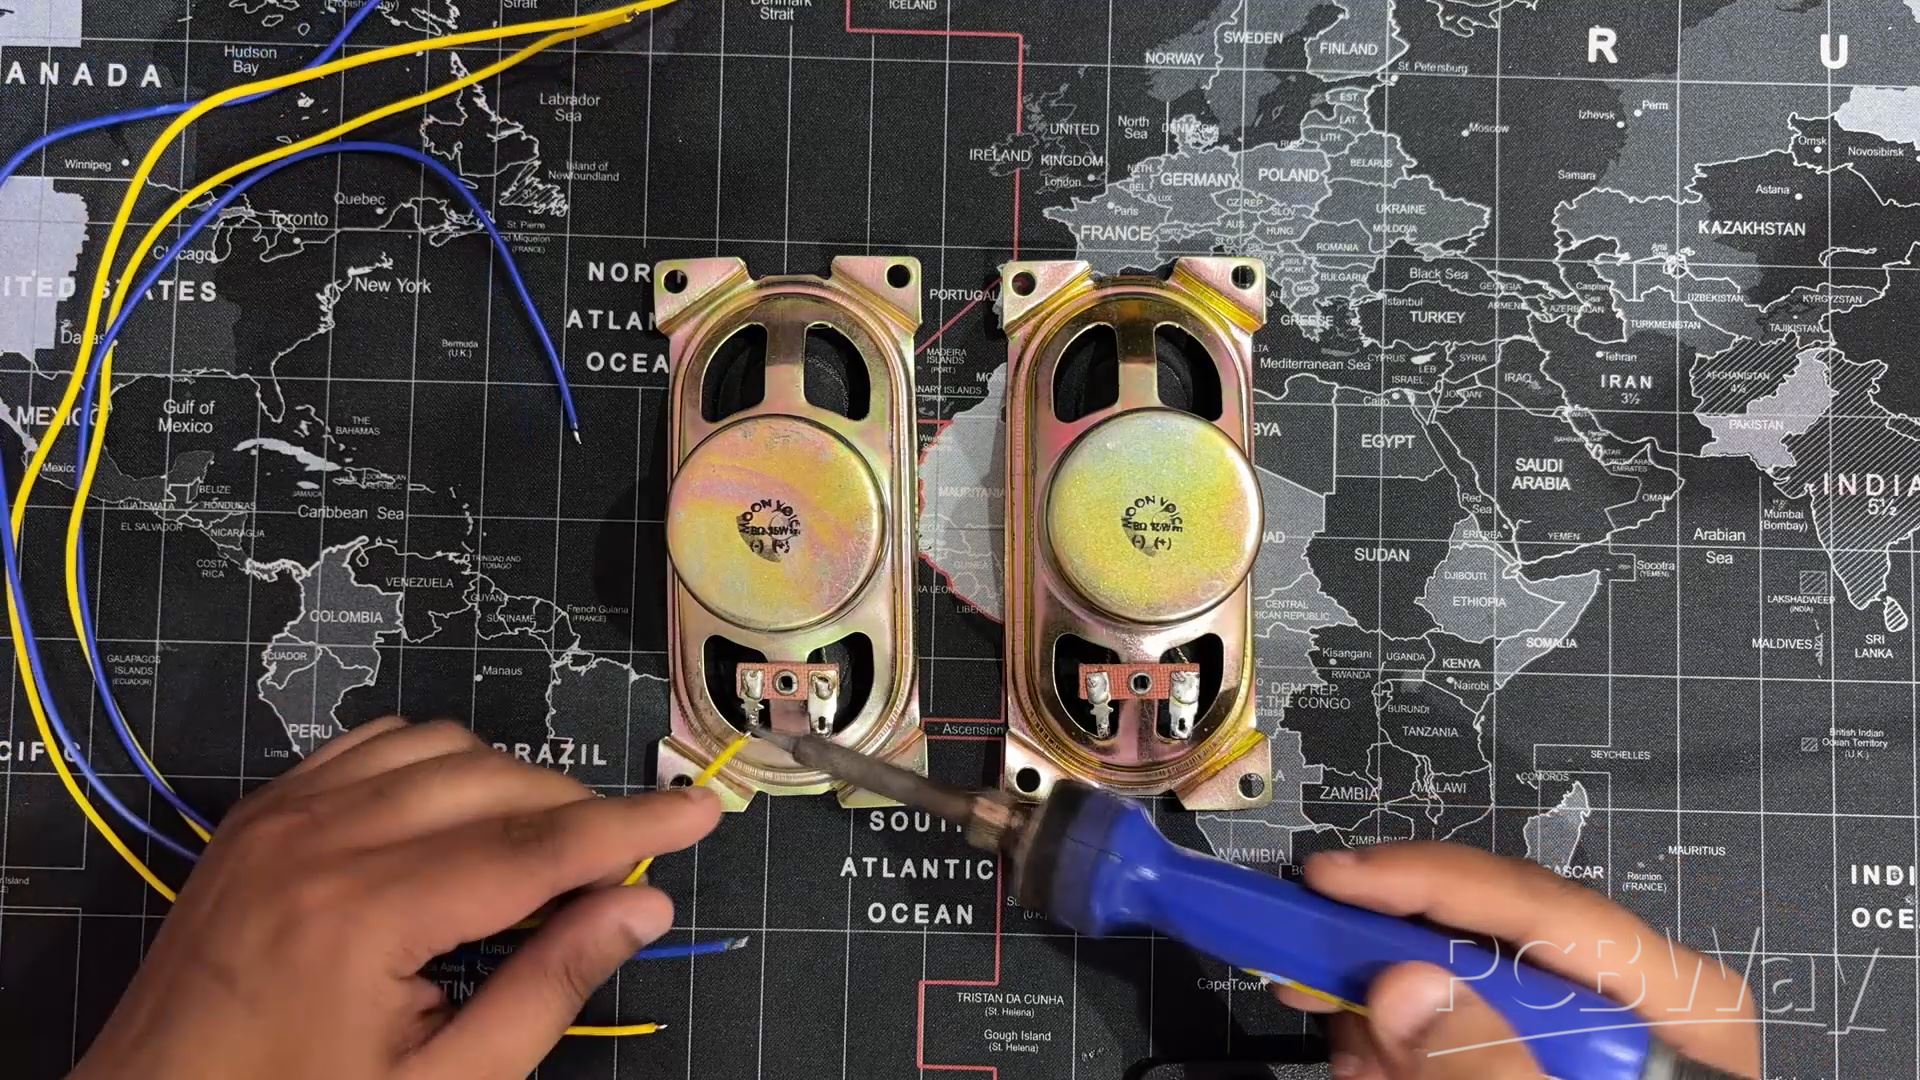
- Now comes the speaker assembly process; here we are using these rectangular 8-ohm 10 W speakers for this build.
- We start the assembly by first adding wires to both speaker's positive and negative terminals.
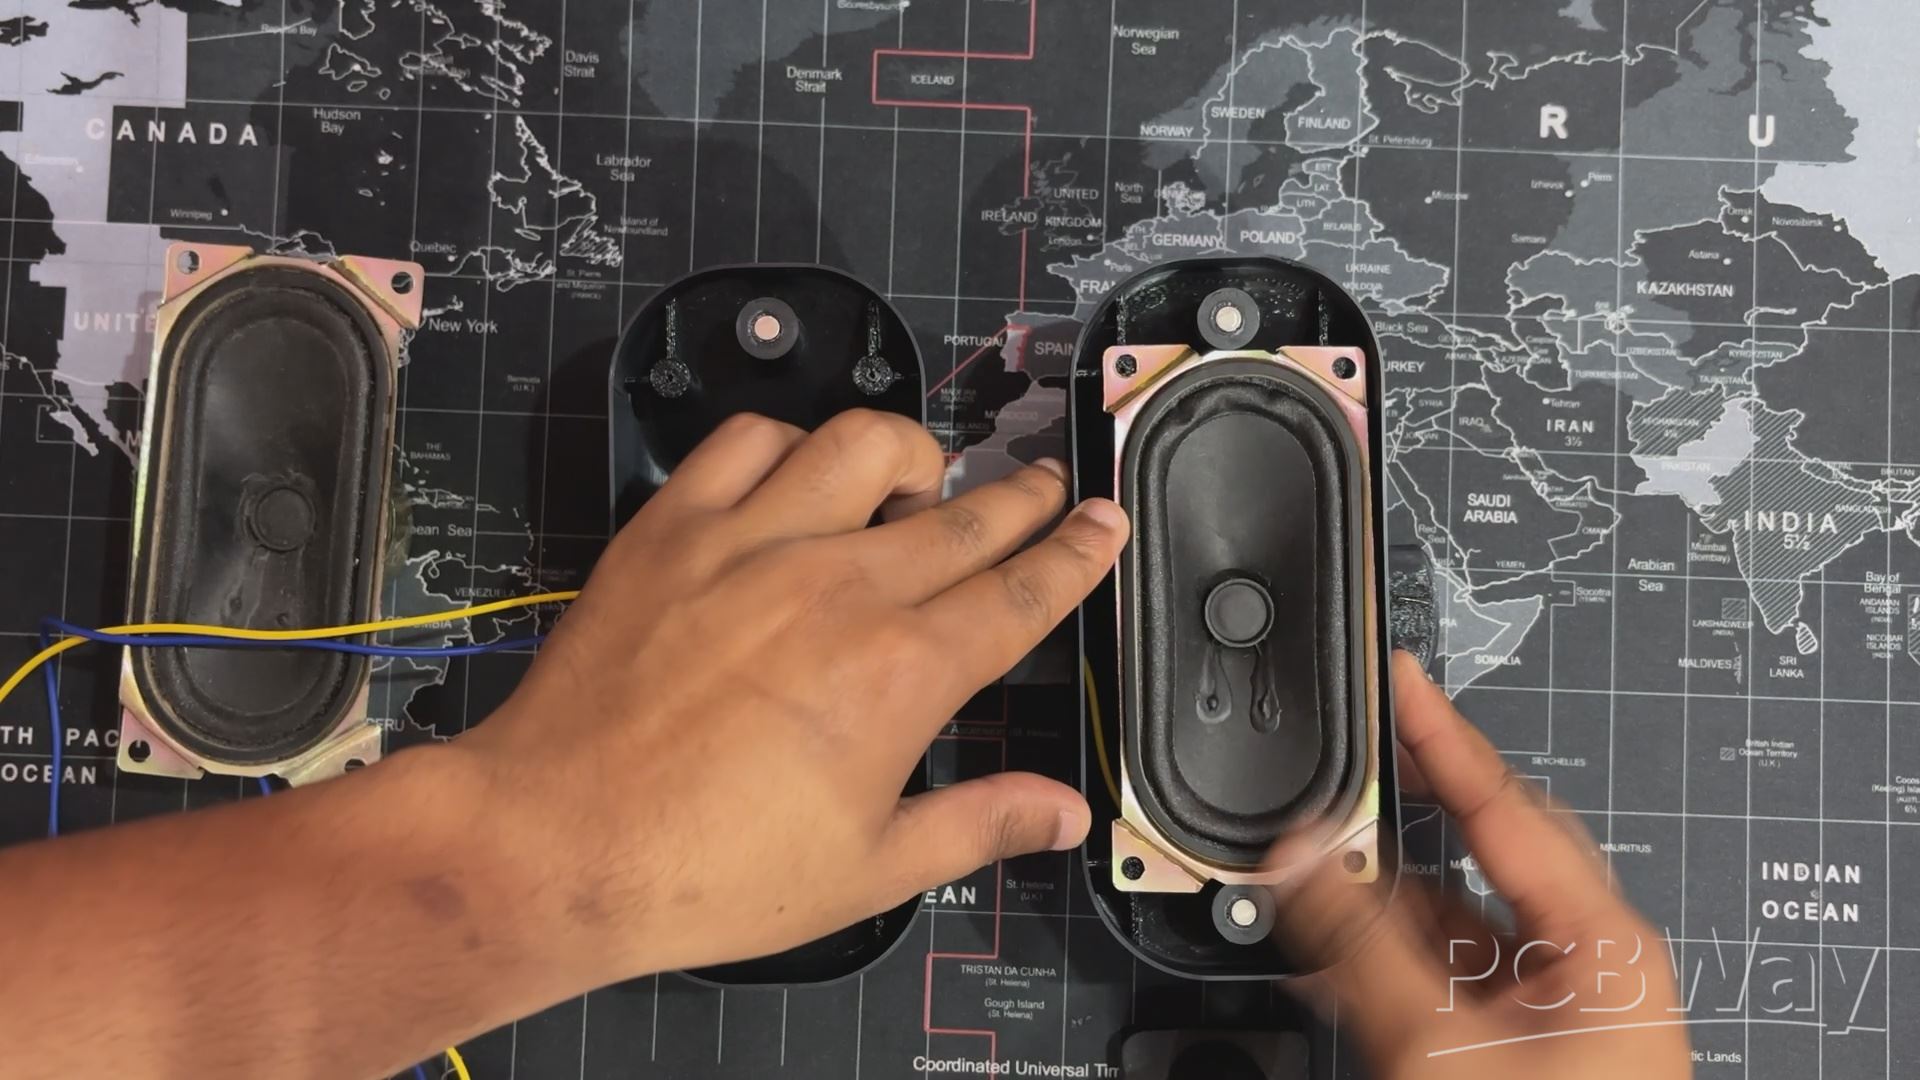
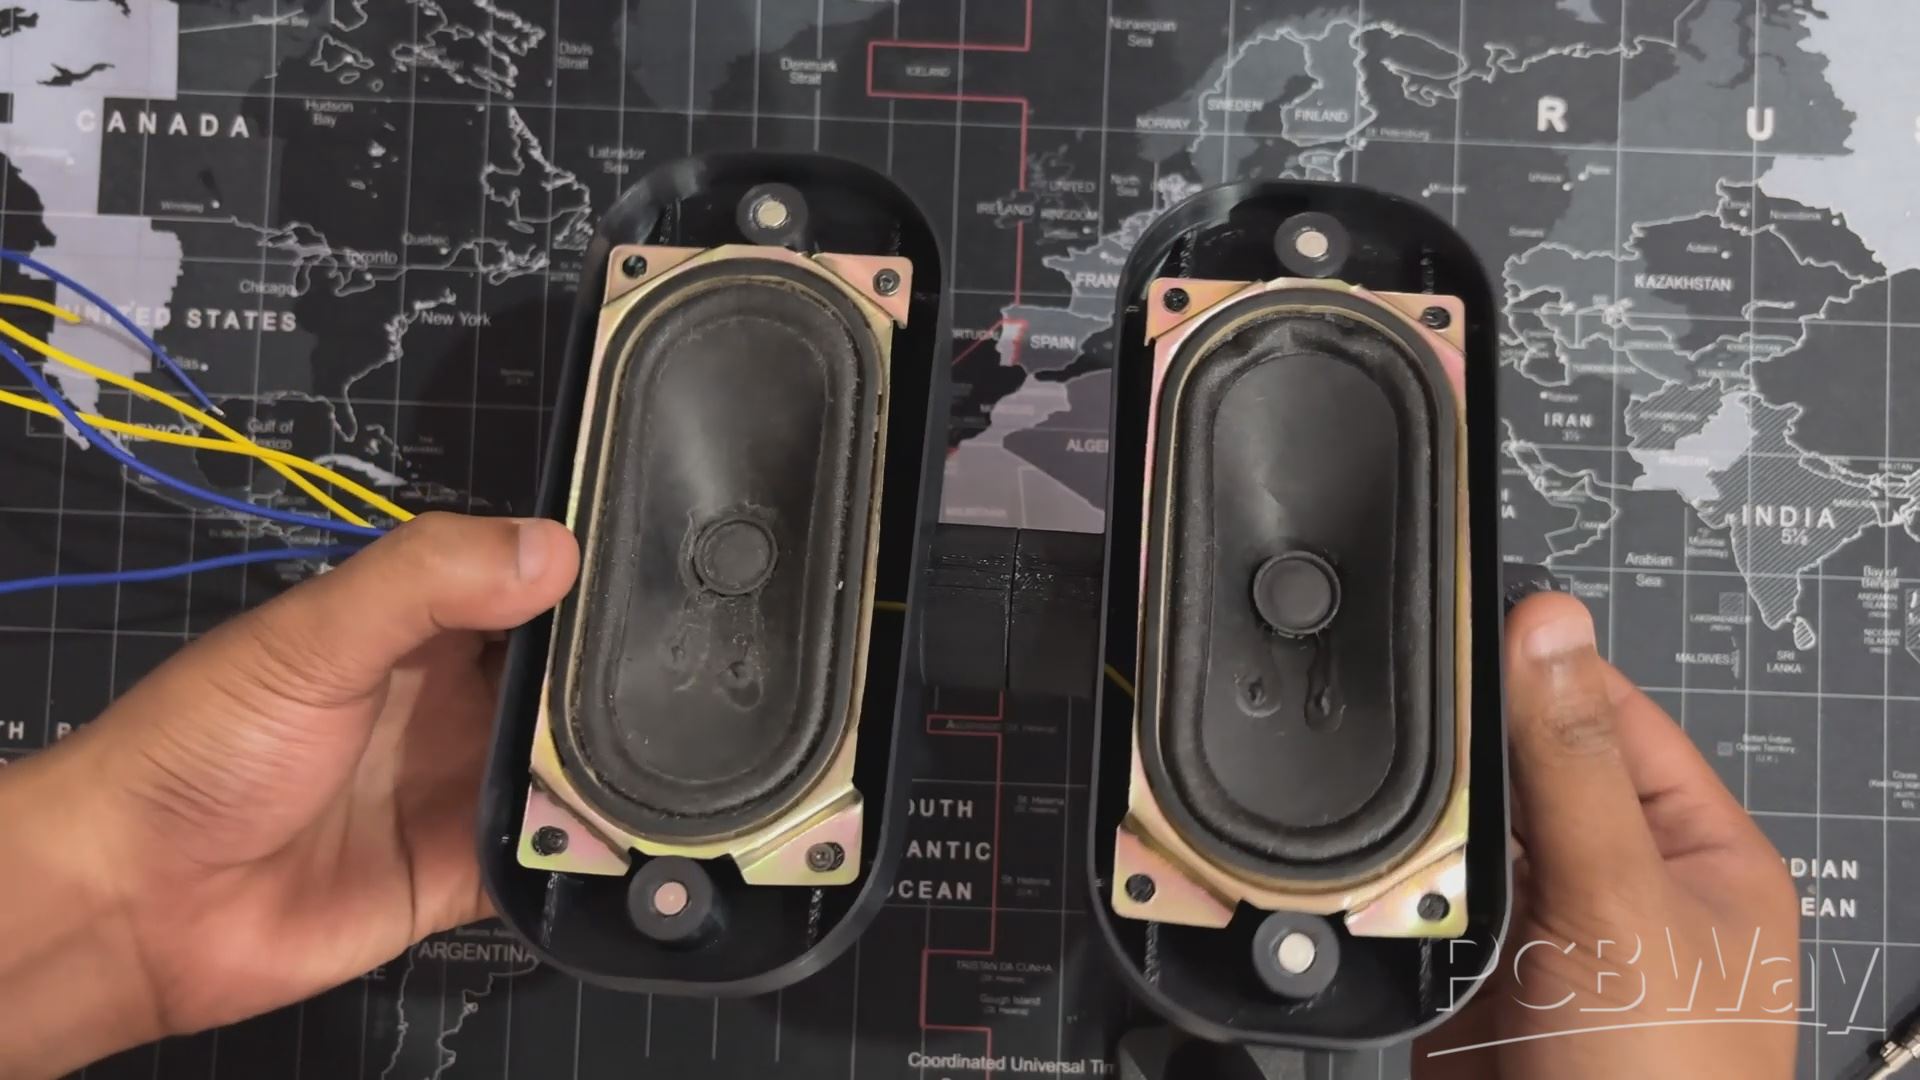
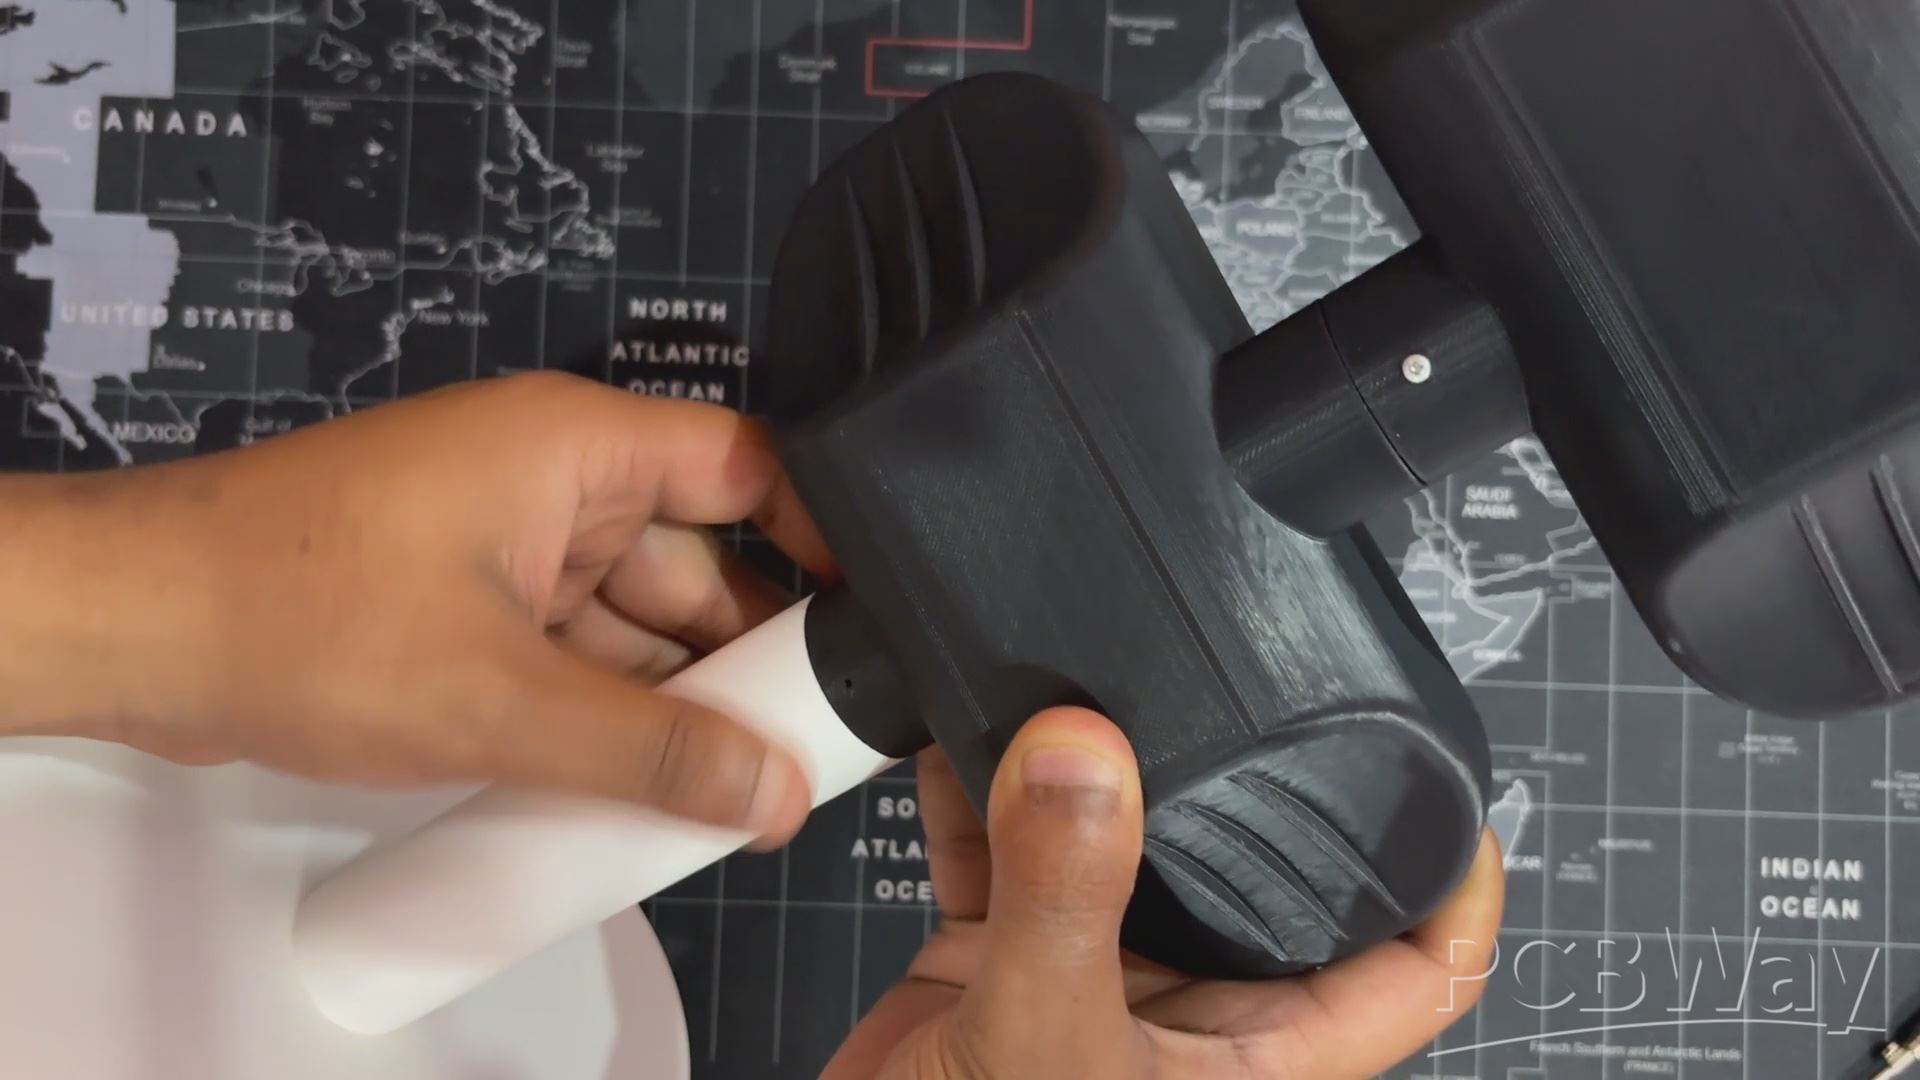
- we pass the wire of the first speaker through the joint part of the Speaker 1 and Speaker 2 body and then place both speakers in their position over their mounting screw bosses. The M2 screw is then used to secure both speakers with speaker 1 and speaker 2 body.
- At last, we added an additional M2 screw on the backside of the joint between both speaker bodies; this screw will keep both speaker 1 and speaker 2 locked together so they can't rotate in place.
FINAL ASSEMBLY
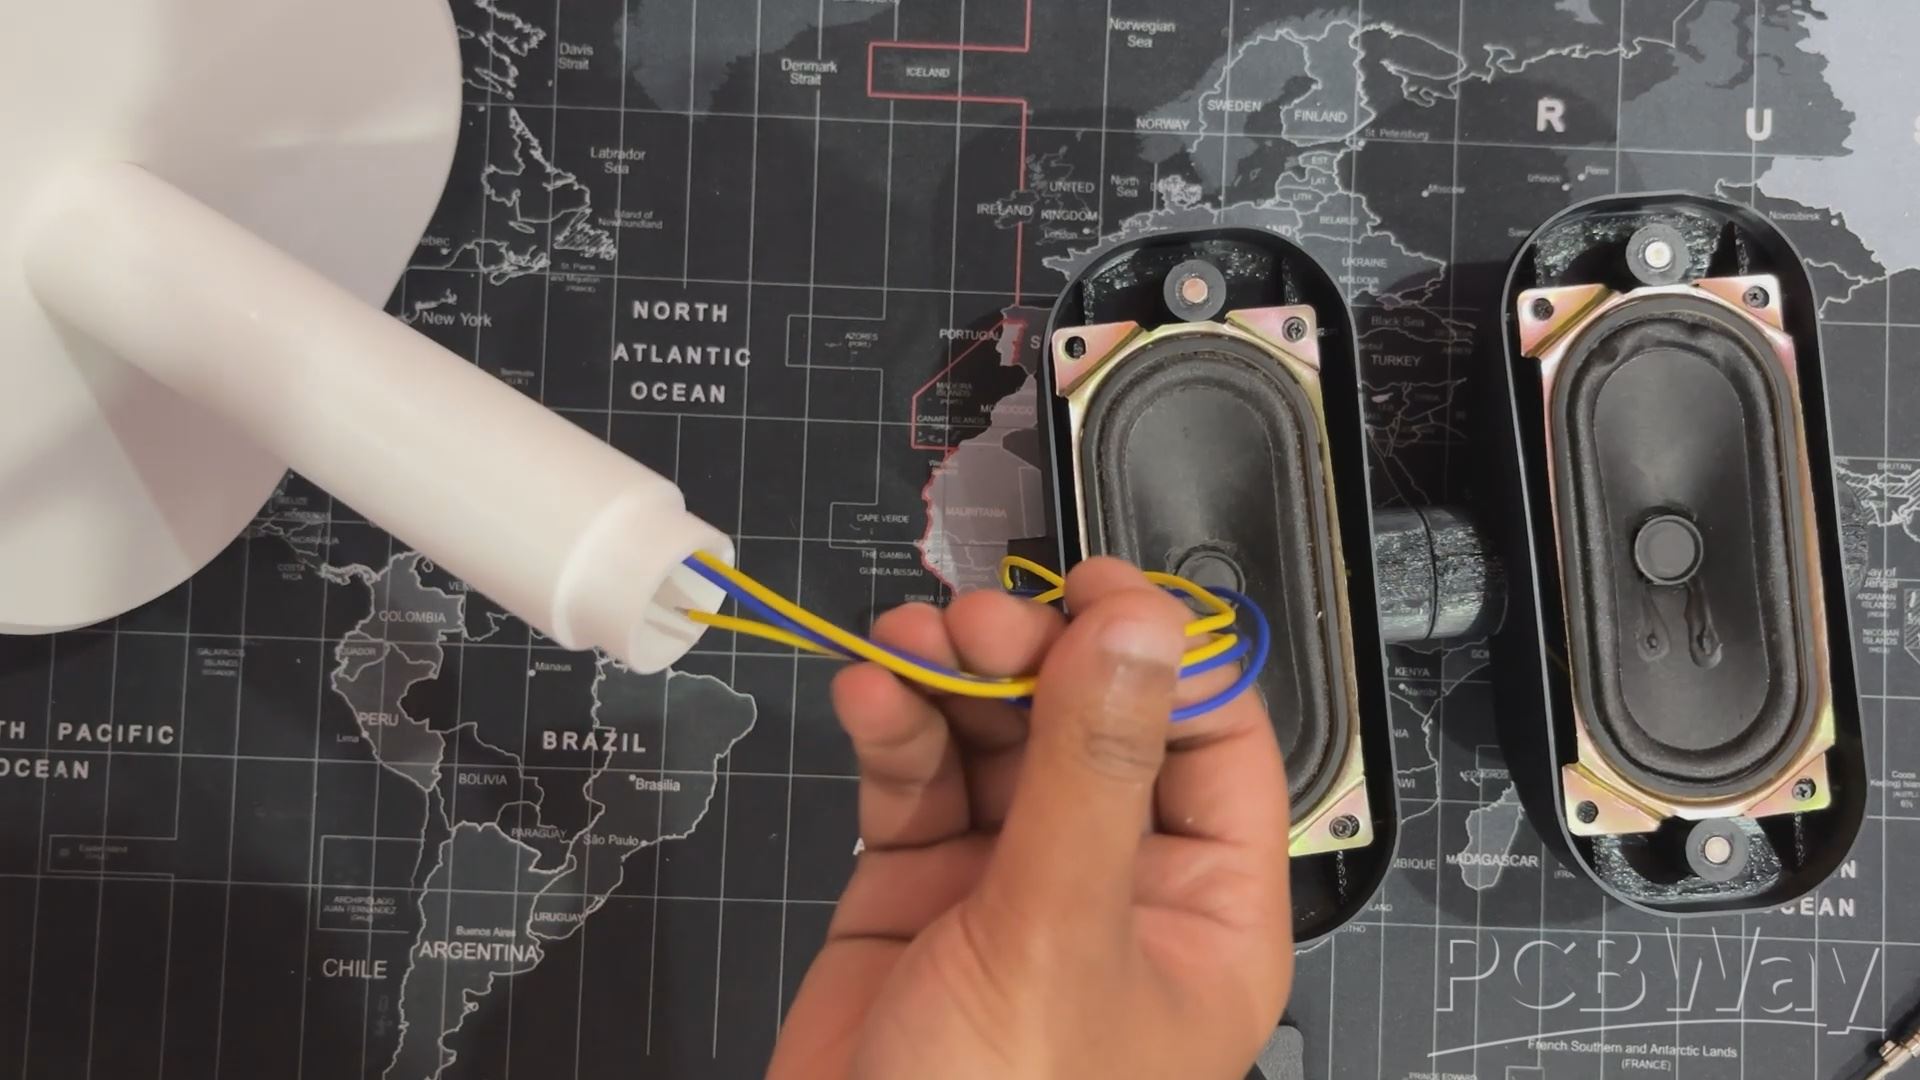
- The final assembly begins by passing the wires of the speakers through the pipe-like structure, followed by placing each speaker section over the pipe in its designated position.
- An M2 screw is inserted from the back to secure the speaker assembly to the pipe-like structure. This screw ensures that both halves of the device remain firmly connected.
- The wiring process starts next, where Speaker 1’s positive and negative wires are connected to the L+ and L– terminals of the audio board. Similarly, Speaker 2’s positive and negative wires are attached to the R+ and R– terminals.
- Finally, the lid is placed onto the base, and four M2 screws are used to fasten them together.
- At last, we place the front Grill over both speaker bodies, and this completes the assembly process.
RESULT
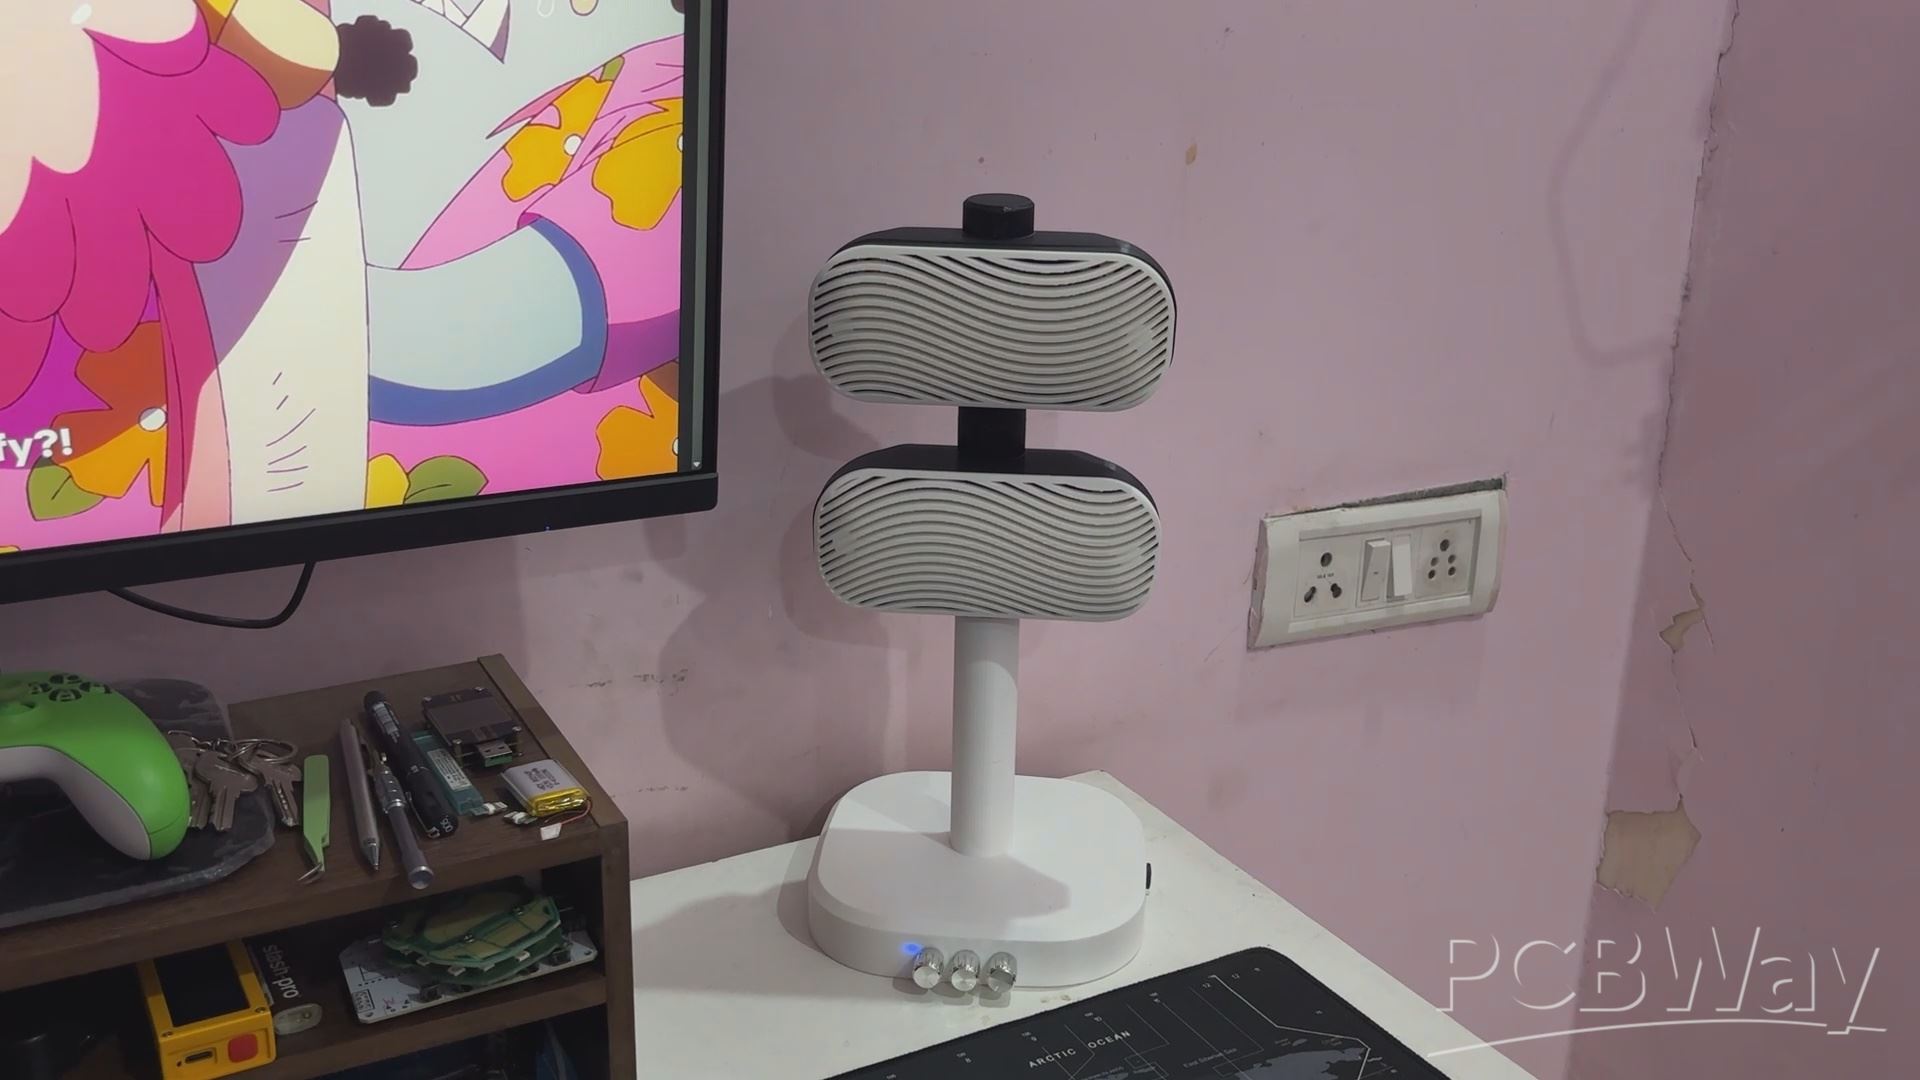
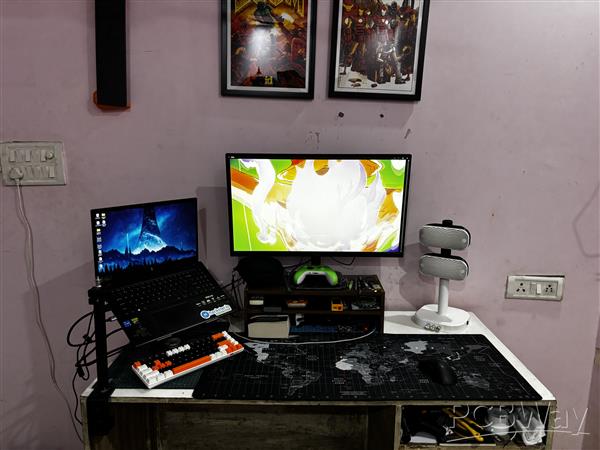
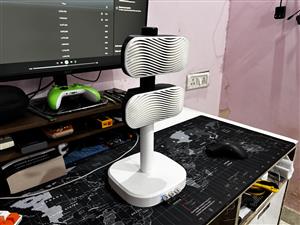
ModiFi delivered exactly what I set out to build: a clean, modular Bluetooth speaker that fits seamlessly into my desk setup and sounds far better than the monitor speaker it replaced.
The onboard ZK-502MT audio module includes built-in bass and treble controls, which make a noticeable difference in everyday use. With the bass dialed in, ModiFi handles music with low-end punch beautifully—perfect for tracks that thrive on depth and rhythm. On the flip side, the treble adjustment brings clarity to vocals and dialogue, making it ideal for watching anime episodes or any content where crisp audio matters.
The magnetic grill system worked flawlessly—snapping into place with satisfying precision and holding firm without any mechanical fasteners. The modular speaker holders proved their worth too: while I started with a 2-speaker setup, the design is ready to scale up to 4 speakers whenever I want more volume or wider coverage.
Visually, the wave-patterned front mesh and dual-tone print (White and Black Hyper PLA) give ModiFi a distinct, polished look that stands out on any desk.
Overall, ModiFi isn’t just a speaker—it’s a flexible, maker-friendly platform for audio builds that look as good as they sound.
In addition, we appreciate PCBWAY's support of this project. Visit them for a variety of PCB-related services, such as stencil and PCB assembly services, as well as 3D printing services.
Thanks for reaching this far, and I will be back with a new project pretty soon.
Peace.
ModiFi - Modular Bluetooth Speaker
Project images are for reference only. Actual production is based on the manufacturing files on the project page.
Please review the designer's notes (e.g., PCB thickness) and select the appropriate options.
PCBWay is not responsible
for issues caused by unsuitable parameter selections.
For more important ordering information, please refer to
Read More


Raspberry Pi 5 7 Inch Touch Screen IPS 1024x600 HD LCD HDMI-compatible Display for RPI 4B 3B+ OPI 5 AIDA64 PC Secondary Screen(Without Speaker)
BUY NOW


- Comments(0)
- Likes(1)
- 1 USER VOTES
- YOUR VOTE 0.00 0.00

-
8design
-
8usability
-
7creativity
-
8content
More by Arnov Arnov sharma
-
 DIY XBOX Controller
Greetings everyone, and welcome back. Here's something fun and custom.This is my version of an Xbox ...
DIY XBOX Controller
Greetings everyone, and welcome back. Here's something fun and custom.This is my version of an Xbox ...
-
 Pocket SNES
Greetings everyone, and welcome back! Today, I’ve got something fun and tiny to share—the Pocket SNE...
Pocket SNES
Greetings everyone, and welcome back! Today, I’ve got something fun and tiny to share—the Pocket SNE...
-
 Batocera Arcade Box
Greetings everyone and welcome back, Here's something. Fun and nostalgic. Right now, we are using ou...
Batocera Arcade Box
Greetings everyone and welcome back, Here's something. Fun and nostalgic. Right now, we are using ou...
-
 64x32 Matrix Panel Setup with PICO 2
Greetings everyone and welcome back.So here's something fun and useful: a Raspberry Pi Pico 2-powere...
64x32 Matrix Panel Setup with PICO 2
Greetings everyone and welcome back.So here's something fun and useful: a Raspberry Pi Pico 2-powere...
-
 Portable Air Quality Meter
Hello everyone, and welcome back! Today, I have something incredibly useful for you—a Portable Air Q...
Portable Air Quality Meter
Hello everyone, and welcome back! Today, I have something incredibly useful for you—a Portable Air Q...
-
 WALKPi PCB Version
Greetings everyone and welcome back, This is the WalkPi, a homebrew audio player that plays music fr...
WALKPi PCB Version
Greetings everyone and welcome back, This is the WalkPi, a homebrew audio player that plays music fr...
-
 Delete Button XL
Greetings everyone and welcome back, and here's something fun and useful.In essence, the Delete Butt...
Delete Button XL
Greetings everyone and welcome back, and here's something fun and useful.In essence, the Delete Butt...
-
 Arduino Retro Game Controller
Greetings everyone and welcome back. Here's something fun.The Arduino Retro Game Controller was buil...
Arduino Retro Game Controller
Greetings everyone and welcome back. Here's something fun.The Arduino Retro Game Controller was buil...
-
 Super Power Buck Converter
Greetings everyone and welcome back!Here's something powerful, The SUPER POWER BUCK CONVERTER BOARD ...
Super Power Buck Converter
Greetings everyone and welcome back!Here's something powerful, The SUPER POWER BUCK CONVERTER BOARD ...
-
 Pocket Temp Meter
Greetings and welcome back.So here's something portable and useful: the Pocket TEMP Meter project.As...
Pocket Temp Meter
Greetings and welcome back.So here's something portable and useful: the Pocket TEMP Meter project.As...
-
 Pico Powered DC Fan Driver
Hello everyone and welcome back.So here's something cool: a 5V to 12V DC motor driver based around a...
Pico Powered DC Fan Driver
Hello everyone and welcome back.So here's something cool: a 5V to 12V DC motor driver based around a...
-
 Mini Solar Light Project with a Twist
Greetings.This is the Cube Light, a Small and compact cube-shaped emergency solar light that boasts ...
Mini Solar Light Project with a Twist
Greetings.This is the Cube Light, a Small and compact cube-shaped emergency solar light that boasts ...
-
 PALPi V5 Handheld Retro Game Console
Hey, Guys what's up?So this is PALPi which is a Raspberry Pi Zero W Based Handheld Retro Game Consol...
PALPi V5 Handheld Retro Game Console
Hey, Guys what's up?So this is PALPi which is a Raspberry Pi Zero W Based Handheld Retro Game Consol...
-
 DIY Thermometer with TTGO T Display and DS18B20
Greetings.So this is the DIY Thermometer made entirely from scratch using a TTGO T display board and...
DIY Thermometer with TTGO T Display and DS18B20
Greetings.So this is the DIY Thermometer made entirely from scratch using a TTGO T display board and...
-
 Motion Trigger Circuit with and without Microcontroller
GreetingsHere's a tutorial on how to use an HC-SR505 PIR Module with and without a microcontroller t...
Motion Trigger Circuit with and without Microcontroller
GreetingsHere's a tutorial on how to use an HC-SR505 PIR Module with and without a microcontroller t...
-
 Motor Driver Board Atmega328PU and HC01
Hey, what's up folks here's something super cool and useful if you're making a basic Robot Setup, A ...
Motor Driver Board Atmega328PU and HC01
Hey, what's up folks here's something super cool and useful if you're making a basic Robot Setup, A ...
-
 Power Block
Hey Everyone what's up!So this is Power block, a DIY UPS that can be used to power a bunch of 5V Ope...
Power Block
Hey Everyone what's up!So this is Power block, a DIY UPS that can be used to power a bunch of 5V Ope...
-
 Goku PCB Badge V2
Hey everyone what's up!So here's something SUPER cool, A PCB Board themed after Goku from Dragon Bal...
Goku PCB Badge V2
Hey everyone what's up!So here's something SUPER cool, A PCB Board themed after Goku from Dragon Bal...
-
Programmable Mist Maker - XIAO / QT PY Extension
1087 2 1 -
RadioHAT - Raspberry Pi radio development platform
909 0 2 -
-
-
-
-
ARPS-2 – Arduino-Compatible Robot Project Shield for Arduino UNO
3344 0 6 -
A Compact Charging Breakout Board For Waveshare ESP32-C3
3959 3 8 -
AI-driven LoRa & LLM-enabled Kiosk & Food Delivery System
4343 2 2


