





|
KiCADKicad
|
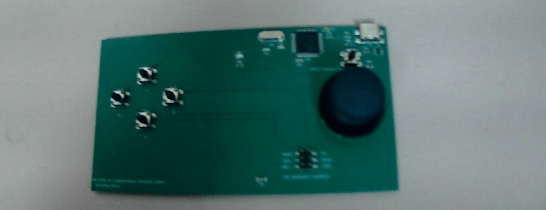
MicroPad V1
This is a MicroPad V1. It is a macropad/gamepad that is simple and handheld. (if you already coded it, get a wire and short circuit pin 33 to gnd ( usb ).To code it,
Get your code in Arduino IDE and in "Sketch", click export compiled binary and open the folder. Get the ino.hex file of your code and put it into ATmel FLIP.
To use Atmel FLIP, you must install Atmel FLIP and also install Java JRE. In Amel FLIP, click the chip icon and select ATmega32U4 then plug in your MicroPad V1 device. Import your .ino.hex sketch and then click the USB icon and click USB and then Open. Then Select run. If it is successful, unplug and wait 4 seconds and then replug. In Device Manager, Arduino Leonardo should appear. That means your code is running!
Sorry for these long instructions :(. I hoped you liked it though :D.
Here is some test code
// --- MicroPad Hardware Test (Corrected Pinout) ---constint PIN_JOY_X = A5; // PF0 (Pin 41)constint PIN_JOY_Y = A4; // PF1 (Pin 40)constint PIN_JOY_SW = 8; // PB4 (Pin 28)// ISP / Port B Pushbuttonsconstint PIN_SW1 = 15; // PB1 / SCK (Pin 9)constint PIN_SW2 = 16; // PB2 / MOSI (Pin 10)constint PIN_SW3 = 14; // PB3 / MISO (Pin 11)constint PIN_SW4 = 17; // PB0 / SS (Pin 8)void setup() { Serial.begin(115200); pinMode(PIN_JOY_SW, INPUT_PULLUP); pinMode(PIN_SW1, INPUT_PULLUP); pinMode(PIN_SW2, INPUT_PULLUP); pinMode(PIN_SW3, INPUT_PULLUP); pinMode(PIN_SW4, INPUT_PULLUP); } void loop() { int xVal = analogRead(PIN_JOY_X); int yVal = analogRead(PIN_JOY_Y); bool joyClick = (digitalRead(PIN_JOY_SW) == LOW); bool sw1 = (digitalRead(PIN_SW1) == LOW); bool sw2 = (digitalRead(PIN_SW2) == LOW); bool sw3 = (digitalRead(PIN_SW3) == LOW); bool sw4 = (digitalRead(PIN_SW4) == LOW); Serial.print("X: "); Serial.print(xVal); Serial.print("\tY: "); Serial.print(yVal); Serial.print(" | Stick: "); Serial.print(joyClick ? "[CLICK]" : " -- "); Serial.print(" | SW1(15): "); Serial.print(sw1 ? "[X]" : " - "); Serial.print(" | SW2(16): "); Serial.print(sw2 ? "[X]" : " - "); Serial.print(" | SW3(14): "); Serial.print(sw3 ? "[X]" : " - "); Serial.print(" | SW4(17): "); Serial.println(sw4 ? "[X]" : " - "); // Fast polling so quick clicks are never missed delay(10); }
Thank you! Github: https://github.com/UnlimitedMicro Website: https://www.unlimitedmicro.tech
youtube: https://www.youtube.com/@UnlimitedMicro
MicroPad V1
Project images are for reference only. Actual production is based on the manufacturing files on the project page.
Please review the designer's notes (e.g., PCB thickness) and select the appropriate options.
PCBWay is not responsible
for issues caused by unsuitable parameter selections.
For more important ordering information, please refer to
Read More









Raspberry Pi 5 7 Inch Touch Screen IPS 1024x600 HD LCD HDMI-compatible Display for RPI 4B 3B+ OPI 5 AIDA64 PC Secondary Screen(Without Speaker)
BUY NOW


- Comments(1)
- Likes(1)
More by Unlimited Micro
-
Programmable Mist Maker - XIAO / QT PY Extension
2255 2 2 -
RadioHAT - Raspberry Pi radio development platform
1941 0 4 -
-
-
-
ARPS-2 – Arduino-Compatible Robot Project Shield for Arduino UNO
4113 0 6 -
A Compact Charging Breakout Board For Waveshare ESP32-C3
4877 3 8 -
AI-driven LoRa & LLM-enabled Kiosk & Food Delivery System
5666 2 2 -





















