The year is 2029. Humans are populating the Moon, starting at Moon Base One. Two Moon Base Operators are about to commit another grave mistake in the crop garden of beautiful red tomatoes…

Tomato Crop and NB-IoT Sensors on Moon Base One
Operator 1: After the last IoT calamity I’m glad we switched from MQTT to CoAP Servers connected by NB-IoT. Now that we have added many sensors to our crop garden, our NB-IoT Sensors need to transmit more efficiently. Can you change the CoAP payload from JSON to CBOR?
Operator 2: Sure thing! Lemme look at the specs of the CBOR binary format and program the CBOR encoder in C…
Operator 1: It’s already 2029! Why aren’t you using Rust? Just call the Rust Macro that encodes CoAP payloads into JSON and CBOR!
// Compose the CoAP Payload using the coap!() macro.
// Select @json or @cbor To encode CoAP Payload in JSON or CBOR format:
let _payload = coap!( @json {
  // Create "values" as an array of items under the root.
  // Append to the "values" array:
  // {"key":"device", "value":"0102030405060708090a0b0c0d0e0f10"},
  "device": &device_id,

  // Assume `val` contains `key: "t", val: 2870`.
  // Append to the `values` array the Sensor Key and Sensor Value:
  // `{"key": "t", "value": 2870}`
  val,
});
Encoding CoAP Payloads in JSON and CBOR with a Rust Macro. From https://github.com/lupyuen/stm32bluepill-mynewt-sensor/blob/rust-nbiot/rust/app/src/app_network.rs
Operator 2: Rust Macros can do so much? Wow I did not know that! Anyway I have finished the C programming for the new firmware. I’ll push the new firmware to 1,000 sensors now…
Operator 1: Great! Hold on… Our IoT Dashboards are going crazy… Temperature 80 degrees Celsius? Humidity 25 percent? WHAT HAPPENED??!!
Operator 2: OOPS I think the pointers are corrupted in my C firmware… The Sensor Data was supposed to point to the string “TEMPERATURE”… But it got overwritten by “HUMIDITY”… Should have used safer, simpler Rust instead of C…
Operator 1: The Temperature and Humidity Sensor Data are ALL MIXED UP!!! The sprinklers are spraying water on our tomatoes! The ventilators are blowing cold air on them!
Our beautiful tomatoes are turning into… ICED TOMATOES!!! NOOOOO…
Why Embedded Rust instead of Embedded C?
We’re back in 2019… Hardly anyone writes embedded programs in Rust for microcontrollers (like STM32 Blue Pill), we all use C. But we really should switch to Rust! Moon Base One has given us 2 key reasons…
1. Complexity: Our gadgets are more powerful than ever before. They can communicate via Bluetooth, WiFi, Zigbee, nRF, LoRa, Sigfox and now NB-IoT. Messaging formats are getting more complicated with CoAP and CBOR. Embedded C wasn’t meant for handling such complexity. Rust is!
2. Safety: With great power comes great responsibility… says the Great Arachnid. How do we ensure that our complex gadgets run non-stop without crashing? We need something safer than Embedded C to prevent runaway pointers before they happen… Rust can!
But have our gadgets already become so complex and unsafe and affordable that we need Embedded Rust?
Well, take a look at this video demo… https://youtu.be/MgK72dqwDuM
Demo of Embedded Rust on STM32 Blue Pill with Quectel BC95-G Global NB-IoT Module
STM32 Blue Pill with Quectel BC95-G Global NB-IoT Module… Runs a realtime operating system (Apache Mynewt) that polls the internal temperature sensor every 10 seconds concurrently while transmitting CoAP messages over NB-IoT… All built for under $10… And managed flawlessly by Embedded Rust!
This article uncovers the secrets of the Embedded Rust program running on that Blue Pill… And how how you can do the same! If you’re new to Embedded Rust, no worries, this will be a friendly and gentle introduction to Embedded Rust… I promise!
Overall Program Flow
This diagram illustrates the overall flow of the Embedded Rust program. We’ll dive into each function now…
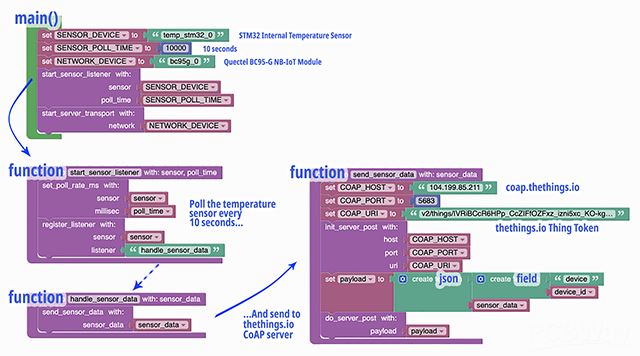
Overall flow of our Embedded Rust program
Main Program: lib.rs
Normally the Rust Compiler builds our Rust Programs starting at main.rs. In this case we’re building a Rust Library that will be linked into the Apache Mynewt firmware, so the Rust Compiler starts at lib.rs instead.
#![no_std] // Don't link with standard Rust library, which is not compatible with embedded systems

extern crate cortex_m;         // Declare the external library `cortex_m`
extern crate mynewt;          // Declare the Mynewt library
extern crate macros as mynewt_macros;  // Declare the Mynewt Procedural Macros library

mod app_sensor;   // Declare `app_sensor.rs` as Rust module `app_sensor` for Application Sensor functions
mod app_network;  // Declare `app_network.rs` as Rust module `app_network` for Application Network functions
From https://github.com/lupyuen/stm32bluepill-mynewt-sensor/blob/rust-nbiot/rust/app/src/lib.rs#L24-L37
First thing in lib.rs… #![no_std]. This is absolutely essential for Embedded Rust programs and libraries — it tells the Rust Compiler not to include the Rust Standard Library, which contains code that is unnecessary for embedded devices. Think of the Rust Standard Library as the C standard libraries stdio + stdlib + …
When we specify #![no_std], the Rust Compiler includes a lighter version of the standard library, known as the Rust Core Library. It contains the bare minimum needed to run Rust applications.
Rust Externs and Modules
extern crate declares the external Rust Libraries (known as Crates) that we’ll be using. External Crates are declared in Cargo.toml and don’t need to be declared again here… Unless we’re using macros from these crates.
mod app_sensor tells the Rust Compiler that we have a Rust module named app_sensor, and the module’s source code may be found in app_sensor.rs.
If you remember how namespace and #include “…” work in C++, mod app_sensor translates into something like this in C++…
namespace app_sensor {
  #include "app_sensor.rs"
}
Which means that the functions in app_sensor.rs will be imported in the module namespace app_sensor. (We’ll see this later when we study the macro expansions for our program.)
We’ll soon discover that in Rust we use mod often to pull in Rust source files, which may use mod to pull in other source files, … That’s how we assemble a Rust program from a tree of Rust source files, starting at lib.rs or main.rs.
app_sensor and app_network will be covered in the subsequent sections.
use core::panic::PanicInfo; // Import `PanicInfo` type which is used by `panic()` below
use cortex_m::asm::bkpt;  // Import cortex_m assembly function to inject breakpoint
use mynewt::{
  kernel::os,       // Import Mynewt OS API
  sys::console,      // Import Mynewt Console API
  libs::sensor_network,  // Import Mynewt Sensor Network Library
};
From https://github.com/lupyuen/stm32bluepill-mynewt-sensor/blob/rust-nbiot/rust/app/src/lib.rs#L38-L45
Next we tell the Rust Compiler which functions and types to import into this code file (lib.rs). We could write core::panic::PanicInfo in our code. But when we say use core::panic::PanicInfo, we can just refer to it later in our code as PanicInfo.
core refers to the Rust Core Library. cortex_m is an external crate that has useful functions for Arm Cortex-M processors, like triggering debugger breakpoints.
mynewt is a crate that contains Rust wrappers for the Mynewt API. That means we can call the Mynewt system functions written in C — just use the Rust wrappers that have been provided. More about Rust safe wrappers in a while.
In lib.rs we’ll be calling some Mynewt kernel-level functions, as well as the debugging console and the Sensor Network Library that provides NB-IoT networking.
Rust Main Function
/// Main program that initialises the sensor, network driver and starts reading and sending sensor data in the background.
/// main() will be called at Mynewt startup. It replaces the C version of the main() function.
#[no_mangle]         // Don't mangle the name "main"
extern "C" fn main() -> ! { // Declare extern "C" because it will be called by Mynewt
  // Initialise the Mynewt packages and Blue Pill internal temperature sensor driver.
  mynewt::sysinit();

  // Start polling the temperature sensor every 10 seconds in the background.
  app_sensor::start_sensor_listener()
    .expect("TMP fail");

  // Start the Server Transport for sending sensor data to CoAP Server over NB-IoT.
  sensor_network::start_server_transport()
    .expect("NET fail");

  // Main event loop
  loop {              // Loop forever...
    os::eventq_run(        // Processing events...
      os::eventq_dflt_get()   // From default event queue.
        .expect("GET fail")
    ).expect("RUN fail");
  }
  // Never comes here
}
From https://github.com/lupyuen/stm32bluepill-mynewt-sensor/blob/rust-nbiot/rust/app/src/lib.rs#L46-L74
This is the main() function — it works just like C.
mynewt::sysinit() is called to start up the Mynewt OS system functions and drivers, like the driver for the Blue Pill internal temperature sensor.
app_sensor::start_sensor_listener() is defined in the app_sensor module (explained below). This function tells Mynewt to poll the internal temperature sensor every 10 seconds.
AT> NBAND=8
AT= OK
AT> CFUN=1
AT= OK
AT> CGATT=1
AT= OK
AT> CEREG=0
AT= OK
AT> CEREG?
AT= +CEREG:0,1
AT= OK
AT> CGATT?
AT= +CGATT:1
AT= OK
AT> NSOCR=DGRAM,17,0,1
AT= 1
AT= OK
Quectel BC95-G driver sends AT commands to connect to NB-IoT. From https://github.com/lupyuen/stm32bluepill-mynewt-sensor/blob/rust-nbiot/logs/standalone-node.log#L90-L100
sensor_network::start_server_transport() tells the Sensor Network Library to start the NB-IoT network.
The NB-IoT Driver starts sending AT commands to the NB-IoT Module (Quectel BC95-G), and waits for successful connection to the NB-IoT network.
This happens in the background, so other functions may continue running, like polling the temperature sensor.
Check Rust Errors with Expect
Note the curious way that we’re calling the functions followed by expect()…
app_sensor::start_sensor_listener()
  .expect("TMP fail");
This actually means “call the function start_sensor_listener(), and if it FAILS, show the message TMP fail”. So it certainly doesn’t mean that we expect the function to fail!
This is an unusual Rust coding convention. But thankfully we’ll see expect only in the main() function. In other functions we’ll use a simpler way to check for failures… the question-mark operator: ?
Sensor Functions: app_sensor.rs
/// Sensor to be polled: `temp_stm32_0` is Blue Pill's internal temperature sensor
static SENSOR_DEVICE: Strn   = init_strn!("temp_stm32_0");
/// Poll sensor every 10,000 milliseconds (10 seconds)
const SENSOR_POLL_TIME: u32   = (10 * 1000);
/// Use key (field name) `t` to transmit raw temperature to CoAP Server
const TEMP_SENSOR_KEY: &str   = "t";
/// Type of sensor: Raw temperature sensor (integer sensor values 0 to 4095)
const TEMP_SENSOR_TYPE: sensor_type_t = sensor::SENSOR_TYPE_AMBIENT_TEMPERATURE_RAW;
app_sensor.rs configures Mynewt to poll Blue Pill’s internal temperature sensor every 10 seconds. At the top we define the constants…
Note that SENSOR_DEVICE has type Strn, which refers to a null-terminated string. Although Rust has two types of strings (str and String), I created Strn because it works more efficiently with Mynewt.
Unlike Rust strings, Strn strings are always null-terminated. So we prevent excessive copying of strings when passing Strn to Mynewt and back. Strn may be passed directly into Mynewt APIs like this…
// Set the sensor polling time to 10 seconds.
sensor::set_poll_rate_ms(
  &SENSOR_DEVICE, SENSOR_POLL_TIME) ? ;
init_strn!() is a Rust Macro that initialises a Strn and terminates the string with null. How do we know it’s a Rust Macro? Because it has ! in its name. Rust Macros are similar to C Macros, but much more powerful.
This eliminates the need to install floating-point libraries on the device. We’ll convert the raw temperature into actual temperature at the CoAP Server.
Poll The Sensor with Mynewt Sensor Framework
/// Ask Mynewt to poll the temperature sensor every 10 seconds and call `handle_sensor_data()`.
/// Return `Ok()` if successful, else return `Err()` with `MynewtError` error code inside.
pub fn start_sensor_listener() -> MynewtResult<()> { // Returns an error code upon error.
  console::print("Rust TMP poll\n");

  // Set the sensor polling time to 10 seconds. SENSOR_DEVICE is "temp_stm32_0", SENSOR_POLL_TIME is 10,000.
  sensor::set_poll_rate_ms(&SENSOR_DEVICE, SENSOR_POLL_TIME) ? ;
Mynewt provides an elegant way to manage IoT sensors and it truly shines here. Recall that start_sensor_listener() is called by main() to poll the temperature sensor. How do we instruct Mynewt to poll our temperature sensor every 10 seconds? Easy — just call sensor::set_poll_rate_ms() like above.
In Mynewt’s Sensor Framework, Mynewt is aware of all sensors installed (like temp_stm32_0, our temperature sensor) and the type of sensor data each sensor will return (like raw temperature). So Mynewt is capable of polling sensors for sensor data on its own… But it needs to know what to do with the polled data.
  // Fetch the sensor by name, without locking the driver for exclusive access.
  let sensor = sensor::mgr_find_next_bydevname(&SENSOR_DEVICE, core::ptr::null_mut()) ? ;
  assert!(!sensor.is_null(), "no sensor");
To answer that, we call sensor::mgr_find_next_bydevname() to fetch the sensor object for our temperature sensor. For safety, we check that returned sensor object pointer is not null.
Define Sensor Listener with Rust Struct
  // Define the listener function to be called after polling the temperature sensor.
  let listener = sensor_listener {
    sl_sensor_type: TEMP_SENSOR_TYPE,    // Type of sensor: ambient temperature
    sl_func    : sensor::as_untyped(handle_sensor_data), // Listener function
    ..fill_zero!(sensor_listener)      // Set other fields to 0
  };
Then we define a sensor_listener, the function that Mynewt will call whenever it has fetched the sensor data. We declare to Mynewt that the function (called the Listener Function) accepts temperature sensor values (TEMP_SENSOR_TYPE).
The Listener Function is named handle_sensor_data() and we’ll see it in a while. We call sensor::as_untyped() to do some translation from Rust to C, because callback functions like handle_sensor_data() are defined differently in Rust and C.
If we look at the way listener is defined as a sensor_listener…
let listener = sensor_listener { ... };
Looks familiar? sensor_listener is actually a struct type! In C++ we would write this as…
sensor_listener listener = { ... };
structs in Rust work the same way as structs in C and C++. But unlike C and C++, Rust also supports this interesting construct…
let listener = sensor_listener {
  sl_sensor_type: ... ,
  sl_func:    ... ,
  // Set other fields to 0
  ..fill_zero!(sensor_listener)
};
.. means “copy the remaining fields from the following object”. The object after .. happens to be fill_zero!(sensor_listener), a Rust Macro that generates an empty sensor_listener with all fields zeroed out. So the result…
1. We set listener to an instance of sensor_listener…
2. And we set in listener the sl_sensor_type and sl_func fields shown above…
3. And we set the remaining fields of listener to 0
This is a handy construct (similar to JavaScript’s … operator) to assure ourselves that the remaining fields in the struct are initialised to some known value. Otherwise the remaining fields will become assigned to some unknown value from the stack and cause runtime errors. In fact, the Rust Compiler refuses to compile this code…
let listener = sensor_listener {
  sl_sensor_type: ... ,
  sl_func:    ... ,
  // What about the other fields?
};
Because the compiler knows that sensor_listener contains other fields that we have not initialised. And that’s the really cool thing about Rust — it genuinely cares about our Safety and it will do anything it can to prevent our programs from crashing! We’ll see many examples of Safe Coding in Rust in a while.
Register Sensor Listener with Mynewt Sensor Framework
  // Register the Listener Function to be called every 10 seconds, with the polled sensor data.
  sensor::register_listener(sensor, listener) ? ; // `?` means in case of error, return error now.

  // Return `Ok()` to indicate success. This line should not end with a semicolon (;).
  Ok(())
}
Finally we call sensor::register_listener() to register our Listener Function for the sensor. Mynewt will call our Listener Function handle_sensor_data() every 10 seconds after fetching the temperature sensor data.
Return Result in Rust
In Rust, functions are expected to return the Result type which contains either a result value or a failure code. Hence start_sensor_listener() is declared as…
pub fn start_sensor_listener()
  -> MynewtResult<()>
  { ... }
Which tells the Rust Compiler that start_sensor_listener() will return a MynewtResult type. What’s the result value for this function? start_sensor_listener() works like a void function in C… it doesn’t return any values. It returns nothing.
In Rust we write “nothing” as (). Therefore the function returns MynewtResult<()>, a generic result that contains either “nothing” or an error code. How do we return “nothing” at the end of the function?
pub fn start_sensor_listener()
  -> MynewtResult<()> {
  ...
  // Return `Ok()` to indicate success.
  // This line should not end with a semicolon (;).
  Ok(())
}
If this function is expected to return 123 we would write it as Ok(123). But since this function returns “nothing”, we write it as Ok(()). Which means “yes this function has completed successfully, but we don’t have a result value”.
When we return Ok(...) at the end of a function, make sure that we don’t add a semicolon ;. That’s because the Rust Compiler treats a block of code like a sushi conveyor belt that unveils statement after statement… separated by a semicolon ;.
The final statement Ok(...) is the result value for the entire sushi conveyor belt… er… function. In fact, returning Ok(...) like this…
  ...
  Ok(123)
}
…is actually equivalent to a return statement plus semicolon…
  ...
  return Ok(123);
}
Both are perfectly valid in Rust. But of course I’ll choose the shorter version. When we call functions that return Result, we add a question mark ? like this…
// Set the sensor polling time to 10 seconds
sensor::set_poll_rate_ms(&SENSOR_DEVICE, SENSOR_POLL_TIME) ? ;
This means “check the result of sensor::set_poll_rate_ms() and if it’s an error, stop the current function and return the error code to the caller”. It’s easy to miss the question mark ? so I make it highly conspicuous by surrounding it with spaces.
Handle Sensor Data with Rust Pattern Matching
/// This listener function is called every 10 seconds by Mynewt to handle the polled sensor data.
/// Return 0 if we have handled the sensor data successfully.
extern fn handle_sensor_data(sensor: sensor_ptr, _arg: sensor_arg,
  sensor_data: sensor_data_ptr, sensor_type: sensor_type_t) -> MynewtError {
  console::print("Rust handle_sensor_data\n");

  // Check that the temperature data is valid.
  if sensor_data.is_null() { return MynewtError::SYS_EINVAL; } // Exit if data is missing
  assert!(!sensor.is_null(), "null sensor");

  // Get the temperature sensor value. It could be raw or computed.
  let sensor_value = convert_sensor_data(sensor_data, sensor_type);
  if let SensorValueType::None = sensor_value.val { assert!(false, "bad type"); }

  // Compose a CoAP message with the temperature sensor data and send to the
  // CoAP server. The message will be enqueued for transmission by the OIC
  // background task so this function will return without waiting for the message
  // to be transmitted.
  let res = send_sensor_data(&sensor_value);

  // `SYS_EAGAIN` means that the Network Task is still starting up the network.
  // We drop the sensor data and send at the next poll.
  if let Err(err) = res { // `if let` will assign `err` to the error code inside `res`
    if err == MynewtError::SYS_EAGAIN {
      console::print("TMP network not ready\n");
      return MynewtError::SYS_EOK;
    }
  }
  // Return 0 to Mynewt to indicate no error. Should not end with a semicolon (;).
  MynewtError::SYS_EOK
}
handle_sensor_data() is the Listener Function that’s called by Mynewt after it has polled the temperature sensor. It calls convert_sensor_data() to convert the sensor data from Mynewt’s format to our own transmission format. More about this in a while.
Then it calls send_sensor_data() to transmit the converted sensor data. (We’ll learn more in the next section.) send_sensor_data() is called like this…
let result = send_sensor_data(&sensor_value);
// `if let` will assign `error_code` to
// the error code inside `result`
if let Err(error_code) = result {
  // Check the error code
  if error_code == MynewtError::SYS_EAGAIN {
    ...
  }
}
send_sensor_data() returns the MynewtResult<()> type, which contains…
1. Either Ok(()), which means no error and nothing to return…
2. Or Err(error_code), which is an error code
Which is it? Let’s use Rust Pattern Matching! This if let condition…
if let Err(error_code) = result { ... }
…will fail if the result is Ok(()). So that eliminates option 1??. What about the error code for option 2???
When we match the pattern Err(error_code) with result, we actually bind error_code to the error code inside result.
So subsequently we may check the value of error_code like this…
if error_code == MynewtError::SYS_EAGAIN { ... }
That’s how we use Rust Pattern Matching to check error codes in Results! If we’re not really interested in the error code, just use the question mark ? to check for success or failure.
Convert Sensor Data with Rust Pattern Matching
/// Convert the raw temperature value received from Mynewt into a `SensorValue` for transmission, which includes the sensor data key `t`.
/// `sensor_type` indicates the type of data in `sensor_data`.
#[allow(non_snake_case, unused_variables)]
fn convert_sensor_data(sensor_data: sensor_data_ptr, sensor_type: sensor_type_t) -> SensorValue {
  console::print("TMP listener got rawtmp\n");
  // Construct and return a new `SensorValue` (without semicolon)
  SensorValue {
    key: TEMP_SENSOR_KEY, // Sensor data key is `t`
    val: match sensor_type {
      SENSOR_TYPE_AMBIENT_TEMPERATURE_RAW => { // If this is raw temperature...
        // Interpret the sensor data as a `sensor_temp_raw_data` struct that contains raw temp.
        let mut rawtempdata = fill_zero!(sensor_temp_raw_data);
        let rc = unsafe { sensor::get_temp_raw_data(sensor_data, &mut rawtempdata) };
        assert_eq!(rc, 0, "rawtmp fail");
        // Check that the raw temperature data is valid.
        assert_ne!(rawtempdata.strd_temp_raw_is_valid, 0, "bad rawtmp");
        // Raw temperature data is valid. Return it.
        SensorValueType::Uint(rawtempdata.strd_temp_raw) // Raw Temperature in integer (0 to 4095)
      }
      // Unknown type of sensor value
      // _ => { assert!(false, "sensor type"); SensorValueType::Uint(0) }
    }
  }
}
convert_sensor_data() is a beautiful function that could only happen in Rust, not C. Recall that it converts sensor data from Mynewt’s format to our own transmission format. The structure of the function looks interesting…
fn convert_sensor_data(...) -> SensorValue {
  // Construct and return a new `SensorValue` (without semicolon)
  SensorValue {
    key: "t",
    val: ...
  }
}
Remember the Ok(...) trick for returning things without semicolon from the sushi conveyor belt… er… function? We’re using it here! We construct a struct with SensorValue { ... }. Then we return the struct, semicolon-less!
Now look closely what’s inside val…
// Construct and return a new `SensorValue` (without semicolon)
SensorValue {
  key: "t",
  val: match sensor_type {
    // If this is raw temperature...
    SENSOR_TYPE_AMBIENT_TEMPERATURE_RAW => {
      // Get the raw temperature
      let mut raw = fill_zero!(sensor_temp_raw_data);
      let rc = unsafe {
        sensor::get_temp_raw_data(
          sensor_data, &mut raw)
      };
      // Return the raw temperature
      SensorValueType::Uint( raw.strd_temp_raw )
    }
    // Unknown type of sensor value
    // _ => { assert!(false, "sensor type"); ... }
  }
}
Does match look familiar? Yes it looks like switch ... case in C! But in Rust, match can return values like this…
  ...
  // Return the raw temperature
  SensorValueType::Uint( raw.strd_temp_raw )
}
Again we used the disappearing semicolon trick to return a value inside match.
What’s SensorValueType::Uint? That’s an enum. And as expected, Rust enums are more powerful than enums in C… Rust enums can contain values (like raw.strd_temp_raw)!
Remember our friends Ok(...) and Err(...)? They are enums too! Yes enums are shockingly powerful in Rust. (Then again, everything in Rust is shockingly powerful!)
The pattern _ => ... at the end of match is identical to the default construct in C’s switch ... case statement (it matches everything else).
But the Rust Compiler is super intelligent in deducing that sensor_type has one and only one possible pattern: SENSOR_TYPE_AMBIENT_TEMPERATURE_RAW. So the Rust Compiler refuses to accept the default pattern _. (And hence I have commented it out.)
Code Safety in Rust
// Interpret the sensor data as a `sensor_temp_raw_data` struct that contains raw temp.
let mut raw = fill_zero!(sensor_temp_raw_data);
let rc = unsafe {
  sensor::get_temp_raw_data(sensor_data, &mut raw)
};
// Return the raw temperature.
SensorValueType::Uint(raw.strd_temp_raw) // Raw Temperature in integer (0 to 4095)
More reminders from convert_sensor_data() that the Rust Compiler really cares about our Safety…
let mut raw = ...
mut (mutable) declares to the Rust Compiler that raw is a variable that will be changed. The Rust Compiler assumes that all variables are const and will not be changed, unless we declare them as mut.
sensor::get_temp_raw_data(sensor_data, &mut raw)
We write &mut to pass a variable to a function that’s expected to change the variable. So sensor::get_temp_raw_data() is expected to change the value of raw above.
let rc = unsafe {
  sensor::get_temp_raw_data( ... )
};
This ought to alarm us… We are calling a function sensor::get_temp_raw_data() that’s Unsafe! This function is declared unsafe because it’s a C function that could cause our program to crash.
Unlike the other Mynewt C functions, I haven’t constructed a Safe Wrapper yet for sensor::get_temp_raw_data(), so we have to call it the Unsafe way. unsafe is a good way to tag C functions that require closer inspection before calling them.
Network Functions: app_network.rs
app_network.rs contains the functions for transmitting sensor data to the CoAP Server over NB-IoT. We’re using the CoAP Server hosted at thethings.io.
/// Compose a CoAP JSON message with the Sensor Key (field name) and Value in `val`and send to the CoAP server
pub fn send_sensor_data(val: &SensorValue) -> MynewtResult<()> { // Returns an error code upon error.
  console::print("Rust send_sensor_data\n");
  // Get a randomly-generated device ID that changes each time we restart the device.
  let device_id = sensor_network::get_device_id() ?;

  // Start composing the CoAP Server message with the sensor data in the payload. This will
  // block other tasks from composing and posting CoAP messages (through a semaphore).
  // We only have 1 memory buffer for composing CoAP messages so it needs to be locked.
  let rc = sensor_network::init_server_post( strn!(()) ) ? ; // `strn!(())` means use default CoAP URI in `syscfg.yml`

  // If network transport not ready, tell caller (Sensor Listener) to try again later.
  if !rc { return Err(MynewtError::SYS_EAGAIN); }
send_sensor_data() is called by handle_sensor_data() to transmit the polled sensor data from the temperature sensor.
It calls sensor_network::get_device_id() to fetch the randomly-generated device ID. This device ID changes each time we restart the device. We’ll transmit the device ID to thethings.io so that we can see the sensor data for our device.
sensor_network::init_server_post() prepares the memory buffers to compose a new CoAP message. In embedded devices like Blue Pill, we have limited RAM so we can’t compose two CoAP messages at the same time. Hence init_server_post() uses a locking Mynewt semaphore to ensure that only one task is composing a CoAP message at any time.
Remember that the connection to NB-IoT is established by a background task. There’s a chance that the connection isn’t ready yet. If it’s not ready, we return Err( MynewtError::SYS_EAGAIN ) to ask the Listener Function to retry later. That’s how we return an error code SYS_EAGAIN as a Result type in Rust.
Here comes the magical part of the entire program… How we actually compose a CoAP Message containing the sensor data… And how we manage Intent vs Implementation…
CoAP Intent vs Implementation
  // Compose the CoAP Payload using the coap!() macro.
  // Select @json or @cbor To encode CoAP Payload in JSON or CBOR format.
  let _payload = coap!( @json {
    // Create `values` as an array of items under the root.
    // Append to the `values` array the random device ID:
    // `{"key":"device", "value":"0102030405060708090a0b0c0d0e0f10"}`
    "device": &device_id,

    // Assume `val` contains `key: "t", val: 2870`.
    // Append to the `values` array the Sensor Key and Sensor Value:
    // `{"key": "t", "value": 2870}`
    val,
  });
The above Rust code shows our Intent clearly… We just want to transmit 2 items of data to the server:
1. Device ID, which we’ll be using to view our sensor data. (In case there are other devices transmitting at the same time)
2. Raw Temperature, which is a whole number from 0 to 4095
What about the Implementation? Well that depends which server we’ll be transmitting the message to. For thethings.io, the server expects a JSON Payload in the CoAP Message like this…
{"values":[
  {"key":"device",
     "value":"010203"},
  {"key":"t",
     "value":1715}
]}
It’s similar to our Intent, just that the Implementation is different. And the above Rust code handles that! coap!() is a Rust Macro I have written that generates the above JSON Payload given the device_id and val values.
Why is this Intent vs Implementation distinction important?
As I’m writing this, thethings.io is preparing to launch CBOR support for their CoAP Server. As we have seen on Moon Base One, CBOR promises to shrink our CoAP Messages because we will no longer use inefficient JSON Payload encoding… we will use compressed, binary CBOR Payload encoding instead!
Guess What? The coap!() macro is ready to generate CBOR Payloads based on the same code! All we need to do is to replace “@json” by “@cbor” and the rest happens like magic!
Same for your own CoAP Server — you should be able to tweak the coap!() macro to support the encoding format required by your server. This level of Intent vs Implementation separation is not possible with C Macros, only with Rust Macros.
Multitasking with Mynewt
  // Post the CoAP Server message to the CoAP Background Task for transmission. After posting the
  // message to the background task, we release a semaphore that unblocks other requests
  // to compose and post CoAP messages.
  sensor_network::do_server_post() ? ;

  // Display the URL with the random device ID for viewing the sensor data.
  console::print("NET view your sensor at \nhttps://blue-pill-geolocate.appspot.com?device=");
  console::print_strn(&device_id); console::print("\n");

  // The CoAP Background Task will transmit the message in the background.
  Ok(())
}
Finally we call sensor_network::do_server_post() to transmit our CoAP Message. The actual transmission is done by a background task so that the we won’t get stuck waiting for the transmission to complete. We display the URL for viewing the sensor data. And we return Ok(()) semicolon-lessly.
ADC open ch 16
STM read int temp sensor
Rust handle_sensor_data
TMP listener got rawtmp
Rust send_sensor_data
NET payload size 102
{"values": [{"key": "device","value": "f3586de5b755539499312e74f3f2bfc0"},{"key": "t","value": 1836}]}
NET view your sensor at
https://blue-pill-geolocate.appspot.com?device=f3586de5b755539499312e74f3f2bfc0
[
NBT send udp
AT> NSOST=1,104.199.85.211,5683,174,
NBT send mbuf 174...
58 02 00 01 00 00 16 4a 27 2a e2 39 b2 76 32 06 74 68 69 6e 67 73 0d 1e 49 56 52 69 42 43 63 52 36 48 50 70 5f 43 63 5a 49 46 66 4f 5a 46 78 7a 5f 69 7a 6e 69 35 78 63 5f 4b 4f 2d 6b 67 53 41 32 59 38 11 32 51 32 ff
7b 22 76 61 6c 75 65 73 22 3a 20 5b 7b 22 6b 65 79 22 3a 20 22 64 65 76 69 63 65 22 2c 22 76 61 6c 75 65 22 3a 20 22 66 33 35 38 36 64 65 35 62 37 35 35 35 33 39 34 39 39 33 31 32 65 37 34 66 33 66 32 62 66 63 30 22 7d 2c 7b 22 6b 65 79 22 3a 20 22 74 22 2c 22 76 61 6c 75 65 22 3a 20 31 38 33 36 7d 5d 7d
NBT send mbuf OK
AT> ,1
AT= 1,1
AT< 74
AT= OK
]
Our Rust program reads the sensor and transmits the sensor data concurrently, managed by Mynewt. From https://github.com/lupyuen/stm32bluepill-mynewt-sensor/blob/rust-nbiot/logs/standalone-node.log#L128-L148
We can see that Mynewt plays an important role in managing the realtime tasks on our Blue Pill…
1. The temperature sensor is polled automatically by Mynewt according to a timer (every 10 seconds)
2. CoAP Messages are transmitted by Mynewt in a background task
This is possible only because Mynewt is a realtime operating system. It would be very difficult for Rust to do this on bare metal.
Install Embedded Rust and Mynewt
Ready to try out the Embedded Rust code for yourself? Follow the instructions below to install the Embedded Rust + Mynewt build and application files on Windows…
“Install Embedded Rust and Apache Mynewt
for Visual Studio Code on Windows”
What is VSCode? Is it related to Visual Studio? How is Microsoft involved? Read this
Hardware Required

STM32 Blue Pill, ST-Link V2, Quectel BC95-G breakout board with antenna, NB-IoT SIM
To run the Embedded Rust program and send sensor data over NB-IoT, we’ll need the following hardware…
3. Quectel BC95-G Global NB-IoT Module (breakout board with antenna). I ordered mine here. The manual in Chinese is here.
4. NB-IoT SIM from your local NB-IoT network operator
Many thanks to StarHub for sponsoring the NB-IoT SIM that I used for this tutorial!
Connect The Hardware
To connect Blue Pill to Quectel BC95-G and ST-Link, follow the instructions here
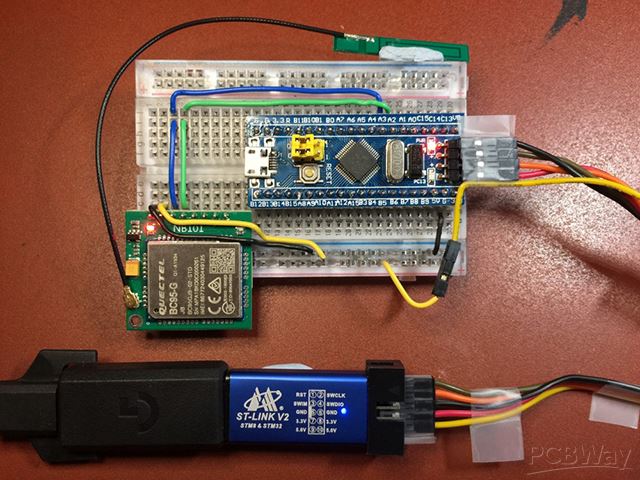
Blue Pill connected to Quectel BC95-G and ST-Link
Flash The Firmware To Blue Pill
The next step is to flash the firmware into Blue Pill’s ROM. We’ll need to connect the Blue Pill to the USB port of our computer via an ST-Link V2 adapter.
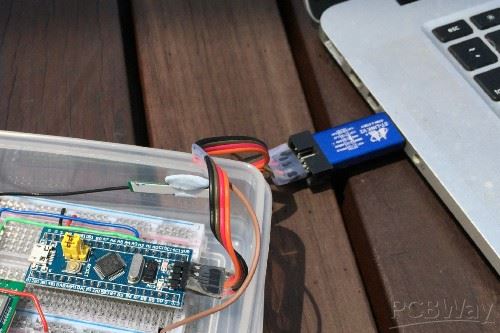
Blue Pill and ST-Link connected to USB port
1. Check that the Blue Pill is connected to ST-Link…
And the ST-Link is connected to your computer’s USB port.
Now let’s head back to Visual Studio Code…
2. Click Terminal → Run Task → [4] Load bluepill_boot
This flashes the bootloader to Blue Pill, to start the Apache Mynewt operating system upon startup. If it shows errors, compare with this flash log.
3. Click Terminal → Run Task → [5] Load bluepill_my_sensor
This flashes the firmware (containing our Visual Program) to Blue Pill. If it shows errors, compare with this flash log.
Run The Program
1. Click Debug → Start Debugging
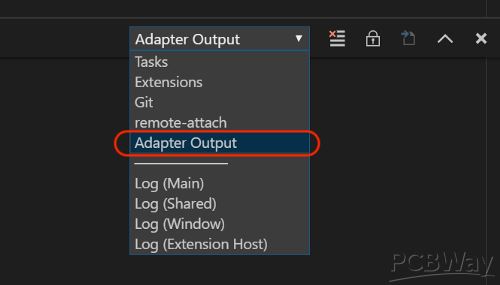
2. Click View → Output
Select Adapter Output to see the Blue Pill log
3. The debugger pauses at the line with LoopCopyDataInit
Click Continue or press F5
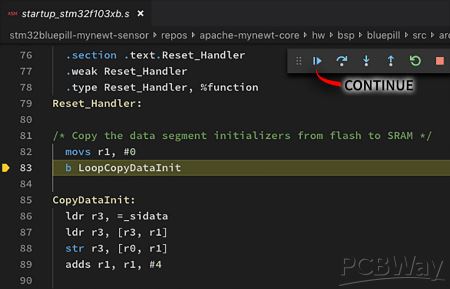
4. The debugger pauses next at the main() function.
Click Continue or press F5

The program should now poll the internal temperature sensor every 10 seconds and transmit to thethings.io. Let’s study the Blue Pill execution log…
Check The Log
ADC open ch 16
STM read int temp sensor
Rust handle_sensor_data
TMP listener got rawtmp
Rust send_sensor_data
NET payload size 102
{"values": [{"key": "device","value": "f3586de5b755539499312e74f3f2bfc0"},{"key": "t","value": 1836}]}
NET view your sensor at
https://blue-pill-geolocate.appspot.com?device=f3586de5b755539499312e74f3f2bfc0
[
NBT send udp
AT> NSOST=1,104.199.85.211,5683,174,
NBT send mbuf 174...
58 02 00 01 00 00 16 4a 27 2a e2 39 b2 76 32 06 74 68 69 6e 67 73 0d 1e 49 56 52 69 42 43 63 52 36 48 50 70 5f 43 63 5a 49 46 66 4f 5a 46 78 7a 5f 69 7a 6e 69 35 78 63 5f 4b 4f 2d 6b 67 53 41 32 59 38 11 32 51 32 ff
7b 22 76 61 6c 75 65 73 22 3a 20 5b 7b 22 6b 65 79 22 3a 20 22 64 65 76 69 63 65 22 2c 22 76 61 6c 75 65 22 3a 20 22 66 33 35 38 36 64 65 35 62 37 35 35 35 33 39 34 39 39 33 31 32 65 37 34 66 33 66 32 62 66 63 30 22 7d 2c 7b 22 6b 65 79 22 3a 20 22 74 22 2c 22 76 61 6c 75 65 22 3a 20 31 38 33 36 7d 5d 7d
NBT send mbuf OK
AT> ,1
AT= 1,1
AT< 74
AT= OK
]
Excerpt from the Blue Pill log: Reading the sensor and transmitting the sensor data over NB-IoT. From https://github.com/lupyuen/stm32bluepill-mynewt-sensor/blob/rust-nbiot/logs/standalone-node.log#L128-L148
The log from our Blue Pill should look like this.
The contents of the log should be similar to the previous article. To understand the log messages, refer to the section “Check The Log” of this article.
When we Ctrl-Click the URL in the log…
https://blue-pill-geolocate.appspot.com?device=ac913c…

Web page with computed temperature
…We see a web page with the computed temperature value of our temperature sensor in degrees Celsius.
That’s because thethings.io has converted the raw temperature into the actual temperature (in degrees Celsius).
We have installed a script at thethings.io that pushes the computed temperature to blue-pill-geolocate.appspot.com, so that we could see the computed temperature.
The URL (and the random number) changes each time we restart the program. More details about the setup for thethings.io may be found in an earlier article.
What’s Next?
Visual Rust, of course! We’ll soon be able to generate the Embedded Rust program in this article by simply dragging and dropping blocks around. Check out the article here…

I have extended the Rust Code Generator for Google Blockly to generate Rust code that’s fairly close to the code that we see in this article.
Embedded Rust can clearly harness our powerful gadgets… It handles complex embedded programs well. And it prevents bugs from crashing our gadgets.
But will we know how to harness the power of Rust?
With great power comes great… Teaching! (That’s where I fit in…)
Could Rust harness its own power, like with auto-generated Safe Wrappers?
Or could we do it Visually… so we can see in a single glance how Rust is controlling our gadgets?
I’m about to find out… Stay tuned!
UPDATE: I have a new article that explains how to reduce the power consumption of our device…


Under Development: Visual Studio Code Extension for Visual Embedded Rust
The CoAP Macro is defined in rust/mynewt/src/encoding/macros.rs
It’s a Rust Declarative Macro that parses the JSON-like input (sensor data fields) and generates Rust code to encode the sensor data in JSON or CBOR format. Given this input…
// Compose the CoAP Payload using the coap!() macro.
// Select @json or @cbor To encode CoAP Payload
// in JSON or CBOR format.
let _payload = coap!( @json {
  // Create `values` as an array of items under the root.
  // Append to the `values` array the random device ID:
  // `{"key":"device", "value":"010203"}`
  "device": &device_id,

  // Assume `val` contains `key: "t", val: 2870`.
  // Append to the `values` array the Sensor Key
  // and Sensor Value:
  // `{"key": "t", "value": 2870}`
  val,
});
… And depending on the selector “@json” or “@cbor”, the CoAP Macro expands into the following code…
The CoAP Macro was adapted from the JSON parser in the serde_json crate.
The generated code uses a CoAP Context object to maintain the current JSON and CBOR encoding state: rust/mynewt/src/encoding/coap_context.rs
The JSON encoding code calls the Mynewt JSON API while the CBOR encoding code calls the Mynewt OIC API.
Read more about Rust Declarative Macros
Read more about CoAP Encoding
We use a custom Build Script to build the Rust application and link it into the Mynewt firmware. (View the Build Log) The script does the following…
1.Run cargo build to build the Rust application into a library named libapp.rlib
2.Extract the *.o object files from libapp.rlib (including the main() function from Rust) and external crates. Combine the object files into a new library rustlib.a
3.Copy rustlib.a into the Mynewt build folder for custom library libs/rust_app
4.Copy the Rust Core Library libcore-*.rlib from the Rust Compiler into the Mynewt build folder for custom library libs/rust_libcore
5.Run newt build to build the Mynewt firmware, which includes rust_app and rust_libcore
6.The Mynewt firmware calls the main() function defined in Rust, so the Rust application runs on startup
The following files may be useful for reference…
Read more about hosting Rust applications on Mynewt
Although Rust can call C functions directly, it’s unpleasant to call the Mynewt API with unsafe code. And we need to be very careful when converting pointers between Mynewt and C. Also all strings need to be null-terminated when passing from Mynewt to Rust. That’s why we create Safe Wrappers for the Mynewt API.
#[mynewt_macros::safe_wrap(attr)]
extern "C" {
  pub fn os_task_init(
    arg1: *mut os_task,
    arg2: *const ::cty::c_char,
    arg3: os_task_func_t,
    arg4: *mut ::cty::c_void,
    arg5: u8,
    arg6: os_time_t,
    arg7: *mut os_stack_t,
    arg8: u16,
  ) -> ::cty::c_int;
}
Here’s a typical Mynewt API os_task_init() that has been imported into Rust with our gen-bindings.sh script, thanks to bindgen...
pub fn task_init(arg1: Out<os_task>, arg2: &Strn,
  arg3: os_task_func_t, arg4: Ptr, arg5: u8,
  arg6: os_time_t, arg7: Out<[os_stack_t]>, arg8: u16)
     -> MynewtResult<()> {
      extern "C" {
        pub fn os_task_init(arg1: *mut os_task,
          arg2: *const ::cty::c_char,
          arg3: os_task_func_t,
          arg4: *mut ::cty::c_void, arg5: u8,
          arg6: os_time_t, arg7: *mut os_stack_t,
          arg8: u16) -> ::cty::c_int;
      }
      arg2.validate();
      unsafe {
        let result_value =
          os_task_init(arg1 as *mut os_task,
            arg2.as_ptr() as *const ::cty::c_char,
            arg3 as os_task_func_t,
            arg4 as *mut ::cty::c_void, arg5 as u8,
            arg6 as os_time_t,
            arg7.as_ptr() as *mut os_stack_t,
            arg8 as u16);
        if result_value == 0 { Ok(()) }
        else { Err(MynewtError::from(result_value)) }
      }
    }
…And here’s the Safe Wrapper for that API. Note the following…
1.Unsafe types like * const c_char have been replaced by the safer version Strn
2.We validate all Strn strings to confirm that they are null-terminated before passing to Mynewt: arg2.validate()
3.We convert the Mynewt result code into the standard MynewtResult<()> type
How did we create the Safe Wrappers? They were automatically generated with a Rust Procedural Macro named safe_wrap. That’s why we see this annotation…
#[mynewt_macros::safe_wrap(attr)]
Here is the Rust Doc for the Mynewt API
Read more about Safe Wrappers
The Safe Wrappers were generated by our Rust Procedural Macro named safe_wrap(). If you look at the source code, you’ll see that it’s actually another Rust program, except that it’s invoked during the Rust build, not during runtime.
#[mynewt_macros::safe_wrap(attr)]
extern "C" {
  pub fn os_task_init(
    arg1: *mut os_task,
    arg2: *const ::cty::c_char,
    arg3: os_task_func_t,
    arg4: *mut ::cty::c_void,
    arg5: u8,
    arg6: os_time_t,
    arg7: *mut os_stack_t,
    arg8: u16,
  ) -> ::cty::c_int;
}
safe_wrap() takes an extern declaration like this…
pub fn task_init(arg1: Out<os_task>, arg2: &Strn,
  arg3: os_task_func_t, arg4: Ptr, arg5: u8,
  arg6: os_time_t, arg7: Out<[os_stack_t]>, arg8: u16)
     -> MynewtResult<()> {
      extern "C" {
        pub fn os_task_init(arg1: *mut os_task,
          arg2: *const ::cty::c_char,
          arg3: os_task_func_t,
          arg4: *mut ::cty::c_void, arg5: u8,
          arg6: os_time_t, arg7: *mut os_stack_t,
          arg8: u16) -> ::cty::c_int;
      }
      arg2.validate();
      unsafe {
        let result_value =
          os_task_init(arg1 as *mut os_task,
            arg2.as_ptr() as *const ::cty::c_char,
            arg3 as os_task_func_t,
            arg4 as *mut ::cty::c_void, arg5 as u8,
            arg6 as os_time_t,
            arg7.as_ptr() as *mut os_stack_t,
            arg8 as u16);
        if result_value == 0 { Ok(()) }
        else { Err(MynewtError::from(result_value)) }
      }
    }
…And generates this Safe Wrapper.
It calls the syn crate to parse the extern declaration, and calls the quote crate to generate the Safe Wrapper code.
Yes, safe_wrap() is a Rust program that reads a Rust program and generates another Rust program!
We don’t generate wrappers yet for the entire Mynewt API. The whitelist of Mynewt APIs for generating wrappers is specified here.
We also use fixed rules to determine the namespace for each Mynewt function. Given a Mynewt function like os_task_init(), we use the rules to deduce that os is the namespace and task_init() should be name of the Rust Safe Wrapper.
To test the macros, I created a test-rust-macros project.
Read more about Rust Procedural Macros
The Mynewt API was imported into Rust using the gen-bindings.sh script. Here is the log.
int os_task_init(
  struct os_task *t,
  const char   *name,
  os_task_func_t func,
  void      *arg,
  uint8_t     prio,
  os_time_t    sanity_itvl,
  os_stack_t   *stack_bottom,
  uint16_t    stack_size);
This script takes the preprocessed C header files from Mynewt and generates extern function declarations in Rust. The script calls bindgen to create the declarations.
Given this C declaration…
#[mynewt_macros::safe_wrap(attr)]
extern "C" {
  pub fn os_task_init(
    arg1: *mut os_task,
    arg2: *const ::cty::c_char,
    arg3: os_task_func_t,
    arg4: *mut ::cty::c_void,
    arg5: u8,
    arg6: os_time_t,
    arg7: *mut os_stack_t,
    arg8: u16,
  ) -> ::cty::c_int;
}
…The script generates this Rust extern function declaration.
Only a subset of the Mynewt API is processed. Although bindgen can process *.h header files in selected include directories, it doesn’t work for Mynewt because of its complicated include structure.
I have chosen to let gcc create preprocessed versions of each header file. The gcc options look like this. The preprocessed header file looks like this. The generated Rust declarations is here.
The script passes blacklists and whitelists to bindgen to ensure that there are no duplicate declarations.
Read more about generating Rust bindings
Note: The content and the pictures in this article are contributed by the author. The opinions expressed by contributors are their own and not those of PCBWay. If there is any infringement of content or pictures, please contact our editor (zoey@pcbway.com) for deleting.
Written by