Summary: The development of the Magnos generator has gained an adapter that is able to produce quite a few hundred AC volts, with just minimal input, at this point we are able to light a 220VAC lightbulb from just a USB port and two 60 watts 24 volts solar panels. This is a huge advancement, as here, on PCBWay, is claimed as one of the greatest yet simplest powerful magnetic generators.
Long time no see folks.
In the last article we talked about how to shape the curves or spikes of DC waves to smoothen into AC.
By the means of derivatives, well, that worked pretty much fine, for an SSR or Solid State Relay, but either because we're too lazy or the SSRs ended up not being fast enough, we decided to use transformers.
Tamuras are quite good, for its purpose, I'll show you the diagram and how does it look like.
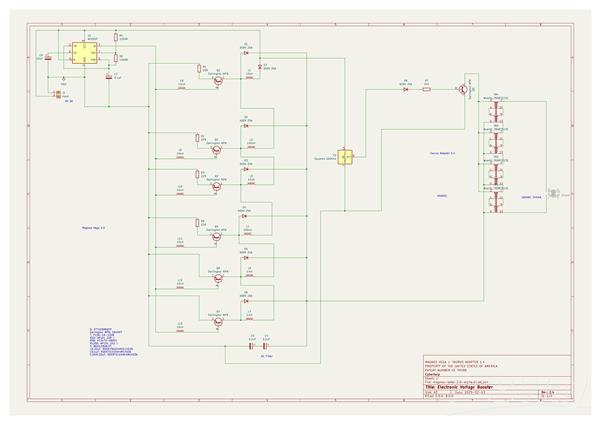
So the base of this, is to charge the Tamuras as fast as possible with as much voltage as possible, they will smooth the charge by sine wave or whatever as they are designed in a circular sine shape. They are connected parallel to transform and in the output series to accumulate the voltage, pretty cool, there are many other configurations, but this one is the easier.
This is just like, the most advanced version of Magnos, can supply 220-600VAC from a supply of only a few 5-24 volts range.
Cool right?
At this moment, and I'm going to be as brief as possible, this miracle happened, around 8 am Central Europe Time, we managed to light a lightbulb from a 5-24 VDC range.
One of the problems we faced was the collapse of the Casimir forces, which is something I'm trying to figure out, and that it is a pretty "modern" concept that is currently out of my comprehension, as the inductive voltage goes up, it does not really matter if the voltage is oscillating somewhere, it will just collapse, because electrons are being pulled one by one, to compensate the transformation, so they collapse, what do we do is to add inductors before every oscillation so that the current can flow in one direction and so that the collapse flybacks in order not to exchange current for voltage.
The circuit is not hot, it's pretty cold as oscillation makes it go up hot down cold, which is pretty good.
This is the last part of the Voltage journey, later on we'll update with specific details on math, components and so on.
So, we did it folks! I hope this can help you with whatever power supply you need.
In the next article we'll talk about how to use AI to predict voltage drops and use (or charge) batteries, so that the energy keeps flowing and charges when connect (or when there is sunlight).
This is Kai, Cybertwip's founder, delighted to write a new article, here on PCBWay.
#include <Arduino.h>

const int CS_PIN = 0;  // Chip Select pin connected to pin 10 on MKR Zero

void setup() {
  pinMode(CS_PIN, OUTPUT);
  digitalWrite(CS_PIN, HIGH);  // Deselect the chip initially
}


void loop() {
  digitalWrite(CS_PIN, LOW);   // Select the chip
  delayMicroseconds(980);
  digitalWrite(CS_PIN, HIGH);  // Deselect the chip
  delayMicroseconds(850);
}


