


Pluto Bluetooth RC Car
Pluto Bluetooth RC Car © LGPL
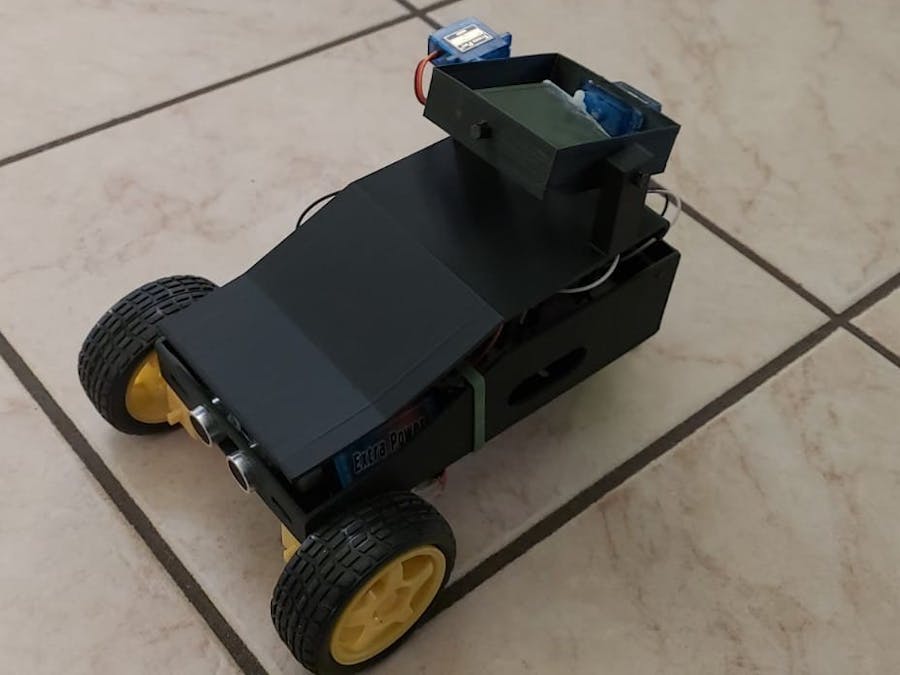
Pluto is a 2WD bluetooth car on which is placed a self balancing plane.
COMPONENTS AND SUPPLIES
 Arduino IDEUltimaker CuraSolidWorks 2019/20
ABOUT THIS PROJECT

Pluto is a project about a particular bluetooth machine.
This car can be controlled by a mobile phone, connecting the car on the Bluetooth we have used the app Arduino Bluetooth Controller which can be found on the Play Store.

On it are installed a self balancing platform composed of two floors connected to two servomotors, which keep the horizontal plane, by means of an accelerometer, which calculates the angle and sends the same values to the servomotors, but opposite.
We decided to do this project for two reasons: 1 have a child play; 2 to be able to bring a glass to a person without emptying it if there are ramps.
The operation is simple: sending a bluetooth signal from the phone the arduino card detects it and makes the machine move left, right, forward, backward or stand still based on what we want it to do to it.
For the self balancing plane it stabilizes independently thanks to the two servomotors, the accelerometer and the gyroscope (mpu6050).
CODE
Pluto car codeArduino
char t;
#include <Wire.h>          //include the required libraries
#include <MPU6050.h>       //include MPU6050 libraries
#include <Servo.h>
MPU6050 sensor ;          //create an instance of the MPU6050 named sensor
Servo sg90y;
Servo sg90x;
int servo_pinX = 2;
int servo_pinY = 3;
int motor1A = 4;
int motor1B = 5;
int motor2A = 6;
int motor2B = 7;

int16_t ax, ay, az ;      //declare 6 16 bit integer variables
int16_t gx, gy, gz ;      //declare 6 16 bit integer variables

void setup() {
  pinMode(servo_pinX, OUTPUT);
  pinMode(servo_pinY, OUTPUT);
  pinMode(motor1A, OUTPUT);
  pinMode(motor1B, OUTPUT);
  pinMode(motor2A, OUTPUT);
  pinMode(motor2B, OUTPUT);
  pinMode(A5, INPUT);
  pinMode(A4, INPUT);
  sg90x.attach ( servo_pinX );
  sg90y.attach ( servo_pinY );
  Wire.begin ( );                  //begins the trasmission with MPU6050
  sensor.initialize ( );           //initialise the sensor
  Serial.begin(9600);
  delay(400);
}
void forward() {
  digitalWrite(motor1A, LOW);
  digitalWrite(motor1B, HIGH);
  digitalWrite(motor2A, LOW);
  digitalWrite(motor2B, HIGH);
}

void reverse() {
  digitalWrite(motor1A, HIGH);
  digitalWrite(motor1B, LOW);
  digitalWrite(motor2B, LOW);
  digitalWrite(motor2A, HIGH);
}
void right() {
  digitalWrite(motor1B, HIGH);
  digitalWrite(motor1A, LOW);
  digitalWrite(motor2B, LOW);
  digitalWrite(motor2A, HIGH);
}
void left() {
  digitalWrite(motor1B, LOW);
  digitalWrite(motor1A, HIGH);
  digitalWrite(motor2B, HIGH);
  digitalWrite(motor2A, LOW);
}
void nomove() {
  digitalWrite(motor1B, LOW);
  digitalWrite(motor1A, LOW);
  digitalWrite(motor2B, LOW);
  digitalWrite(motor2A, LOW);
}
void loop() {
  sensor.getMotion6 (&ax, &ay, &az, &gx, &gy, &gz);   //read 6 values into 6 variables
  ay = map (ay, -17000, 17000, 0, 180) ;              // change the range of the ay value from -17000/17000 to 0/180
  sg90y.write (ay);
  ax = map (ax, -17000, 17000, 0, 180) ;              // change the range of the ax value from -17000/17000 to 0/180
  sg90x.write (ax);
  if (Serial.available()) {

    t = Serial.read();
    Serial.println(t);                               //Read the incoming data and store it into variable t
    if (t == 'F') {
      forward();
    }
    else if (t == 'B') {
      reverse();
    }
    else if (t == 'L') {
      left();
    }
    else if (t == 'R') {
      right();
    }

    else if (t == 'S') {
      nomove();
    }
  }
}
- Comments(0)
- Likes(1)
 More by Raushan Kumar
-
 How to Make Google Home Assistant Control LED Strip Light at Home
Introduction: How to Make Google Home Assistant Control LED Strip Light at HomeHey Guy’sIn this vide...
How to Make Google Home Assistant Control LED Strip Light at Home
Introduction: How to Make Google Home Assistant Control LED Strip Light at HomeHey Guy’sIn this vide...
-
 Breadboard Friendly Breakout Board for ESP8266
Introduction: Breadboard Friendly Breakout Board for ESP8266-01 With Voltage RegulatorHello everyone...
Breadboard Friendly Breakout Board for ESP8266
Introduction: Breadboard Friendly Breakout Board for ESP8266-01 With Voltage RegulatorHello everyone...
-
 Weather Station Using Esp32
For my first IoT project I wanted to build a Weather Station and send the data to data.sparkfun.com....
Weather Station Using Esp32
For my first IoT project I wanted to build a Weather Station and send the data to data.sparkfun.com....
-
 Simple Motion Sensor Light! (PIR)
Step 1: Gather the PartsOne can Buy Everything Used in this Project from Ebay.While i Get most of th...
Simple Motion Sensor Light! (PIR)
Step 1: Gather the PartsOne can Buy Everything Used in this Project from Ebay.While i Get most of th...
-
 Smartphone Holder ! PCBWAY!
Our ANTiDISTRACTION device is aimed at terminating all forms of cellular distraction during periods ...
Smartphone Holder ! PCBWAY!
Our ANTiDISTRACTION device is aimed at terminating all forms of cellular distraction during periods ...


