


MyPetBot (A Bot That Follows You)


Ai is one of the most beautiful application of mathematics. It's basically a bunch of matrices operations optimized to match the result you are looking for. Luckily there are tons of open source tool that allow us to make use of it.
I originally had the idea long time ago when I was working on a waterfall de-activated by the people passing throw. I was using ultrasound sensors and discovered too late that they don't work greatly when they are wet... That was not a fun experience. We ended up using a big button that people would press if they wanted to pass. It turned out fine because it was hot and people loved getting wet, but the problem stayed in my head... How to detect people and activate a reaction.
Im telling this story because I want to point out that this principle can be used for tons of other applications! Following your face with a toy is only one of them. For interactive installations you could do any kind of thing. You could use a model to detect if a face is smiling. You could count the number of dogs in a park. You could close your blinds when people are passing by. Or... make a controller for your nintendo base on your body position.... You can download many other Ai models that do any kind of stuff.
There are a few tutorial on how to make Ai inference work with raspberry pi. I am here to teach you how to make the hole integration into a self working unit. As soon as your robot boot, it will start the necessary programs.
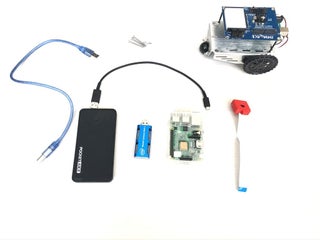
Supplies:
- Parallax robot: I chose this robot because I had it laying around, but any robot that can be controlled with an arduino will do the work.
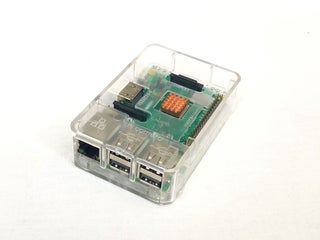
- Raspberry pi: I recommend at least the raspberry pi 3B+.
- Intel Neural Stick: The inference rate goes from one per sec to 8. You really need one if you want to do Ai in a raspberry pi.
- Power Bank: Easiest way to manage the power. Works with the raspberry pi 3B+, you might want to check it works with a pi 4.
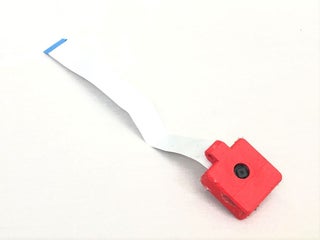
- Picamera: I like using the picamera instead
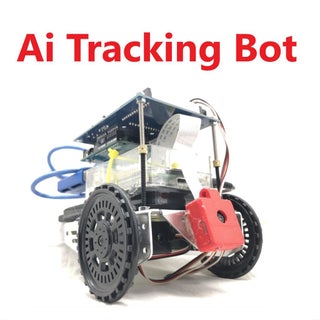
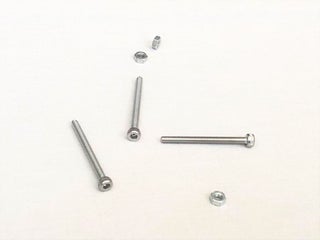
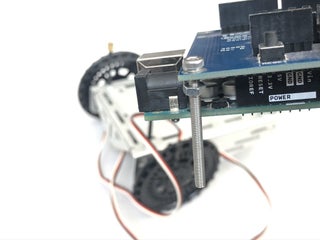
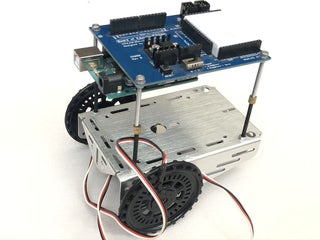
Step 1: Rover Assembly


![]()
![]()
![]()
![]()
![]()
![]()
![]()
![]()
The point of the tutorial is mainly about the software, so I don't want to go too much into the details of the rover. It works with this robot, but it could work really with any other hardware. Doesn't even has to be for a rover, you could use this for a motion sensor camera.
- Find yourself an Arduino controlled vehicle.
- Tight wrap a power bank to it.
- Tight wrap a raspberry pi to it.
- Glue the picamera with at a slight angle towards the top.
- Connect everything together.
- Voila!
Step 2: Raspbian


I'm using a raspberry pi, but there is no reason not to use another linux... up to you. I could release a plug and play image for burning a sd card, I'll get to it if enough people are interested.
Install the Raspbian: You can install the Raspbian Buster Lite. We are not going to use the desktop... Only the ssh Secure Shell connection.
Connect to your Pi: First you can connect to your raspberry pi with an Ethernet connection
Set your wifi: Now you can configure your wireless connection
Step 3: OpenVino

OpenVino is a great library supported by Intel. They have done a great job at compiling example models and they have made most of ai framework compatible. You need this library for the Intel Neural Stick.
Python3 installation: You need to install python 3.
OpenVino installation: Once this is done you will see a line "[setupvars.sh] OpenVINO environment initialized" everytime you connect to the raspberry pi.
OpenVino is an extension of opencv. To test it, you can launch python3 and import cv2.
type into the shell:
- python3
type into python:
- import cv2
- cv2.__version__
The last line should return '4.1.2-openvino' or any version of openvino. if if says opencv your installation didn't work...
Step 4: Download the Code
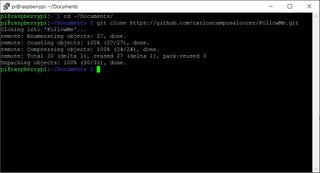
First, we install git. Type into the shell:
- sudo apt-get install git
Then we can move to Documents folder and download the code:
- cd ~/Documents/
- git clone https://github.com/carloscamposalcocer/FollowMe
Step 5: FollowMe (Python)
![]()
This is the part you wanna play with. Make if follow you! Make it scared of you! Follow your dog! Make it recognize face expressions!! Harase your cat!!! Anything you want.
You will find four main, folders: Arduino, Deployment, Player and FollowMe:
Arduino: More on that on the next section
Deployment: This is where I put the user interface. Right now I coded a simple start/stop button and a little camera viewer with control just fur fun.
Player: Meant to be used in your desktop PC. For reviewing the output of the bot!
FollowMe: The module that does the actual fun
I'll put more details on github, so to only have one place to update. This is the place for the code
Step 6: Download the Models
The models for inference are not included in the code since they are quite big. But you can find lots of examples using OpenVino model Zoo
You can use the model downloader or go directly throw this link. In my case I couldn't use the model downloader from my raspberry pi installation...
Then copy the model into a folder named Models with:
- cd ~/Documents/FollowMe
- mkdir Models
- cd Models
- wget https://download.01.org/openvinotoolkit/2018_R5/open_model_zoo/face-detection-adas-0001/FP32/face-detection-adas-0001.xml
- wget https://download.01.org/openvinotoolkit/2018_R5/open_model_zoo/face-detection-adas-0001/FP32/face-detection-adas-0001.bin
You always need the .xml and the .bin.
You can download any model you want... But you will have to change the code. Have fun!
Step 7: Arduino
![]()
We got to download the code on the previous step. The code for the arduino is in it!
The code is meant to drive two continuous servos, if you chose a different configuration your have to modify the code.
It basically does two things. It communicates with the computer and it activates the servos at the selected speed.
I could us the output of the raspberry pi directly to control the motors... but arduinos work better (They have a real frequency generator). Also, I wanted to offload the raspberry pi as much as possible to make the inference faster.
Step 8: GUI
![]()
![]()
Nothing fancy... Yet. I might add some other stuff like live view or motion controls. But on the meantime a simple start and stop will do the trick.
If you want to test it you have to launch it from the FollowMe Level and the type call it from python3:
- cd ~/Documents/FollowMe
- python3 Deployment/FollowMe.py
Then you can access the interface in your browser by typing:
192.168.0.113:8000
with the right IP address of course.
There is also a video viewer with controls... but not with working inference
- python3 Deployment/StreamVideo.py
Step 9: Service!
This is what make the Rover work by itself. A service is a program running in the background of the computer without a user. Make sure ALL YOUR PATHS are absolutes and that you have the correct rights if you use any files and the service will run fine.
To run a python script as a service you need to reference the script in a service file. The service file is in the code downloaded from git in the folder Deployment. The name is FollowMe.service.
To copy it type the following in the shell:
- sudo cp ~/Documents/FollowMe/Deployment/FollowMe.service /etc/systemd/system/
First time you copy the file you need to update systemctl... or reboot:
- sudo systemctl daemon-reload
And to start:
- sudo systemctl start FollowMe
You can also use the commands stop, enable and disable. The last two are for a persistent change of state.
Little Explanation....
Openvino needs some extra paths in the system variables for it to work. Unfortunately the normal installation will not work as a service. So you need this file to set the variables.
Notice that my installation is for python 3.7 therefore there is a variable that you may need to adjust... Good luck!
This file references the python script in the absolute path:
/home/pi/Documents/FollowMe/Deployment/FollowMe.py
Step 10: Thats It! Have
Comments? always welcome
Thanks PcbWay
- Comments(2)
- Likes(1)
 More by Rauahan
-
 BIG POV Fan
e , fun , and easy DIY project that kids and adults can enjoy making .POV or persistence of vision p...
BIG POV Fan
e , fun , and easy DIY project that kids and adults can enjoy making .POV or persistence of vision p...
-
 MyPetBot (A Bot That Follows You)
Ai is one of the most beautiful application of mathematics. It's basically a bunch of matrices opera...
MyPetBot (A Bot That Follows You)
Ai is one of the most beautiful application of mathematics. It's basically a bunch of matrices opera...
-
 Wearable Smart Sensing Insole
Understanding the orientation and distribution of force exerted by the feet can be extremely useful ...
Wearable Smart Sensing Insole
Understanding the orientation and distribution of force exerted by the feet can be extremely useful ...
-
 ESP-12E and ESP-12F Programming and Development Board
The remit for this board was simple:Be able to program ESP-12E and ESP-12F modules as easily as the ...
ESP-12E and ESP-12F Programming and Development Board
The remit for this board was simple:Be able to program ESP-12E and ESP-12F modules as easily as the ...
-
 Make a DIY Sonoff Smart Switch Use Android App
What’s Sonoff?Sonoff is a smart switch device line for Smart Home developed by ITEAD. One of the mos...
Make a DIY Sonoff Smart Switch Use Android App
What’s Sonoff?Sonoff is a smart switch device line for Smart Home developed by ITEAD. One of the mos...


