


MQTT Communication With the Nano 33 IoT & WeMos D1 Boards
MQTT Communication With the Nano 33 IoT & WeMos D1 Boards © CC BY-NC-SA
This post will tell you everything you need to know about MQTT communication which will enable you to use it communicate between devices.
ABOUT THIS PROJECT
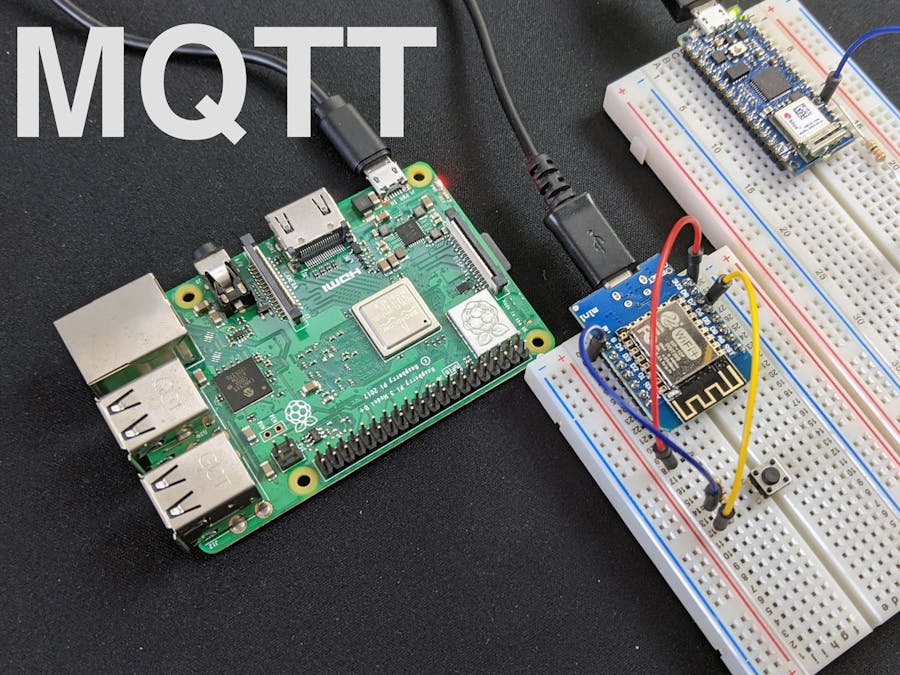
This post will tell you everything you need to know about MQTT communication which will enable you to use it communicate between devices. We add an LED to the Arduino Nano 33 IoT board and this LED is controlled remotely from a switch that is connected to a WeMos D1 mini board. All communication occurs through the MQTT broker which also communicates with Home Assistant.
Step 1: Watch the Video
A lot of effort has been put into making the video above as we felt that a video is the best way to understand a topic like this. Please take a moment to watch the video to get a better understanding of MQTT and how we will set up the broker, use it and so on.
Step 2: Install & Configure the MQTT Broker
As this involves several steps, it is advisable to watch the video to view how to set this up correctly.
Step 3: Download & Update the Sketches
As mentioned in the video, you can use the sketches linked below to test out your setup. The file below contains two sketches - one for the Arduino Nano 33 IoT board and the other for the WeMos D1 mini board.
https://www.bitsnblobs.com/wp-content/media/diy/e34/e34.zip
You will need to add your WiFi network name, and password, along with the MQTT broker details. Please watch the video for more information.
Step 4: Wire the Boards, Upload & Test
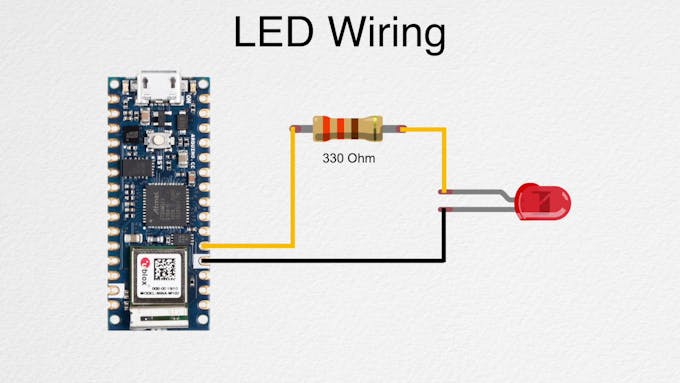
Nano 33 IoT Board Wiring
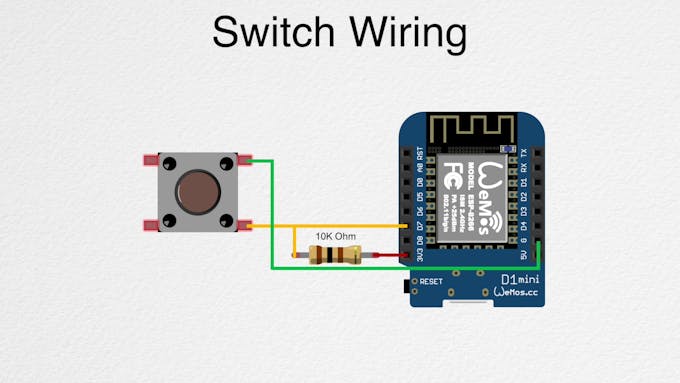
WeMos D1 Mini Wiring
- 1
- 2
First, connect an LED to the Arduino Nano 33 IoT board using the reference wiring shown in the image. Once done, you would need to do the following:
- Install the board support package by using the board manager. Search for "Nano 33 IoT"
- Install the WiFiNiNa library by using the library manager so that we can use the WiFi module. Search for "WiFiNiNa"
- Install the PubSubClient library by using the library manager as this is needed for MQTT communication. Search for "PubSubClient"
Then, select the correct board, COM port and upload the sketch. You can open the serial monitor with the baud rate of 115200 to view the board status.
Next, connect a switch to the WeMos D1 mini board by using the reference wiring diagram. Once done, you need to do the following:
- Add the following URL to the preferences window so that we can install the board support package. http://arduino.esp8266.com/stable/package_esp8266com_index.json
- Install the board support package by using the board manager. Search for "ESP8266"
Then, select the correct board along with the board settings as listed in the sketch. Upload the sketch and then open up the serial monitor with a baud of 115200 to view the board status.
The boards should connect to the MQTT broker and pressing the switch should allow you to control the LED remotely. The video shows you how you can test the setup.
Please do consider subscribing to our YouTube channel as it helps us create projects like these.
- Comments(0)
- Likes(2)
 More by Raushan Kumar
-
 How to Make Google Home Assistant Control LED Strip Light at Home
Introduction: How to Make Google Home Assistant Control LED Strip Light at HomeHey Guy’sIn this vide...
How to Make Google Home Assistant Control LED Strip Light at Home
Introduction: How to Make Google Home Assistant Control LED Strip Light at HomeHey Guy’sIn this vide...
-
 Breadboard Friendly Breakout Board for ESP8266
Introduction: Breadboard Friendly Breakout Board for ESP8266-01 With Voltage RegulatorHello everyone...
Breadboard Friendly Breakout Board for ESP8266
Introduction: Breadboard Friendly Breakout Board for ESP8266-01 With Voltage RegulatorHello everyone...
-
 Weather Station Using Esp32
For my first IoT project I wanted to build a Weather Station and send the data to data.sparkfun.com....
Weather Station Using Esp32
For my first IoT project I wanted to build a Weather Station and send the data to data.sparkfun.com....
-
 Simple Motion Sensor Light! (PIR)
Step 1: Gather the PartsOne can Buy Everything Used in this Project from Ebay.While i Get most of th...
Simple Motion Sensor Light! (PIR)
Step 1: Gather the PartsOne can Buy Everything Used in this Project from Ebay.While i Get most of th...
-
 Smartphone Holder ! PCBWAY!
Our ANTiDISTRACTION device is aimed at terminating all forms of cellular distraction during periods ...
Smartphone Holder ! PCBWAY!
Our ANTiDISTRACTION device is aimed at terminating all forms of cellular distraction during periods ...


