


Getting Started with Nodemcu
Many people asked me to programme NodeMCU with Arduino IDE so I decided to write this guide.
Installing the NodeMCU Support for the Arduino
- First open the Arduino IDE
- Go to files and click on the preference in the Arduino IDE
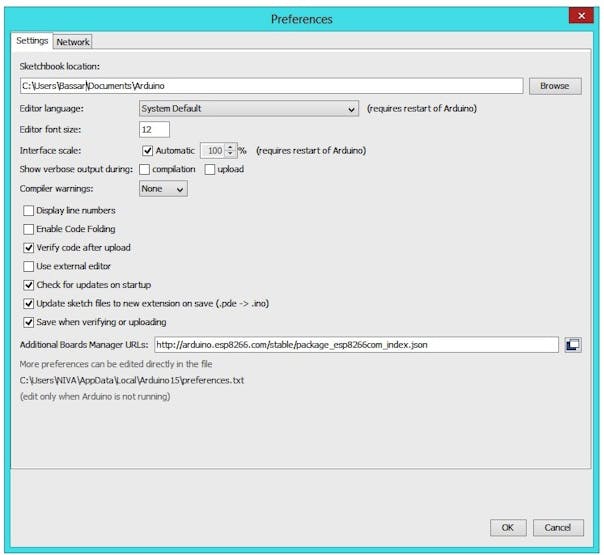
- Paste below URL in the Additional boards Manager
http://arduino.esp8266.com/stable/package_esp8266com_index.json
- click OK, It will close the preference Tab.
- Now, Go to Tools and board, and then select board Manager
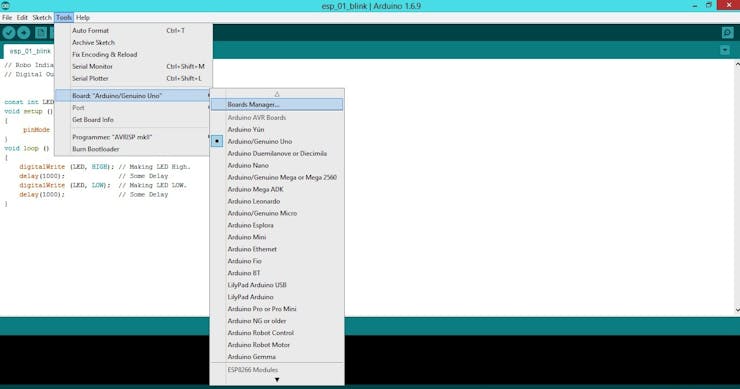
- Navigate to ESP8266 by ESP8266 community and install the software.

- Once all the above process is completed we are ready to program our NodeMCU with Arduino IDE.
Lets Test It With Blink Programme
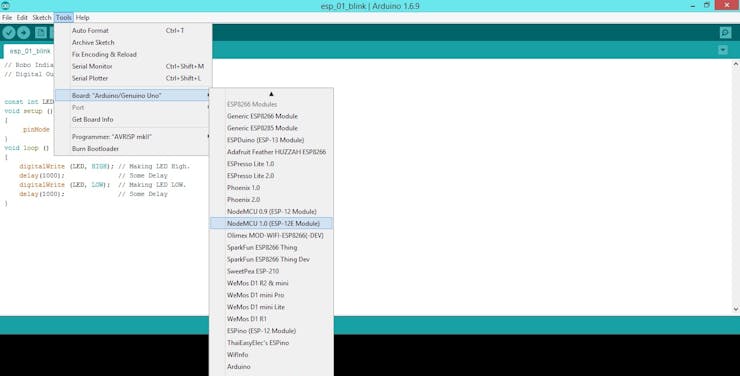
- Now, go to Tools, board and select the type of NodeMCU you have
- Then select the correct COM port to upload the program on your NodeMCU
- Now Copy Paste the below programme and upload it.
- If you did everything correctly then, your led should blink continuously.
If you have any query or issue please comment below.
void setup() {
  // initialize inbuilt LED pin as an output.
  pinMode(13, OUTPUT);
}

// loop function runs over and over again forever
void loop() {
  digitalWrite(13, HIGH);   // turn the LED on by making the pin 13 HIGH
  delay(500);              // wait for a 0.5 second
  digitalWrite(13, LOW);    // turn the LED off by making the pin 13 LOW
  delay(500);              // wait for a 0.5 second
}
Thanks So much Pcbway
Bill of materials used in this project
Nodemcu
13800+ Projects Sponsored
Posted in
Arduino,
Nov 15,2019
1,398 viewsReport item
- Comments(0)
- Likes(1)
Upload photo
You can only upload 5 files in total. Each file cannot exceed 2MB. Supports JPG, JPEG, GIF, PNG, BMP
0 / 10000
 More by Rauahan
-
 BIG POV Fan
e , fun , and easy DIY project that kids and adults can enjoy making .POV or persistence of vision p...
BIG POV Fan
e , fun , and easy DIY project that kids and adults can enjoy making .POV or persistence of vision p...
-
 MyPetBot (A Bot That Follows You)
Ai is one of the most beautiful application of mathematics. It's basically a bunch of matrices opera...
MyPetBot (A Bot That Follows You)
Ai is one of the most beautiful application of mathematics. It's basically a bunch of matrices opera...
-
 Wearable Smart Sensing Insole
Understanding the orientation and distribution of force exerted by the feet can be extremely useful ...
Wearable Smart Sensing Insole
Understanding the orientation and distribution of force exerted by the feet can be extremely useful ...
-
 ESP-12E and ESP-12F Programming and Development Board
The remit for this board was simple:Be able to program ESP-12E and ESP-12F modules as easily as the ...
ESP-12E and ESP-12F Programming and Development Board
The remit for this board was simple:Be able to program ESP-12E and ESP-12F modules as easily as the ...
-
 Make a DIY Sonoff Smart Switch Use Android App
What’s Sonoff?Sonoff is a smart switch device line for Smart Home developed by ITEAD. One of the mos...
Make a DIY Sonoff Smart Switch Use Android App
What’s Sonoff?Sonoff is a smart switch device line for Smart Home developed by ITEAD. One of the mos...


