


Arduino- Servo Motor
Make a wall-mounted dial to indicate today's weather conditions, your current location (à la Harry Potter), or power usage in your home. Or build brainwave-controlled wings. Or a robot arm to serve you Bellinis. The power is yours, with SERVOS!We're using the Arduino to send these motors a position value in degrees, over PWM. We'll start with a simple back-and-forth movement, then make a little physical button-press-counter. Set up your circuit like so:
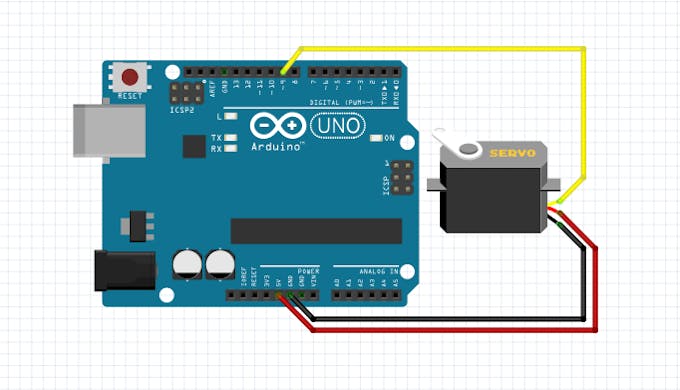
Another example that requires a PWM pin – make sure you're using one with the ~ mark.
Fire up the Arduino IDE, bring
up File > Examples, and scroll alllll the way down to the Servo library. Click on the Sweep example.
CODE
Go ahead and upload this, and you'll soon see your servo's arm sweeping back and forth in an arc. There's one important thing to note: At either end of its arc, the servo may pause and make little angry noises. That means that it's being driven outside its scope. We'll handle that in a minute – first, let's go through the code...
Inside the loop code, there are a couple of sub-loops: for loops. These will "trap" the Arduino in a series of re-executed steps, until a test condition is satisfied.
for (pos = 0; pos <= 180; pos += 1) {
myservo.write(pos);
delay(15);
}
The meat of the loop is in the middle {between the brackets}: the actions we take on each run. The servo, which we called myservo in the setup (or george in the video), is set to the value of the pos variable, which is usually between 0 and 180 degrees: myservo.write(pos);
Then, we wait 15 milliseconds, and loop around again.
This loop takes three arguments: info in parentheses that tells the code how to run. In this case:
- The
forloop will only be triggered if the variableposis at 0 – which it is, when we create it at setup.
- The second argument (our condition) checks to see whether
posis still less than 180; once the loop is triggered, we will keep looping through until that's false. - And finally, the third argument increments the
posvariable by one. (This is an alternative to the "pos++" incrementation we learned in Code Magic.)
As long as the condition is true – that is, until pos hits 180 – the Arduino repeats the loop.
And then, it goes directly into another one! This one starts at 180, then increments the pos variable down by one, until it hits 0. At that point, the entire loop section of this sketch is complete, and the Arduino takes a deep breath and starts again./*
  Button

 Turns on and off a light emitting diode(LED) connected to digital
 pin 13, when pressing a pushbutton attached to pin 2.


 The circuit:
 * LED attached from pin 13 to ground
 * pushbutton attached to pin 2 from +5V
 * 10K resistor attached to pin 2 from ground

 * Note: on most Arduinos there is already an LED on the board
 attached to pin 13.


 created 2005
 by DojoDave <http://www.0j0.org>
 modified 30 Aug 2011
 by Tom Igoe

 This example code is in the public domain.

 http://www.arduino.cc/en/Tutorial/Button
 */

// constants won't change. They're used here to
// set pin numbers:
const int buttonPin = 2;     // the number of the pushbutton pin
const int ledPin =  13;      // the number of the LED pin

// variables will change:
int buttonState = 0;         // variable for reading the pushbutton status

void setup() {
  // initialize the LED pin as an output:
  pinMode(ledPin, OUTPUT);
  // initialize the pushbutton pin as an input:
  pinMode(buttonPin, INPUT);
}

void loop() {
  // read the state of the pushbutton value:
  buttonState = digitalRead(buttonPin);

  // check if the pushbutton is pressed.
  // if it is, the buttonState is HIGH:
  if (buttonState == HIGH) {
    // turn LED on:
    digitalWrite(ledPin, HIGH);
  } else {
    // turn LED off:
    digitalWrite(ledPin, LOW);
  }
}

- Comments(0)
- Likes(0)
 More by paaa
-
 Esp8266 Firmware Update
Introduction: The ESP8266 module is a cheap Wireless module.It has SOC(system on chip) that is capab...
Esp8266 Firmware Update
Introduction: The ESP8266 module is a cheap Wireless module.It has SOC(system on chip) that is capab...
-
 16x16 RGB LED Panel Arduino Projects
Hi Everyone,I am posting this project because I would like everyone to have a simple place to come t...
16x16 RGB LED Panel Arduino Projects
Hi Everyone,I am posting this project because I would like everyone to have a simple place to come t...
-
 RGB Color Picker
I’ve designed a simple 3D printed enclosure for the electronics to make the device portable, simply ...
RGB Color Picker
I’ve designed a simple 3D printed enclosure for the electronics to make the device portable, simply ...
-
 Fish Feeder
I'm setting up a betta fish tank and wanted to make an automatic fish feeder so he never misses a me...
Fish Feeder
I'm setting up a betta fish tank and wanted to make an automatic fish feeder so he never misses a me...
-
 Attiny85 Wireless Weather Sensor
In this article is shown how to build your own wireless weather sensor compatible with Oregon weathe...
Attiny85 Wireless Weather Sensor
In this article is shown how to build your own wireless weather sensor compatible with Oregon weathe...


