By Lisa Horn @Ponoko
You’ve put your heart and soul into building a custom electronics device with PCBWay. While the soldering, connecting and working out any bugs is complete, you’re not done…yet.
No, this piece of hardware perfection can’t be left naked with its board and wires exposed for all the world to see. It must be protected from the elements so it performs as designed for years to come. You need a custom electronics enclosure.
Unless you’ve got some wicked wizarding skills, perfect faceplates or enclosures for your custom PCB boards typically can’t be bought off the shelf and don’t appear out of thin air with the wave of a wand. Rather, they have to be custom manufactured. Follow these four steps to make the perfect parts to complement your PCB board:
Step 1: Identifying The Ideal Making Method
There are a number of ways you can make enclosures or panels for your electronics project. Which is right for you? Let’s look at a few of the most popular options so you can decide.
One of the first and most logical places to start is by looking at what’s available off-the-shelf. In theory, this should be the least time-consuming and least expensive. Just grab it, mount the PCB and go.
However, if you’ve ever fallen down the rabbit hole of internet searches, you know that hours (or days) can pass without ever finding exactly what you want. The sizing is too big or too small. The aesthetics don’t align with your vision. The materials aren’t conducive to electronics. The price is ridiculous. Even if you find something that will work conceptually, it will most likely need some tweaking to actually work IRL.
If off-the-shelf options leave you feeling like jumping off a cliff, take a step back from the edge. Making custom parts is the way to go.
One option is designing a 3D model of an enclosure using a CAD system and then ordering it from an on-demand 3D printing manufacturer. Pros: Great results in terms of shape. Cons: Limited to prototyping materials used in 3D printing, mad skills required for computer modeling and the price may empty your wallet.
There’s got to be a better way, right? Say hello to laser cutting.
Lasers can cut and engrave flat parts from sheet materials such as plastic, metal and wood in any configuration you can imagine. The flexibility you have with laser cutting is unbeatable. Also, the materials selection is HUGE, ensuring you have the right construction structurally and aesthetically—for both prototypes and production. Thus, you only have to use one manufacturing process to go from idea to prototype to product to market.
In addition to using 3D design tools, you can also work in 2D programs such as Illustrator and Inkscape; previous design experience isn’t required. Pricing is affordable, and turn-around time is fast. Winner!
Step 2: Determining What Kind Of Parts You Need
Before making the final determination if laser cutting is right for your electronics build, it’s important to understand what can be made via laser cutting. The two most popular kinds of parts are faceplates/panels and full enclosures/boxes.
Laser Cut Faceplates (Panels)
Do you have a partial enclosure, perhaps a speaker box or DVD player that you’re repurposing? Laser cutting makes it easy to create a faceplate to exact dimensions you require.
What about labeling? If you’ve ever tried using stickers or printing, you may have found these rub off over time. Using the laser solves this problem, as text and graphics can be engraved for readability that stands the test of time. Check out the precision of the engraving on this faceplate:
You can also see there’s great contrast between the faceplate itself and the engraved text. This is achieved by using two-color acrylics. When the laser engraves away the top color (red, in this case), the underlying color (white) is revealed. It’s a simple solution that is easy to design into your parts and eliminates the need for any hand-finishing for labeling—and important consideration when making quantities to sell.
Laser Cut Enclosures (Boxes)
If your electronics project requires an entire custom enclosure, there are several different ways to construct boxes using laser cutting.
Panel enclosures, as the name suggests, use one piece of laser cut material for each wall of the enclosure. This acrylic box is made from 3mm matte black acrylic (matte keeps fingerprints at bay) as is paired with a white-on-black acrylic faceplate.
Notice that the panels are held together using tabs. When constructing panel boxes with tabs (or finger joints), you must incorporate material thickness in the design in order for all pieces to fit together properly. MakerCase is a great resource for help when designing using this method.
Panel enclosures can also be held together with clips—no glue or screws needed—such as this Stacking Pi Case. Congo Jo designed this case so multiple Raspberry Pi units could be stacked on top of one another in a tower format. White-on-black acrylic was used here to illustrate not only how graphics look when engraved but also the contrast of the edge cuts, which gives the box even more dimension.
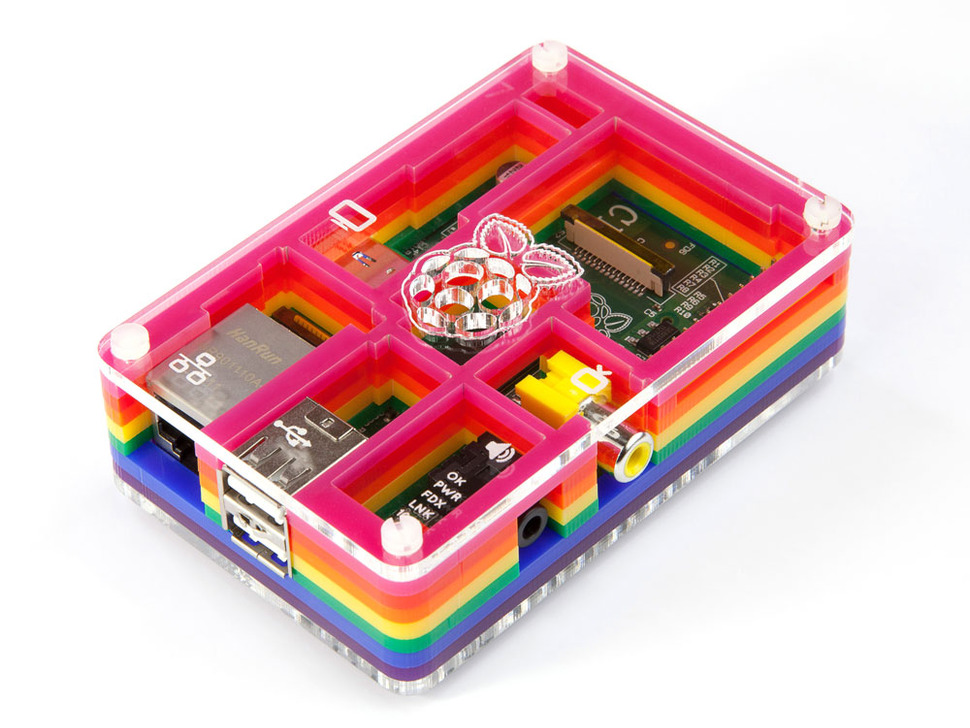
Not to be confused with the “stackable case” above, this Rainbow Pi by Adafruit stacks layers of laser cut acrylic upon one another to build a simple enclosure that’s great for beginners. While you don’t have to use every color in the rainbow, it sure looks sweet when you do.
When building a layered case, some kind of hardware or fixtures (the little plastic screws) must be used to hold the layers securely together. It’s also interesting to note how this case takes advantage of layering to create internal walls to isolate and mount components.
While these aren’t the only ways to make box enclosures, these examples should give you an idea if laser cutting is right for you. If so, keep reading.
Laser Cut Fixtures And Panels
Wires and PCB boards often just need something solid to mount onto, and laser cut panels are perfect for this application. This example by Wes Westhaver, a software developer who leans toward software/hardware integration projects, demonstrates a rear mounting panel made from laser cut clear acrylic.
Step 3: Designing Your Parts For Manufacture (DFM)
Now that you’ve decided laser cutting is right for your electronics project, it’s time to have some fun and start designing. Laser cutters work on vector artwork, a mathematical point and line system that allows text and graphics to easily be scaled without losing resolution or clarity. Thus, files must be prepared using vector-based design software.
You can build laser cutting files in two main ways. The first is to manually measure and “draw” flat shapes or lines in a 2D modeling program, such as Adobe Illustrator or Inkscape, and export an SVG file.
The second is to export your PCB design file in DXF format from your engineering software, then import it into CAD software (AutoCAD, Fusion360, Rhinoceros 3D, TinkerCAD, etc.) where you’d build a 3D model of your full enclosure. From there, export a DXF file that contains only the cutting lines needed for your flat laser cut parts.
Either way you go, make sure to incorporate these five design considerations into your parts.
Use
How your device will be used will determine how the enclosure is constructed. Will it sit on a shelf or will it need to withstand transport? Think about use to determine how secure the enclosure must be to protect components from the elements and movement.
Dimensions
From there, determine the dimensions required. While faceplates are pretty straightforward, boxes can be a bit more complex. The interior size must be able to contain all components, plus you want to have at least an extra 1/16” clearance space. Additionally, if you have outward facing components (LEDs, buttons, switches, potentiometer, 7 Segment Displays or even small LCD screens), leave enough room to make those crucial electrical connections.
Mounting
While it’s possible to secure a PCB in an enclosure with hot glue or a dab of epoxy, using adhesive material is not a permanent solution. A better strategy is to use screws, standoffs, threaded inserts, locking nuts, o-rings or other special washers to keep components in place, insulate exposed connections, and protect your board from external vibration or movement. Knowing how components will be mounted will help you include the appropriate cuts in your design from the very start.
Accessibility
Once your electronic device is housed in an enclosure, what kind of access to components is required? It’s reasonable to be able to plug into a power supply, recharge a battery or allow access to a replaceable battery. Consider where these (and other) components are placed on the board to allow for easy access from outside the enclosure.
Finish
The professional finish of laser cutting can’t be beat. Unlike the textured look of 3D printing, laser cutting is silky smooth, features clean cut lines and offers engraving options to enhance the users interaction with your device. It’s good for both prototypes and final products.
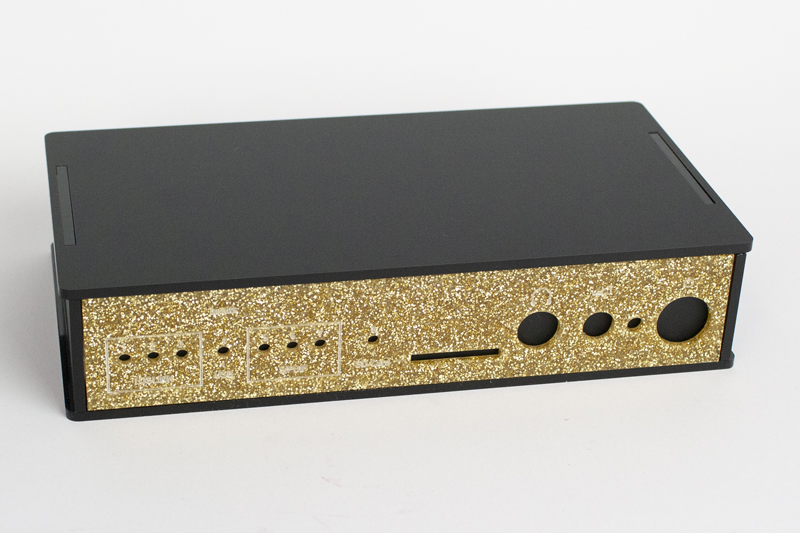
Acrylic is a great choice, as there are tons of colors and finishes to offer personality and refinement for your build. For those who want a metal look, there are brushed silver (shown) and brushed gold acrylics that simulate metal but at a much nicer price point—plus you don’t have to worry about any pesky conductivity that might mess with circuits.
In addition to the two-color acrylics above, there’s a rainbow of solid color acrylics, translucent acrylics and clear acrylic. There’s even glitter acrylic for those who want to add touch of whimsy and a bit of bling.
Step 4: Laser Cutting Parts
Once the design files are prepared, it’s time to start cutting! If you don’t have access to a laser cutter at a local makerspace or university, let us introduce you to our friends at Ponoko, an online cloud-to-robot laser cutting service that can make the custom parts you need—from the simple to the sublime.
PCBWay and Ponoko are similar in that we both use an automated, online process to help engineers and pro makers order their hardware parts. Once you build the smart parts of your device with PCBWay, you can laser cut the finished shell or skin at Ponoko to complete the build. Together, PCBWay and Ponoko enable you to take a device all the way from concept to professional finished product, to thrive in the real world.
Getting Started At Ponoko (With 25% Off For PCBWay Peeps)
To help you create faceplates, panels or enclosures that look just as amazing on the outside as the components are on the inside, PCBWay is teaming up with Ponoko to help you bring your vision to life.
Laser cutting with Ponoko is easy. Simply head over to Ponoko, choose a material, upload your design file, get an instant quote and order online. Easy.
Click this special Ponoko link to get 25% off your first order. Consider it a welcome gift for PCBWay people to use Ponoko for the first time.
Got questions about laser cutting? Contact the Ponoko team at hello-at-ponoko.com for answers.
And stay tuned for our next article about laser cut metal faceplates and enclosures.