Summary: In this post, I will explain how to export your PCB as a single .step object. In this way, you can import the (PCB).step on Fusion 360 for your 3D projects.

In this article, I'll explain how to do it. I assume you have already downloaded KiCad (free program) and Fusion 360 (paid license), otherwise, you can search on any search engine to download the two software.
There are several methods to import your PCB from KiCad to Fusion 360, in this post I show you the one I usually use. The goal is to obtain a 3D object to facilitate the design of an object that must contain the PCB that we have designed on KiCad.
Before you start make sure you, make sure you have assigned each component on the PCB its .step file (3D model).
Open KiCad and open the PCB Layout Editor of your project (Where did you design the PCB). Then click on File at the top right.
Then select "Export" and in the drop-down menu that opens click on "STEP...".

Now using the Browse button you can select the folder where to save the .step file of your PCB, keeping all the settings you see in the screenshot below. And now you can click on the Export button to export the .step file.

After exporting the file you can save your project and close KiCad for now.
Now you can open fusion 360, click on the file at the top right (as shown in the screenshot below) and then click on open. Then also use the key combination "CTRL + O".

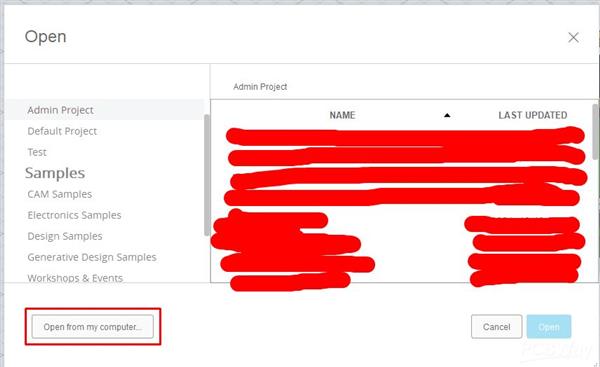
Now you will have a window open to search for the .step file generated earlier on KiCad. Click on the button at the bottom left "Open from my computer". Once you have opened the last window of your operating system you can import the .step file generated on KiCad.
Once you have exported the .step file you will immediately notice the PCB that you previously designed on KiCad. And also in the top right, you will have opened a new project with the name of the .step file. I advise you to save the file by simultaneously pressing the following key combination "CTRL + S".

How do I import the 3D PCB model to an existing Fusion 360 project?
First make sure you have saved the 3D model of the PCB, to verify this just click on "My Recent Data" (as shown below in the screenshot). This will update the library of your 3D models saved on the Fusion 360 cloud.
If the 3D model has been saved successfully you will find it on the right under "My Recent Data".

Now open the 3D project where you want to import the PCB. Now you just need to right-click on the name of your project as shown in the screenshot below.
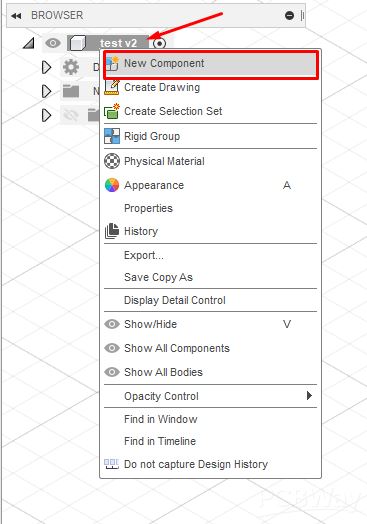
Now click on "New component", in this way you can make a new component also choosing the name if you want, and other settings that for now, we will leave the recommended ones. (In the screenshots below I show you the component settings).

Once the new component is created, press "CTRL + S" to save the project. Now you can import the PCB.
To import the 3D model of the PCB, just drag it from the "My Recent Data" side section onto the new component created previously. Now you can move and edit it and adapt it for your 3D projects.


I hope this post has been useful for you to develop your projects. If you have any questions, don't hesitate to ask.


