


|
Visual Studio Code |
ESP32 RC Wireless Trailer Controller for ESP32 RC Sound & Light Controller
Use it in combination with this sound and light controller:
This ESC is compatible as well:
Very important:
- Please read the comments on the schematic carefully! You can find it here
- The input supply range is 5 - 6V (5 is recommended). If you are using a PAM8403 amplifier: 5V only!
- There is no reverse polarity protection! Check wiring carefully before connecting the battery!
See it in operation:
Discussion forum in German and English:
Main features:
- Connects wirelessly to the sound and light controller in the truck via ESP-NOW (up to 3 trailers)
- Browser based configuration (192.168.4.1), Standard SSID & PW: "My_Trailer", "123456789"
- taillights
- reversing lights
- side lights
- indicators
- motorized legs
- motorized ramps
- rotating beacon
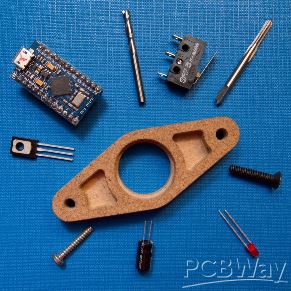
Parts list:
- C1: 1 x 6.3V, 47uF 1206 ceramic capacitor
- C2: 1 x 25V, 22uF 1206 ceramic capacitor
- R1 - R3: 10k, 1/4W
- R4: 1k, 1/4W
- U1: D1 Mini ESP32 Module (read notes on schematic)
- IC1: ULN2003AN (DIL16 thru hole version)
- 0.1" straight 1 row male pin headers
- 0.1" angle 2 row male pin headers
- 0.1" angle 3 row male pin headers
- STL data for top housing
- STL data for 1.6mm bottom housing
- STL data for 1.0mm bottom housing
Assembling:
- solder capacitors, if you want to use them
- solder ULN2003
- solder straight headers, using the D1 Mini as a jig
- solder angle headers
- solder resistors, if you want to use them
- carefully check for solder bridges
- clean the solder joints, using some flux remover
- solder battery monitor wire
- print housing in PETG and snap it in position
- Assemble battery monitor DuPont header
- Press both halves together
- load the software, using VS Code (recommended), the ESP32 Web Flasher or Arduino IDE
- Wire up your vehicle and have fun!
If you want to change the D1 Mini on board 3.3V regulator according to the schematic:
- apply flux
- apply solder to the soldering iron
- heat the regulator on the side with 3 legs until it comes loose
- wipe it away, using the soldering iron tip
- apply flux and then fresh solder to the pads
- place the new regulator, using tweezers
- reflow the solder, using the soldering iron on all pins
- check for solder bridges
- clean the solder joints, using some flux remover
Example wiring, if used as sound and light controller:

As you can see, this trailer controller can also be used as a sound and light controller, if you are using an external amplifier for the sound! How cool is this?
Configuration website example:

Another application example (with 2nd sound controller board in the trailer):
ESP32 RC Wireless Trailer Controller for ESP32 RC Sound & Light Controller
Project images are for reference only. Actual production is based on the manufacturing files on the project page.
Please review the designer's notes (e.g., PCB thickness) and select the appropriate options.
PCBWay is not responsible
for issues caused by unsuitable parameter selections.
For more important ordering information, please refer to
Read More


Raspberry Pi 5 7 Inch Touch Screen IPS 1024x600 HD LCD HDMI-compatible Display for RPI 4B 3B+ OPI 5 AIDA64 PC Secondary Screen(Without Speaker)
BUY NOW

- Comments(1)
- Likes(9)
- 1 USER VOTES
- YOUR VOTE 0.00 0.00

-
9design
-
10usability
-
10creativity
-
10content
More by TheDIYGuy999
-
 ESP32 RC Wireless Trailer Controller for ESP32 RC Sound & Light Controller
Use it in combination with this sound and light controller:https://www.pcbway.com/project/shareproje...
ESP32 RC Wireless Trailer Controller for ESP32 RC Sound & Light Controller
Use it in combination with this sound and light controller:https://www.pcbway.com/project/shareproje...
-
 RZ7886 based ESC for ESP32 Sound and Light Controller
Note: this 7A ESC only works together with the following sound & light controller:https://www.pc...
RZ7886 based ESC for ESP32 Sound and Light Controller
Note: this 7A ESC only works together with the following sound & light controller:https://www.pc...
-
 Arduino RC engine sound & light controller with inertia simulation for ESP32
Pre compiled software binaries (very easy):https://thediyguy999.github.io/TheDIYGuy999_ESP32_Web_Fla...
Arduino RC engine sound & light controller with inertia simulation for ESP32
Pre compiled software binaries (very easy):https://thediyguy999.github.io/TheDIYGuy999_ESP32_Web_Fla...
-
Programmable Mist Maker - XIAO / QT PY Extension
1100 2 1 -
RadioHAT - Raspberry Pi radio development platform
916 0 2 -
-
-
-
-
ARPS-2 – Arduino-Compatible Robot Project Shield for Arduino UNO
3345 0 6 -
A Compact Charging Breakout Board For Waveshare ESP32-C3
3961 3 8 -
AI-driven LoRa & LLM-enabled Kiosk & Food Delivery System
4348 2 2


